My thoughts on backpacking, hiking and camping during hunting season.
For this video I’ll discuss my experiences, thoughts and opinions on fall backpacking during hunting season. Fall is one of my favorite times to hike and camp, and it also just happens to be hunting season in many parts of the country. I just so happen to both hunt and backpack, so I figured I’d take to opportunity to share my thoughts on, from the perspectives of both a hunter and a minimalist backpacker.
Many of my thoughts on the topic are general in nature, but as I touch on in the video, I’m sure that experiences can vary a bit from region to region, so please feel free to share your own stories and thoughts on backpacking during hunting season in the comments section.
Join Mike & I on Colorado’s Four Pass Loop for 3 days of hiking, backpacking & hammock camping.
For this multi-part adventure, we’ll be faced with two challenges.
Phase 1 (seen in the prior Pt 1 video): Driving on a substantial time crunch from the east coast to Colorado, without any hotels or road food purchases. This will not only keep the budget low, but will also save us a ton of time by not having to check-in/out, be tempted to sleep in, decide where/what to eat, stand in lines etc. Sleeping will be done in the car (while the other person drives) and all meals will be comprised of cooler-stored left-overs and pre-purchased beverages. The only stops allowed: bathroom breaks and gas pumps.
Phase 2 (covered in this video, Pt 2) will be a multi-day hike of the Four Pass Loop, within the Maroon Bells Snowmass Wilderness, located just outside of Aspen Colorado (about 3 hours west of Denver). We chose to do the loop in a counter-clockwise direction.
A discussion on clothing choices for backpacking, hiking & camping trips.
In this video, I’ll go over each backpacking clothing item that I’ll be wearing for an upcoming backpacking trip, as well as spare and alternate clothing options that I’ll be packing for the hike.
These are pretty much the same clothes take I would take on just about any 3-season hiking trip.
Join Sara & I for 3 days of desert hiking, backpacking & camping in the Superstition Mountains. And who knows – maybe Sara will find the Lost Dutchman’s Gold Mine…
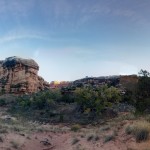
For this desert backpacking trip, we’ll be hiking a loop in the Superstition Wilderness, within the greater Tonto National Forest – about 60 miles east of Phoenix, Arizona. Not only was this a beautiful and scenic hike due to the stark desert surroundings and sharp, rugged peaks, but this particular region has added bonus – a rich history full of intrigue and lore right at home in your favorite spaghetti western flick. Some of these tales are indisputable facts. Others, are more debatable – the stuff of legends and mystery. The most notable and famous of those stories being that of Jacob Waltz, or as it’s commonly referred to, the mystery of the Lost Dutchman’s Gold.
As touched on in the video, the story of the Dutchman and the lost gold mine is much to deep to give justice to in the passing of a hiking video, so for those interested, I highly recommend taking the time to check out the various iterations of the story, theories, etc. For the sake of this post though, the basic idea goes like this – Jacob Waltz stumbled upon some gold in the Superstition Mountains. Whether it was an actual mine, or a hidden cache that was originally mined elsewhere, depends on which version of several accounts you choose to believe. In fact, even the fact that he came upon it accidentally is up for debate as well. Some iterations of the tale suggest that he was given the details of the hidden mine after saving the life of a man who belonged to a wealthy Mexican mining family. The name of that family, by the way, was Peralta – you know, like the trailhead we parked at. But anyway, I’m getting ahead of myself and going down the rabbit hole. Hmm, maybe the gold was hidden in a burrow of sorts, and not an actual gold mine. No wait, I’ve got to stop this.
Okay, let me try this again. Somehow, Jacob knew where a bunch of gold was in these mountains, and he kept it a complete secret, despite rumors throughout the years that he knew about it’s location. People would try to follow him when he went into the mountains, but he always lost them, or at the least, waved a gun at them until they left. Finally, on his death bed in 1891, he confirmed the gold mine and gave some info on it’s whereabouts to two individuals. Apparently, it wasn’t quite enough info, because they never found it after years of searching. Word spread, many more people started searching, and they continue to search until this day. People have gone missing while searching, some have even had their skull found right on one of the trails we hiked on our loop, complete with two bullet holes and their body found separately 3/4 of a mile away (his name was Adolf Ruth, and he went into the Superstitions in search of the gold back in 1931) .
So what does all this have to do with our backpacking trip? Did we find some gold or something? Am I devoting my life to finding the Lost Dutchman’s Mine? Well no, but it makes hiking around out there pretty cool and Old Westy, if you ask me. At the very least, it gives you something to ponder as you hike along the cactus covered traverses, baked incessantly by a sun they just may have glinted off of Jacob Waltz’s prize back in the 1800’s.
But anyway, back to the hike we did. Here’s the details…
Route Overview – Hiking the Superstition Mountains – Sintax77
Season / Time of Year
Winter – January 20th to January 23, 2016.
Elevation Range
Minimum – 2,283′
Maximum – 3,550′
Full GPS track data and waypoints are available on the Trip Data page.
Trails Used Day 1 (in order of use) Peralta Trailhead Parking Lot, Dutchman Trail Set up camp in a relatively flat area along the trail, about .75 miles after crossing an intermittent stream. This particular stream actually had a decent flow at the time, but depending on recent conditions and time of year, it may not always be that way.
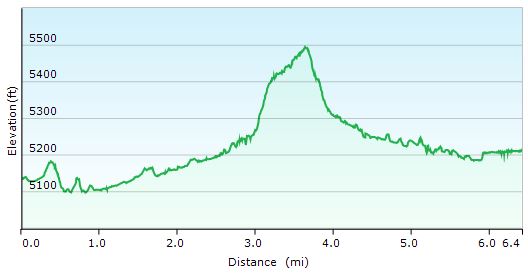
Day 1 Total Mileage: 2 miles Day 1 Total Elevation Gain: 344′
Day 1 Elevation Profile – Superstition Mountains Hike
Trails Used Day 2 (in order of use)
Continue on Dutchman Trail
Pass the intersection with Coffee Flat Trail to stay on Dutchman Trail, after which you’ll begin to rack up the bulk of your elevation gain for the day.
Leave the Dutchman Trail and head east on the Whiskey Springs Trail. Just before the upcoming trail intersection, the trail crosses LeBarge Creek (where we stocked up on water for the rest of the day)
At the intersection, turn left to head west on the Red Tanks Trail.
Red Tanks Trail ends at the intersection with Dutchman Trail.
Turn right to head north on Dutchman Trail.
Set up camp along Dutchman Trail.
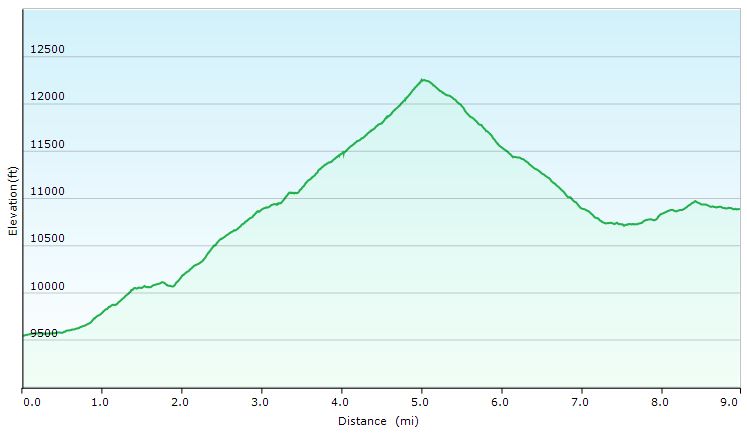
Day 2 Total Mileage:10 miles Day 2 Total Elevation Gain:1,325′
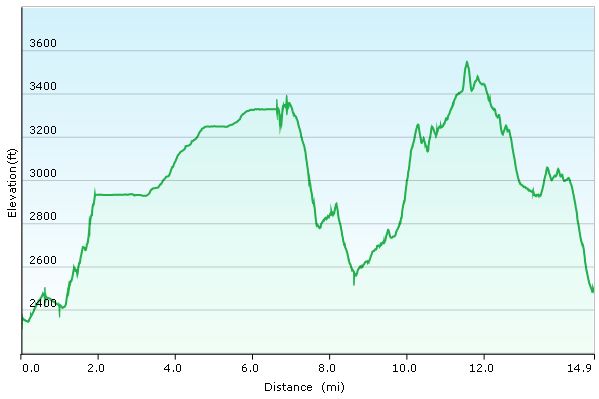
Day 2 Elevation Profile – Superstition Mountains – Sintax77
Trails Used Day 3 (in order of use)
Continue on Dutchman Trail
At the intersection, continue straight (west) on Bull Pass Trail
Turn left to head south on Black Top Mesa Trail, towards the top of Black Top Mesa
Explore the mesa and hunt for the Spanish Hieroglyphs or maybe some of the Lost Dutchman’s Gold, etc.
Retrace your steps back down Black Top Mesa Trail.
At the bottom, turn right to head east on the unofficial Bull Pass Alternate Trail (not the same as the previous Bull Pass Trail).
At the intersection, turn right to head south on our recurring friend, Dutchman Trail.
At the intersection, depart the Dutchman Trail and take Terrapin Trail.
At the intersection, turn right to head south on Bluff Springs Trail.
Return to the Peralta Trailhead parking lot.
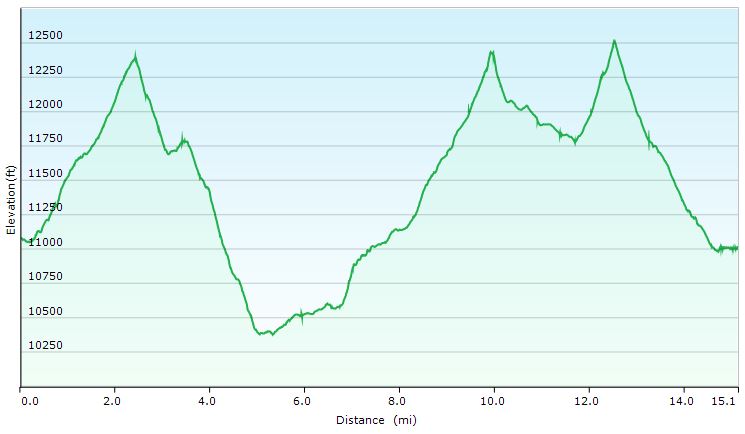
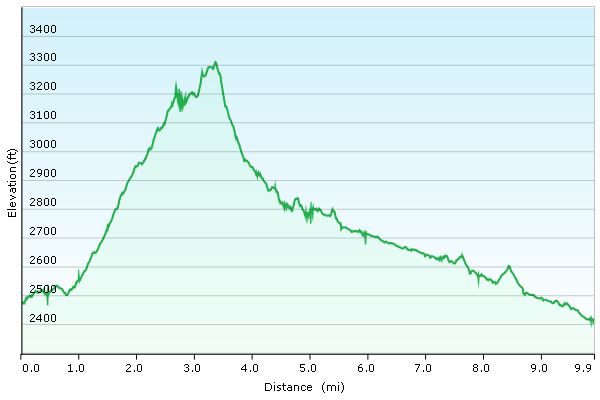
Day 3 Total Mileage: 15 miles (plus a couple miles of meandering about on Blacktop Mesa) Day 3 Total Elevation Gain:2,933 feet
Day 1 Elevation Profile – Superstition Mountains – Sintax77
Trip Grand Total Mileage: 27 Miles Trip Grand Total Elevation Gain: 4,662′
Highly recommended book for hikes in this area:
‘Hiker’s Guide to the Superstition Wilderness‘ by Jack Carlson and Elizabeth Stewart
This book appears to be out of print, but I managed to get a used copy and love it. It has detailed descriptions of all the trails, with some cool related history mixed in. It also contains plenty of solid maps and a bunch of suggested hikes.
Join Mike and I for for a “Train to Trail” Winter Camping, Backpacking, Campfire cooking, & Hiking adventure in Harpers Ferry, WV.
We tried something a bit different for fun on this winter camping trip – instead of driving, we decided to take an Amtrak train directly to the trailhead. This is actually and idea that Mike and I had been kicking around for a while now. The first challenge was finding an interesting trail that was actually close to a train station, without a need for secondary transportation or an excessive walk. After a bit of research, we determined that Harpers Ferry, West Virginia fit the criteria quite well. The train practically dumps you right on the Appalachian Trail. We booked our tickets, packed our bags, and hit the trail, er, I mean, train station.
With 4 days and 3 nights off, we had a decent amount of time to play with on this trip. The challenge however, would be that we needed to plan an out and back trip that didn’t put us to far away from the train station on our final morning, rather than doing a loop like we normally prefer. Fortunately, we quickly realized that to be a perfect excuse to do a a laid back, more camping, less hiking kind of trip.
The plan? After leaving the train behind,we would hop on the Appalachian trail for a few miles – just long enough to feel the seclusion of the deep winter woods, and set up a base camp for the duration of the trip. Other than that, we really had no hard set plans, other than relaxing, having a good time, and brushing up on our campfire cooking skills. Did we succeed? I guess you’ll just have to watch and see…
Trails Used
Leave Harpers Ferry via Appalachian Trail South After around 3 miles, bushwack West to unofficial campsite.
Return via Appalachian Trail North
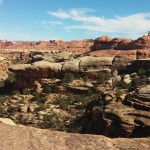
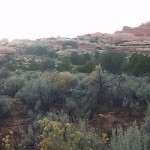
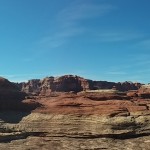
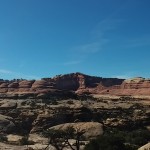
Join Sara and I in Utah for a little high desert camping, hiking, and backpacking in Canyonlands National Park.
For this adventure, we did a 2 day, 1 night backpacking trip through the Needles District of Utah’s Canyonlands National Park, followed by a little day hike visit to Arches National Park on the way back to Salt Lake City to catch our flight back home. In fact, this was actually the first trip we’ve ever done via flight instead our usual road warrior routine. That being said, we still got at least a moderate dose of driving during this trip, as the drive from SLC airport to Moab and Arches NP is about 4 hours. From there it was another 1.5 hour drive south to the Needles District, the southernmost district in Canyonlands.
Full GPS track data and waypoints for this trip can be found on the Trip Data page.
Here’s an overview of the route, highlighted in pink, that we took clockwise. As you can see, there are several other trails accessible from Squaw Flat parking lot, creating the potential for larger loop options.
Squaw Canyon Trail
Lost Canyon Trail
Camp at Lost Canyon Campsite 2 (LC2)
Total Mileage: 6 miles
Gross Elevation Gain: 768′
Gross Elevation Loss: 682′
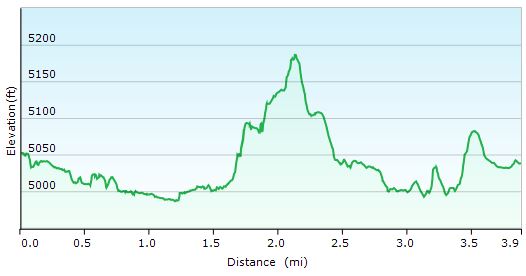
Day 1 Elevation Profile – Lost Canyon Loop
It should be pointed out that campsites in the Needles district are restricted to designated areas only, and must be registered in advance. This can can be done either online or in person at the visitor’s center and costs $30. Since I live about 2,000 miles away, and spots tend fill up well in advance, I went the online route. I reserved my spot about a month in advance and still managed to get the spot I was after, but I could see other areas that were already booked up pretty solid. When stopped in the visitor’s center on the day of our hike in, we caught a glimpse of the availability board and I was hard pressed to see any open spots, so reserving on the same day in person probably isn’t the best game plan. The nice thing is, the spots seem to be nicely spread out. For instance, there were three campsites in the entire Lost Canyon area that we chose to visit, with about a mile of trail in between them. So, while we did have to be a bit more rigid in our planning than usual, and the $30 fee was definitely the highest I’ve ever paid for backcountry permit, we really did feel like we had a whole canyon to ourselves to call home for the afternoon and night. The site was also tucked back a decent way off the main trail and situated with an amazing view. I’m sure all the spots are awesome, but I would highly recommend LC2 to anyone on the fence about where to camp in Canyonlands. It was a great spot.
Speaking of things that make a campsite great, Lost canyon was one of the few areas in Canyonlands NP I could find in my research that had a high probability of reliable water. We crossed over several water sources within less that a mile of the campsite, due to the fact that the sites are located in the bottom of a relatively lush canyon within close proximity to the brook that runs though it. It’s quite a stark contrast to the treeless universe or rock, sand and sun lying only a few hundred feet above. It also didn’t hurt that the area experience some decent rains and flash flooding several days before. I tagged a couple of these spots in a GPS file for this trip using my trusty Garmin Oregon 650, but keep in mind that water flow conditions could be much different depending on time of year and amount of recent rainfall. If you’re planning your own adventure, I would definitely suggest more recent reports and / or just bringing enough water for the duration of your stay.
Day 2 Trails Used (In Order)
Lost CanyonTrail
Peekaboo Trail
Squaw Canyon Trail
Return to Squaw Flat Trailhead A and parking lot.
Total Mileage: 3.8 miles
Gross Elevation Gain: 427′
Gross Elevation Loss: 440′
Day 2 Elevation Profile – Lost Canyon Loop
I’ll save the full story for the video, but this was truly an amazing trip! I’ll tell you what though, southern Utah may bitten me and infected me with the desert bug. Hmmmm, where to next…
Stat Totals for the Full 2 Day Loop
Total Mileage: 9.8 miles
Gross Elevation Gain: 1,195′
Post Hike Burger Joint of Choice Moab Brewery
686 S Main St, Moab, UT 84532
Annnnnd, for good measure, here’s a gallery of some of Sara’s “VR Panorama” and and regular panorama shots that she had fun playing with using her phone’s camera app.


 (zip-off shorts)
 (quarter length)
 shoes
shoes shoes
shoes


 (synthetic or merino wool)


 . For the sake of this post though, the basic idea goes like this – Jacob Waltz stumbled upon some gold in the Superstition Mountains. Whether it was an actual mine, or a hidden cache that was originally mined elsewhere, depends on which version of several accounts you choose to believe. In fact, even the fact that he came upon it accidentally is up for debate as well. Some iterations of the tale suggest that he was given the details of the hidden mine after saving the life of a man who belonged to a wealthy Mexican mining family. The name of that family, by the way, was Peralta – you know, like the trailhead we parked at. But anyway, I’m getting ahead of myself and going down the rabbit hole. Hmm, maybe the gold was hidden in a burrow of sorts, and not an actual gold mine. No wait, I’ve got to stop this.
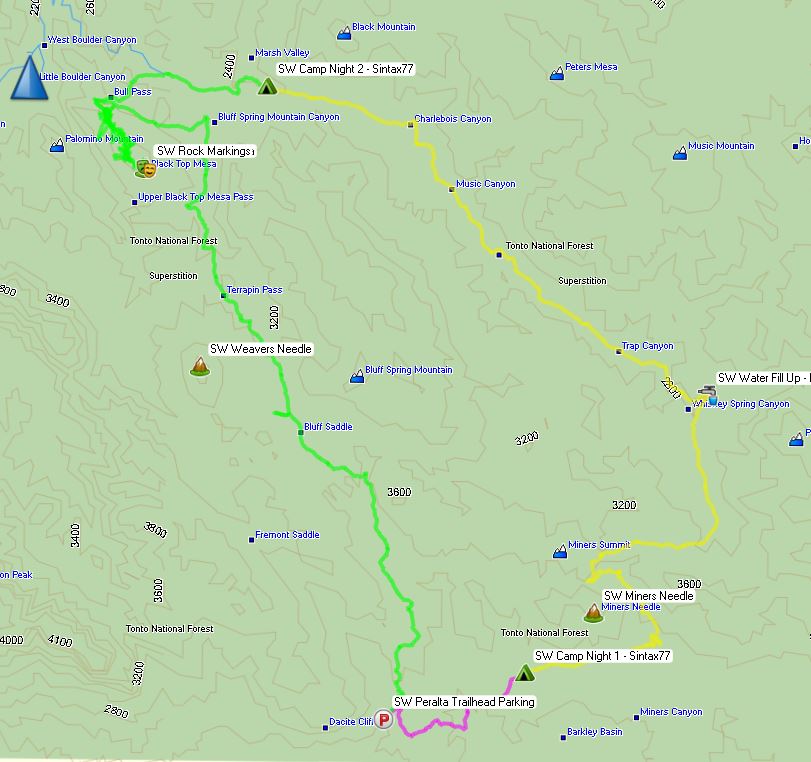


 (long version)
 for water storage.
 for eating our chili and queso appetizer
 on top of a


 water filter configured in a gravity setup
 ‘ by Jack Carlson and Elizabeth Stewart
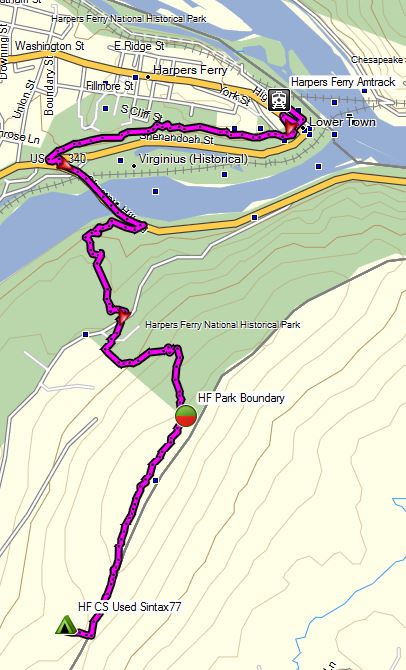
 backpack
 stove
stove with fancy lightshow
 .
.

 / Plate
 tanto blade pocket knife
 , but keep in mind that water flow conditions could be much different depending on time of year and amount of recent rainfall. If you’re planning your own adventure, I would definitely suggest more recent reports and / or just bringing enough water for the duration of your stay.