Join me for 3 days of Solo Backpacking, Hiking, Hammock Camping, & Wild Ponies on the Appalachian Trail in Virginia’s Grayson Highlands.
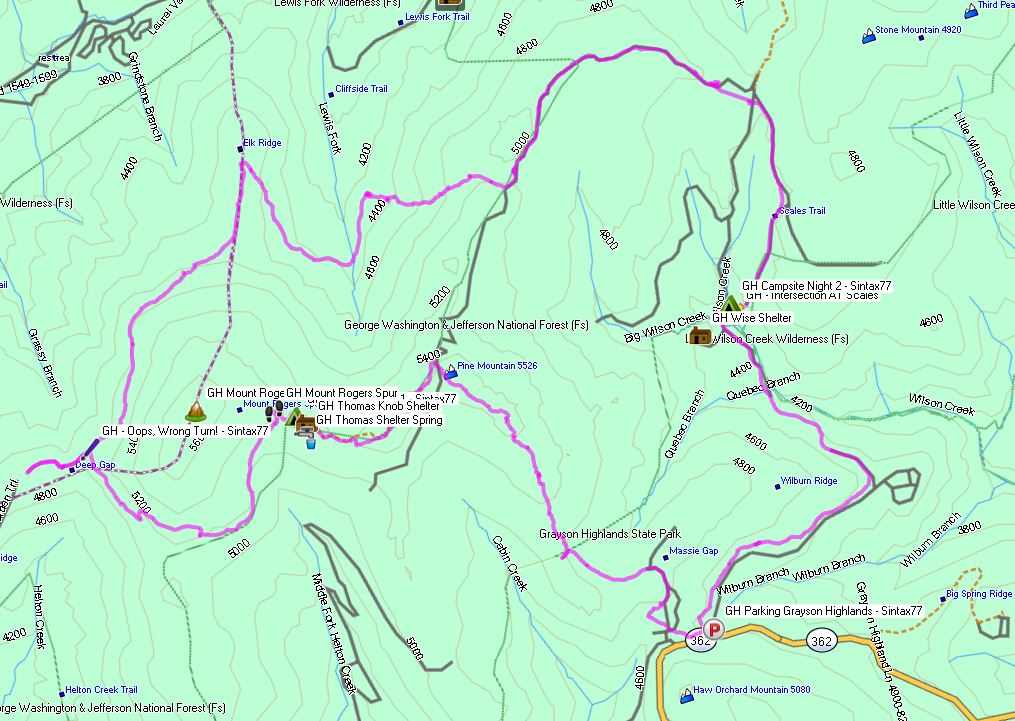
For this backpacking trip, I’ll be hiking and camping solo in a section of the Mt Rogers National Recreation Area, within the larger George Washington and Jefferson National Forest. I’ll be using a portion of the Appalachian Trail to create a 3 day, 2 night backpacking loop of around 20 miles or so. The Grayson Highlands are known for their high winds and unpredictable, rapidly changing weather, so being that I’m doing the trip in March, I’ll be packing amount of warm weather and rain resistant gear. If you’re interested in a detailed account of everything that I packed, check out my previous Winter Ultralight Backpacking Gear List blog post and video. That will give you a look at exactly what I packed for the trip.
Below is a daily rundown of the trails and campsites used for each day. Full GPS track data can be found on the Trip Data page.
Parking Location
Grayson Highlands State Park, Overnight Backpacker’s Parking Area at the Massie Gap Parking Lot. N36° 38.012′ W81° 30.322′
Trails Used, Day 1
Depart Massie Gap Parking Lot
Rhododendron Trail
Appalachian Trail South
Wilburn Ridge Trail (it’s also possible to stay on the AT)
Rejoin the Appalachian Trail South
Setup camp about 200 yards past the Thomas Knob Shelter.
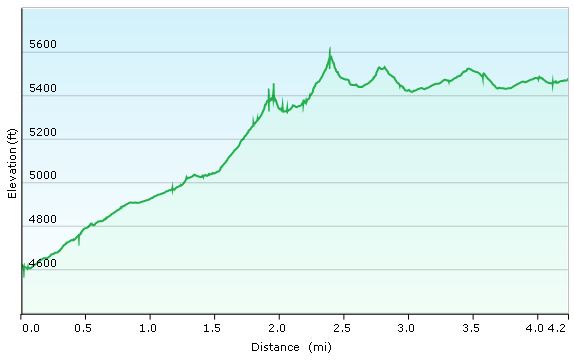
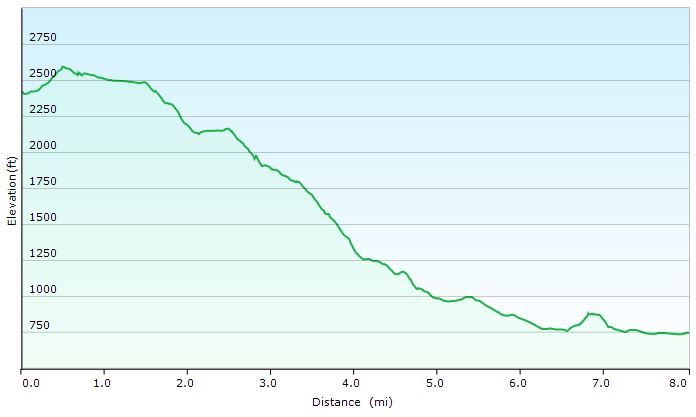
Day 1 Mileage: 4.25 miles Day 1 Elevation Gain: 2,096′
A spring is about a 100 yards down the trail behind the shelter.
Camping options for tents and hammocks are available a few hundred yards past the shelter, heading south. Tenting spots are on the ridge to the left, hammock camping opportunities are in the trees to the right.
There are also some nice campsite opportunities about a 1/4 mile or so before the shelter as well (AT north from the shelter)
Grayson Highlands Day 1 Elevation Profile – Sintax77
Trails Used, Day 2
Continue on the Appalachian Trail South
Mt Rogers Trail Towards Grindstone Campground (not to be confused with the Mt
Rogers Spur Trail which hits the summit of Mt Rogers. That trail is available shortly after leaving the campsite. I’ve heard it doesn’t have any views, but it holds the distinction as Virginia’s highest peak).
Lewis Fork Spur Trail (turn here a couple of miles before hitting the campground).
Cliffside Trail
Crest Trail
Scales Trail
Setup Camp near the intersection of Scales Trail with the Appalachian Trail
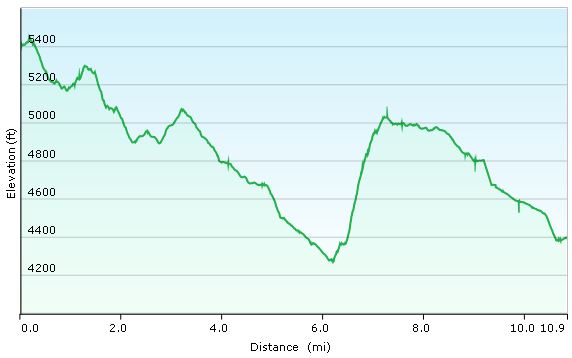
Day 2 Mileage: 11 miles Day 2 Elevation Gain: 1,320′
There are a number of hammock and tent camping opportunities on the edge of the field opposite from the AT intersection.
There is plenty water in several directions from the intersection. The particular campsite I used (tagged in my GPS data) has water right next to it within 20 yards or so.
Grayson Highlands Day 2 Elevation Profile – Sintax77
Trails Used, Day 3
Continue on the Scales Trail South (note: it is possible to continue on the AT
South and eventually make your way back to the Massie Gap parking lot as well. I chose the scales route because it is considerably quicker and I had to do a long drive home upon reaching the lot.)
Seed Orchard Trail (this wasn’t on my Nat Geo Map, but after coming out of the woods, you’ll see a sign directing you towards the AT by turning right. Instead, look left. You’ll see a water crossing with a brown Grayson Highlands State Park sign listing various rules and regs. The path along the fence over there is the Seed Orchard Trail)
Follow signs towards Hickory Ridge Campground.
Past the campground, there will be a large metal gate for a Horse Trail
Follow the Horse Trail (there doesn’t seem to be a fancier name for it)
Appalachian Spur Trail towards the Backpacker’ s Parking Lot
Return the Massie Gap Parking Lot
Day 3 Mileage: 3.5 miles Day 3 Elevation Gain: 499′
Grayson Highlands Day 1 Elevation Profile – Sintax77
Trip Grand Total Mileage: 18.75 miles Trip Grand Total Elevation Gain: 3,915′
Join Sara & for some backpacking, hiking and hammock camping along the Appalachian Trail in Virginia’s James River Face Wilderness Area.
For this fall backpacking trip we’ll be dipping into the world of the Appalachian Trail while testing out some new hammock camping gear – most notably, the Amok Draumr 3.0 Hammock system. The Draumr is a rather unique flat hammock that I touched on in a previous blog post and video, ‘Amok Draumr 3.0 – A Super Flat Hammock? – First Look‘. As discussed in that video, the Draumr works in conjunction with an inflatable sleeping pad to create what is essentially a floating bed. It can also be used in a chair configuration for lounging at camp. In addition to testing out the Draumr, I’ll be trying out some whoopie slings rigged up with some Dutch Whoopie Hooks. The hooks allowed for a really quick and simple way to attach and detach the whoopie slings to my trusty Darien Dream Hammock.
With our shelter and sleeping methods squared away, we were ready for some exploration of the east coast’s most fabled long distance hiking path – the Appalachian Trail, the “AT” as it’s affectionately called by those of us who prefer a nice acronym now and the. While I’ve incorporated pieces of the AT into many of my trips before, this particular hike seemed to really capture the spirit and flavor of the Appalachian Trail.
James River Face Wilderness – Route Overview – Sintax77
Along the way, we bumped into and chatted with some friendly southbound Thru-hikers (or “SoBo’s” as they’re commonly called), checked out a classic example of an Appalachian Trail Shelter (Matt’s Creek Shelter), got some great laughs and stories out of the shelter’s trail journal, and got a healthy dose of rolling ridge line views. While it was obviously no comparison to the experience of actually being out on the AT for five to seven months over the course of it’s roughly 2,200 miles, it was a great little 2 day crash course of what life might be like for the some of the 12,000 or so alumni who have hiked the Appalachian Trail since it’s inception back in 1937.
Who knows, maybe some day Sara and I will be among those dedicated hikers as well, but for now, the occasional appetizer version is quite tasty too! Below is are some details on the section that we did. GPS track data, along with waypoints for our campsite and other points of interest are available for download on our Trip Data Page as well.
Trailhead and Parking: James River Footbridge N37° 35.819′ W79° 23.474′
The James River Face Wilderness Area is a protected area located within the Jefferson National Forest, about 1 hour north of Roanoke, Virginia.
Route Taken and Trails Used, Day One
Access the James River Foot Bridge by heading out of parking lot and passing under the railroad trestle. SinFact: This is the longest pedestrian ridge on the entire Appalachian Trail
Leaving the foot bridge, turn left to continue following the AT along the banks of the river for a while.
The trail will eventually turn away from the river and and head deeper into the woods,following along Matt’s Creek.
Arrive at Matt’s Creek Shelter for a snack break at the picnic bench, and an entertaining peek at the shelter log.
Leaving the shelter, head up the ridge to continue on the Appalachian Trail and get some views of James River, flowing below.
5 miles into the hike there will be a decent lunch spot (marked in my GPS data) with a nice, flat sunny area for lounging before ascending further up the the ridge. This spot was also the last flowing water source we encountered for the rest of the day. If you plan to camp up on the ridge in the same area that we did, make sure to stock up on enough water for the rest of the day, as well as tomorrow for breakfast and the hike out, to be safe.
Continue on the AT until arriving at the three way junction with Balcony Falls Trail and Sulphur Springs Trail. This is where we departed the AT and headed down the Sulphur Springs trail in search of a campsite for the night.
Note: Sulphur Springs trail does not appear to be officially maintained and may be quite grown in and harder to navigate in the summer.
Trip variation Option: If you continue on the Appalachian Trail for another half mile you will reach a junction with the Belfast Trail. About a half mile or less down the Belfast Trail is a possible campsite near the intersection with the Gunter Ridge Trail. It’s important to note that I haven’t personally been to this site, so I’m not sure how legit it may be. It’s location is approximated based on comments I’ve seen posted online, combined with topo map data and may not actually be a suitable site. We chose not to venture that way, but from looking at a photo I found online, it looks like a rather flat, alternate site for camping. Approximately a mile beyond Gunter Ridge campsite is the Devil’s Marble yard, a potential side trip that I hear has very nice views. Nearby is another possible site, marked in my GPS data as well.
Continue along the Sulphur Springs trail for a little less than a mile.
Camp at either of the site’s listed in my GPS Data. We chose the smaller spot labeled “JRF CS Night 1” for it’s better views off the ridge for sunset. On the other side of the trail there is also a larger potential camping area labeled “JRF Hickory Stand CS”. This spot lacks the views down the ridge, but is larger and offers potentially better wind protection, depending on conditions.
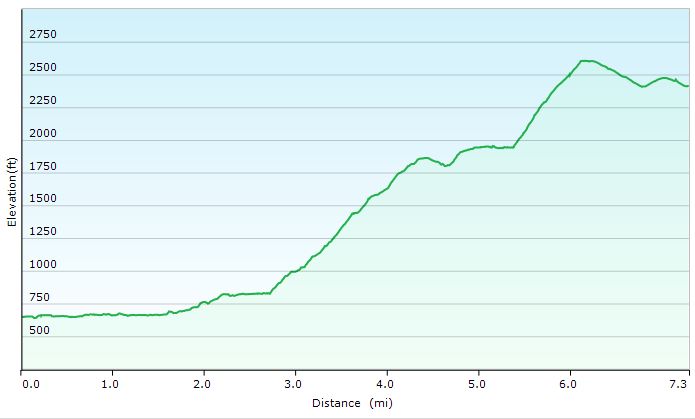
Day 1 Total Mileage: 6.8 Miles Day 1 Total Elevation Gain: 2,297′
Sintax77 – James River Face Wilderness Loop – Day 1 Elevation Profile
Route Taken and Trails Used, Day Two
After packing up camp, you have two options. While it’s possible to continue down the meandering Sulphur Springs Trail for a couple until it runs into the AT, we chose instead to immediately start our day back on our old friend, the AT. This was possible by doing a very small “bushwack” west from the campsite until you run into the adjacent campsite then head south on the AT by turning left. The campsite is literally right smack between the two trails, so the AT should be super easy to spot.
Continue along the AT until you hit the triple junction with Sulphur Springs, the AT and Piney Ridge Trail.
Head down the Piney Ridge Trail, towards Hunt Club Road, which will eventually bring you to Rt 501 Lee Jackson Highway.
Turn left (north) to do a road hike along Lee Jackson Hwy for a short bit, at which point you have two options:
After a mile or so, the Highwater Trailhead (the old AT) will appear on the left side of the road. The sign will actually be for Matt’s Creek, where we were the day before. You can take this trail all the way back to the shelter, then backtrack to the parking lot on the AT, the same way you came in on day one. From trailhead to car looks to be about 4 miles.
We chose to make a more expedient route back to the car, by continuing to walk along the road, over the auto bridge’s pedestrian sidewalk. This route gave us a pretty cool view of the man made waterfall, as well as an alternate view of the rail trestle and footbridge that we had traveled over the previous day.
Arrive back at the Jame River Foot Bridge Parking lot and prepare yourself for cheeseburger time.
Day 2 Total Mileage: 8 Miles Day 2 Total Elevation Gain: 486′
James River Face Wilderness – Day 2 Elevation Profile – Sintax77
Trip Mileage Grand Total: 14.8 Miles Trip Elevation Gain Grand Total: 2,783′


 Hammock –
  for use with Draumr Hammock (30D Double Silicone Coated Ripstop Nylon, Fully taped seams, Reflective guy lines)
 LED Flashlight
 Headlamp (
 (
(