3 Days of Backpacking, Hiking & Hammock Camping on the Appalachian Trail in Virginia.
For this late summer backpacking trip I’ll be hiking the Virginia Triple Crown, which consists of three iconic Virginia hiking destinations – McAfee Knob, Tinker Cliffs, and Dragon’s Tooth.
To create the loop, I essentially took an Appalachian Trail section hike and combined it with the North Mountain trail to close it off into a 35 mile backpacking loop. This gave me a healthy southern mix of mountain hiking, open pastures, and sweeping summit views.
I went with my most basic warm weather ultralight backpacking gear list for this trip, just to keep things simple and light. Due to the threat of rain, I also included a full set of rain gear. Surprisingly how I was still able to keep my base weight down to around 7.5 lbs. This was mostly achieved by simply leaving non critical items at home. Notable items are below or you can see my full gear list with weights & gear links on LighterPack here.
While on the AT in this area, you may only camp at one of the four designated shelters. Since I was exclusively on the AT for the entire first day, this gave me the following camping options:
Jonh’s Spring Shelter
Catawba Shelter (reliable water)
Campbell Shelter
Lambert’s Meadow Shelter (reliable water)
I chose to camp near Lambert’s Meadow Shelter, as it was the farthest one into the loop and offered reliable water.
Backpacking & Winter Camping with a Hot Tent on the Appalachian Trail using a Titanium Wood Stove & 5 person Luxe Twinpeak tent.
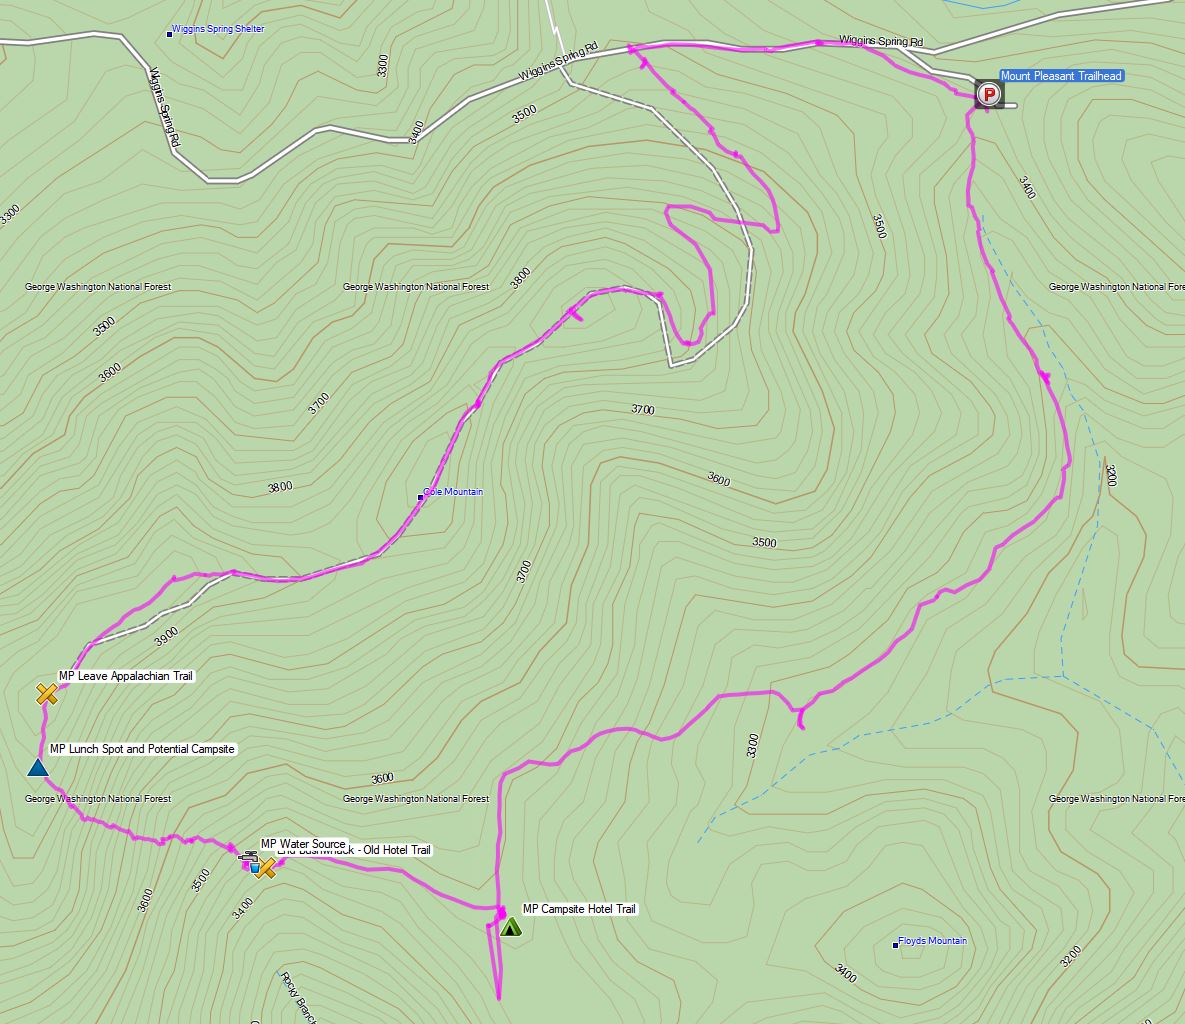
For this adventure, we got a guided tour of Virginia’s Mount Pleasant Scenic Area in the George Washington National Forest. The weather at our elevation of roughly 4,000′ was forecast to be in the mid to low 20’s with high winds, so we were excited to see how the tent & wood stove combo would work out.
Cole Mountain Loop Route Overview – Sintax77
No permit is required to camp in the George Washington National forest, but there are rules and regulations regarding backcountry camping. You can find more information on the George Washington & Jefferson National Forest website here.
3 Days of Hammock Camping, Hiking & Backpacking on the White Mountains Presicat Loop.
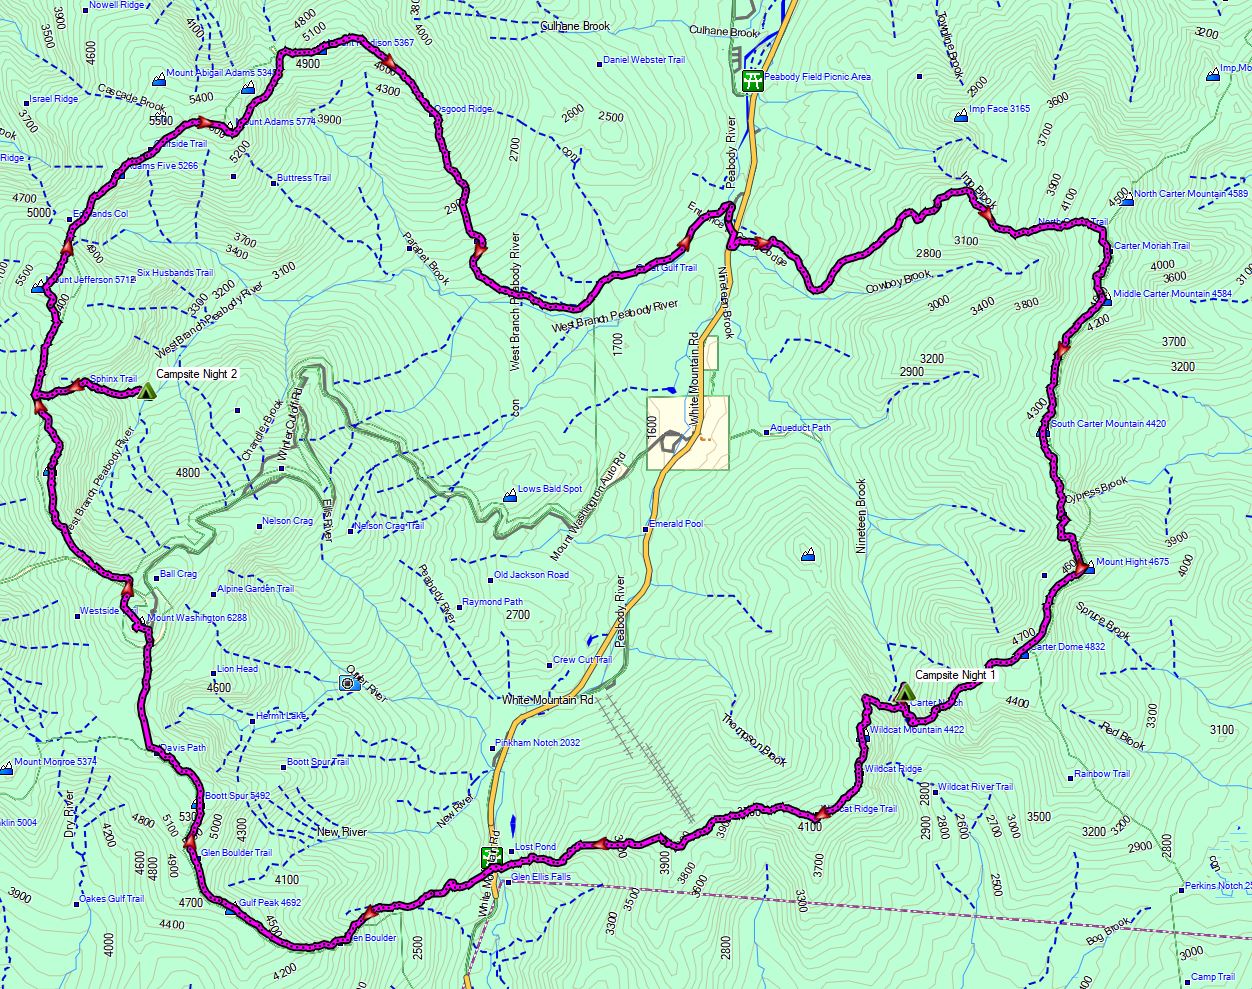
For this 3 day, 2 night summer backpacking trip, I’ll be hiking a 30 mile backpacking loop in New Hampshire’s White Mountain National Forest. I call this the Presicat loop because it’s comprised of the Carter Range and Wildcat Range on one side, and the northern section of the Presidential Range on the other.
This route creates a grand tour of the northern White Mountains with a section of the Appalachian Trail and Mt Washington as it’s centerpiece. Along the way we’ll hit 9 major summits (NH48’s) and 8 subsidiary peaks, while racking up 15,228 feet of elevation gain on some pretty rugged trails.
For sleep and shelter I chose a minimalist ultralight hammock camping system. This allowed me to get my base weight down to 9 lb. Notable gear can be found in the gear section below. Or check out my full printable list with weights and links on LighterPack.
Presicat Loop Route Overview 2019 – Sintax77
No permit is required to camp in the White Mountains, but the trailhead I chose did require a self payment of $3 per day. Rules and regulations regarding backcountry camping can be found on the USFS website here.
Join me for 3 days of Hiking, Hammock Camping & Backpacking along the Appalachian Trail in North Carolina’s Nantahala National Forest.
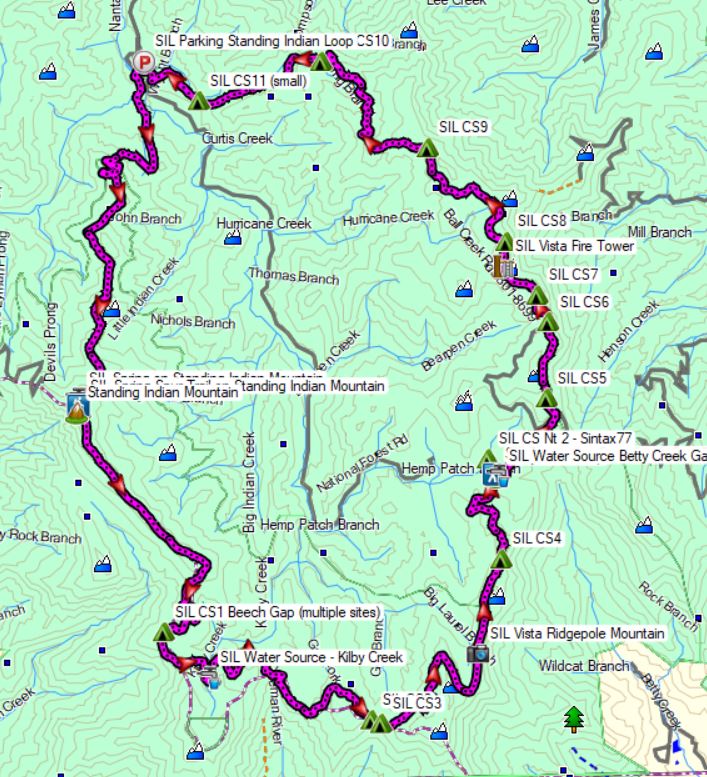
For this backpacking trip, I’ll be doing a 3 day, 2 night hammock camping trip on the Standing Indian Loop in North Carolina’s Nanatahala National Forest. The Standing Indian Loop is a 24 mile loop with a total elevation gain of 4,672′. The loop is made using a portion of the white blazed Appalachian Trail along with the blue blazed Lower Ridge Trail and Long Branch Trail. Campsites and water sources are plentiful on this loop, although many of the campsites are not located along water, so plan accordingly. In my case, I chose two campsites that did have nearby water sources, for added convenience.
Route Overview – Standing Indian Loop – Sintax77
GPS Data for this trip and many others can be found on my Trip Data Page. Includes full track data for each day, and way-points for campsites used / observed along the loop.
Gear Lists for this trip and others can be found on my Gear Lists Page or by using the links below.
Trailhead Used: Standing Indian Campground Information Area – N35° 04.570′ W83° 31.707′ Just up the road from the Standing Indian Campground (car and RV camping), the information area permits overnight parking with spaces available for a half dozen cars or so.
Trails Used, Day 1
Park at the Backcountry Information area, just up the road from Standing Indian Campground. Overnight parking for a half dozen cars or so available at the Info Center, just up the road from the main Standing Indian Campground area. (Overnight parking not available at the actual car camping area)
Lower Ridge Trail (located just behind the bulletin board)
Arrive at intersection with the Appalachian Trail, near summit of Standing Indian Mountain
Setup camp This area has multiple campsite options spread of a large area. A blue blazed spur trail departs the AT near the intersection and leads to a piped spring water source.
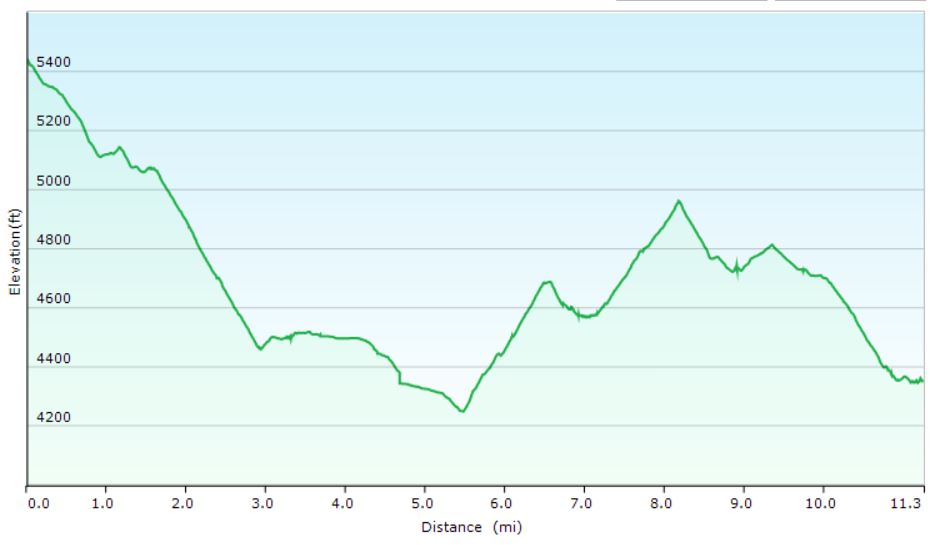
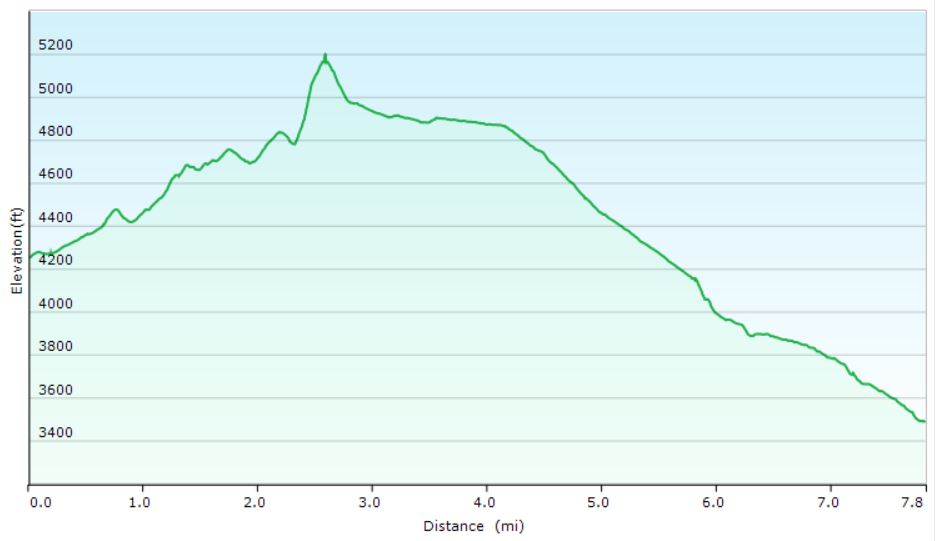
Day 1 Elevation Profile – Standing Indian Loop – Sintax77
Day 1 Mileage: 5 miles Day 1 Gross Elevation Gain: 2,113′
Trails Used, Day 2
Head out Northbound on the Appalachian Trail (away from the spring spur trail) Note: In the video I state on this morning that I was on the Appalachian Trail South. That was incorrect. The AT winds around a bit in this area, and while my compass heading was indeed south, I was actually on the Appalachian Trail North. Arrive at Betty Creek Gap and the depart the Appalachian Trail North on the
Blue Blazed Spur trail to legal camping. While you will notice established campsites directly on the AT at Betty Creek Gap, a sign indicates that camping is currently not permitted in the area for restoration purposes. Setup camp along the water at the end of the blue blazed Betty Creek Gap Spur Trail. There are several campsites of varying size near the water. If they are taken – cross the water and continue about 30 yards to the gravel forest road. After crossing the road, you will immediately see more camping options in the woods beyond the road.
Day 2 Elevation Profile – Standing Indian Loop – Sintax77
Day 2 Mileage: 11 miles Day 2 Gross Elevation Gain: 1,332′
Trails used. Day 3
Backtrack on the blue blazed Betty Creek Spur Trail to the AT intersection from yesterday.
Continue on the Appalachian Trail North.
Catch some views at the Albert Mountain Firetower (located directly on the AT)
Continue on the Appalachian Trail North
At the intersection, take the Long Branch Trail downhill, away from the AT.
Arrive back at the Backcountry Information Area.
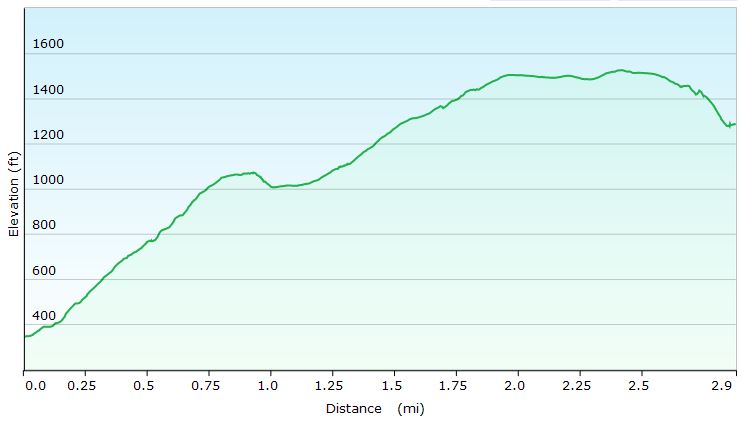
Day 3 Elevation Profile – Standing Indian Loop – Sintax77
Day 3 Mileage: 8 miles Day 3 Gross Elevation Gain: 1,227′
Come along for 2 days of Winter Hammock Camping, Backpacking, & Camp cooking as we hike a portion of the Appalachian Trail near Port Clinton, PA.
For this winter camping adventure, I’ll be taking advantage of a couple of free days by heading up to Port Clinton, Pennsylvania for a spur of the moment solo backpacking trip. Along the way, we’ll see some sections of the Appalachian Trail that PA has to offer, go over my winter backpacking gear, setup a winter hammock camping rig, build a campfire, and do a a decent amount of camp cooking on my trusty, old-school canister stove.
Trailhead Parking
Appalachian Trailhead, Port Clinton, Pennsylvania, Rt 61 Note: Parking at the actual trailhead is no longer allowed / possible. I parked in the town of Port Clinton near the Fire Station and proceeded down Penn St to the dead end. This small detour allows you to hike directly under the highway bridge and link up with the Appalachian Trail on the other side.
This was a relatively simple ‘in and out’ hike with a total one way distance of just under 3 miles and an elevation gain of 1,284′.
Port Clinton Winter Hammock Camping Elevation Profile for Hike In – Sintax77
Notable Gear Used / Seen on this Backpacking Trip: For a more detailed account, check out my full Winter Ultralight Backpacking Gear List Blog Post / Video.
Join me for 3 days of Solo Backpacking, Hiking, Hammock Camping, & Wild Ponies on the Appalachian Trail in Virginia’s Grayson Highlands.
For this backpacking trip, I’ll be hiking and camping solo in a section of the Mt Rogers National Recreation Area, within the larger George Washington and Jefferson National Forest. I’ll be using a portion of the Appalachian Trail to create a 3 day, 2 night backpacking loop of around 20 miles or so. The Grayson Highlands are known for their high winds and unpredictable, rapidly changing weather, so being that I’m doing the trip in March, I’ll be packing amount of warm weather and rain resistant gear. If you’re interested in a detailed account of everything that I packed, check out my previous Winter Ultralight Backpacking Gear List blog post and video. That will give you a look at exactly what I packed for the trip.
Below is a daily rundown of the trails and campsites used for each day. Full GPS track data can be found on the Trip Data page.
Parking Location
Grayson Highlands State Park, Overnight Backpacker’s Parking Area at the Massie Gap Parking Lot. N36° 38.012′ W81° 30.322′
Trails Used, Day 1
Depart Massie Gap Parking Lot
Rhododendron Trail
Appalachian Trail South
Wilburn Ridge Trail (it’s also possible to stay on the AT)
Rejoin the Appalachian Trail South
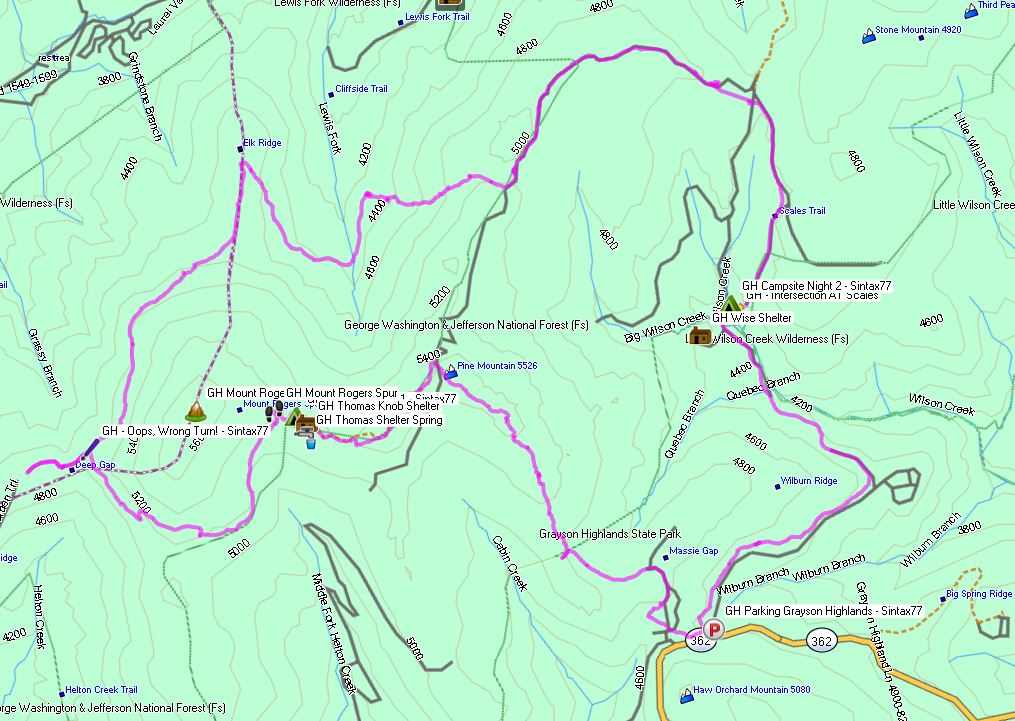
Setup camp about 200 yards past the Thomas Knob Shelter.
Day 1 Mileage: 4.25 miles Day 1 Elevation Gain: 2,096′
A spring is about a 100 yards down the trail behind the shelter.
Camping options for tents and hammocks are available a few hundred yards past the shelter, heading south. Tenting spots are on the ridge to the left, hammock camping opportunities are in the trees to the right.
There are also some nice campsite opportunities about a 1/4 mile or so before the shelter as well (AT north from the shelter)
Grayson Highlands Day 1 Elevation Profile – Sintax77
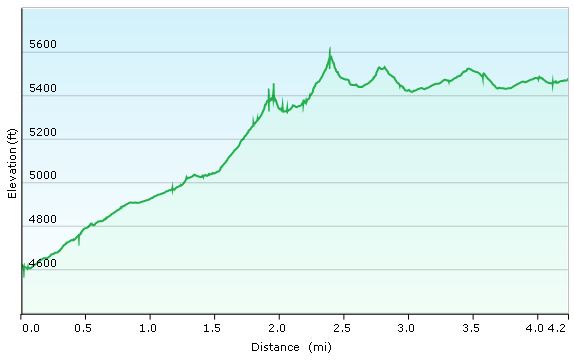
Trails Used, Day 2
Continue on the Appalachian Trail South
Mt Rogers Trail Towards Grindstone Campground (not to be confused with the Mt
Rogers Spur Trail which hits the summit of Mt Rogers. That trail is available shortly after leaving the campsite. I’ve heard it doesn’t have any views, but it holds the distinction as Virginia’s highest peak).
Lewis Fork Spur Trail (turn here a couple of miles before hitting the campground).
Cliffside Trail
Crest Trail
Scales Trail
Setup Camp near the intersection of Scales Trail with the Appalachian Trail
Day 2 Mileage: 11 miles Day 2 Elevation Gain: 1,320′
There are a number of hammock and tent camping opportunities on the edge of the field opposite from the AT intersection.
There is plenty water in several directions from the intersection. The particular campsite I used (tagged in my GPS data) has water right next to it within 20 yards or so.
Grayson Highlands Day 2 Elevation Profile – Sintax77
Trails Used, Day 3
Continue on the Scales Trail South (note: it is possible to continue on the AT
South and eventually make your way back to the Massie Gap parking lot as well. I chose the scales route because it is considerably quicker and I had to do a long drive home upon reaching the lot.)
Seed Orchard Trail (this wasn’t on my Nat Geo Map, but after coming out of the woods, you’ll see a sign directing you towards the AT by turning right. Instead, look left. You’ll see a water crossing with a brown Grayson Highlands State Park sign listing various rules and regs. The path along the fence over there is the Seed Orchard Trail)
Follow signs towards Hickory Ridge Campground.
Past the campground, there will be a large metal gate for a Horse Trail
Follow the Horse Trail (there doesn’t seem to be a fancier name for it)
Appalachian Spur Trail towards the Backpacker’ s Parking Lot
Return the Massie Gap Parking Lot
Day 3 Mileage: 3.5 miles Day 3 Elevation Gain: 499′
Grayson Highlands Day 1 Elevation Profile – Sintax77
Trip Grand Total Mileage: 18.75 miles Trip Grand Total Elevation Gain: 3,915′


 , long
 (came with my Sawyer S3 system)