Join me for 3 days of Backpacking, Hiking and Desert Camping in the Rain while exploring California’s Joshua Tree National Park.
For this winter desert camping adventure, I decided to do a solo backpacking trip in Southern California’s Joshua Tree National Park. I chose the Maze zone as my primary area of exploration, with the added possibility of hiking along the storied Boy Scout Trail as well.
Due to backcountry camping permit regulations, I chose to obtain a permit for camping within the Maze Zone, with the possibility of hiking into and exploring the Boy Scout Zone by day. This was mostly due to the fact that the Boy Scout Zone is the only JNP zone that requires you to specifically get a permit for 1 of 8 specific campsites, and I wanted to have some more flexibility to choose my campsites on the fly.
Getting a permit for the Maze zone allowed me to camp anywhere I wanted as long as I was at least 1 mile from an official trailhead, one half mile from any road, and 200 feet from any trail. Prefect – that sounded like exactly the solitude I was looking for.
Being February in the Mojave Desert, my expected temperature range would be from roughly 40 to 75 degrees or so. What about rain, you ask? Well, 336 days out of the year, the answer would be a solid – “No need for rain gear over here!”. I apparently arrived on one of those 29 other days. No worries though. I think it provided a pretty unique opportunity to see the Mojave Desert during one of it’s most vital times for survival of plants and animals in this arid environment – a desert rain storm curtesy of El Niño.
For sleep and shelter, I packed in my Outdoor Vitals Fortius trekking pole tent, a 3-season sleeping pad and my Hammock Gear 40° down quilt. Reliable drinking water is pretty much non-existent in Joshua Tree National Park regardless of the season, so I was tasked with packing in all of my drinking water for the entire 3 day trip. For this reason, I decided to skip the usual dehydrated backpacking meal choices in favor of some cheap and easy ready to eat food options.
I also opted to ditch the stove and just go the no-cook backpacking food route, because why not? Honestly, my pack was jammed to the hilt with water, and I just wasn’t in the mood to carry more fuel and cooking supplies.
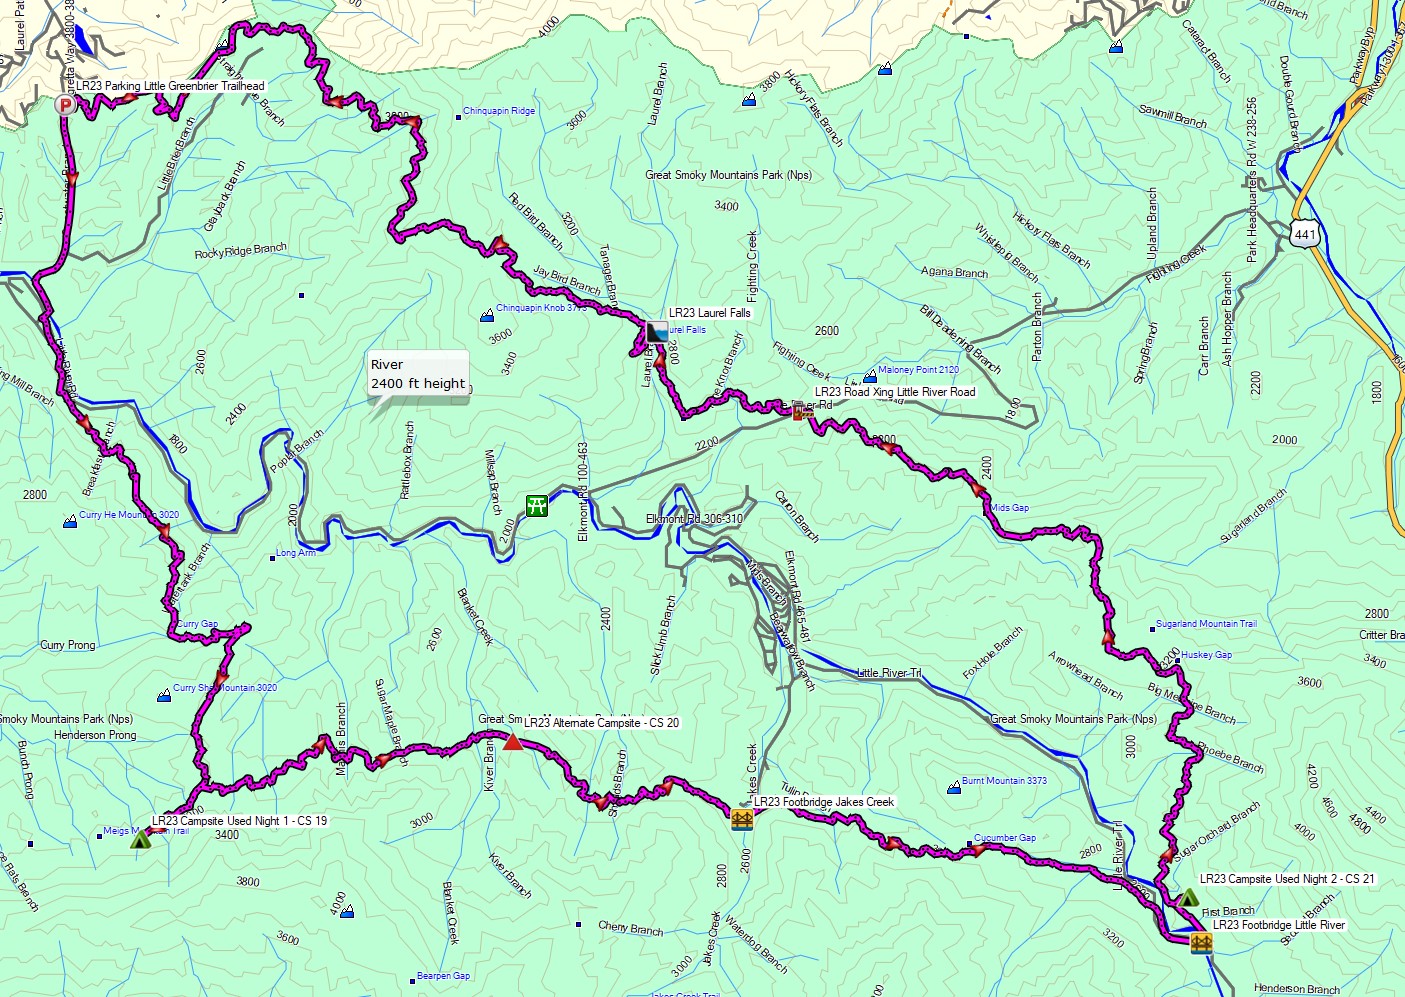
Route Overview – Smoky Mountains Little River Gorge Backpacking Loop – Sintax77
3 Days of Desert Camping and Backpacking in Yuma County Arizona.
For this backpacking trip, I headed even farther south to a remote corner of Arizona not too far from border with with Mexico in an area known as the Kofa Wilderness.
For sleep and shelter I brought an ultralight trekking pole tent, 3-season inflatable sleeping pad, and a 40 degree sleeping bag, as the forecasted temperature range for this December adventure would range fro highs in the eighties down to as low as the upper 30’s depending on wind conditions and where I chose to set up camp in the vast array of mountains and valleys found in this corner of the American Southwest.
My choices for camping food on this backpacking trip would be pretty simple – mostly because there are no reliable water sources in this desolate sampling of the Sonoran Desert. Since I would have to pack in and carry all of my own drinking water from the start, there was little reason to spend money and effort on traditional dehydrated backpacking meals.
Instead I chose to hit the local dollar store for some calorie dense, if not nutritionally diminished, food sources. The end result? 3 days worth of calories for under twenty bucks, and no water or stove required. …there will plenty of opportunities to eat salad back in civilization. If I manage to get back there…
Trailhead Used:
King Road Access, 1/4 mile north of Yuma Customs Checkpoint on AZ Rt 95
Come along for 5 days of Hiking, Camping & Backpacking in Southern Utah’s Zion National Park.
For this adventure, I’ll be spending 5 days exploring Zion National Park with my friends Derrick, Dave, and Tayson from Outdoor Vitals and Randy from Outdoor.Detour on Instagram. We’ll be doing 3 different backpacking / camping trips: A backcountry West Rim Backpacking Trip, Exploring & hiking the Frontcountry Zion National Park area while car camping in Springdale, Utah, and a backcountry camping trip on a top-down Narrows hike, ending at the Zion visitor’s center back in Springdale.
Note: All backcountry camping in Zion requires a permit. For details, visit the Zion NPS website.
Objective #1: Backcountry camp on Zion Canyon’s West Rim
Trailhead Used: West Rim Trailhead, Near Lava Point Overlook.
GPS coordinates N37° 22.899′ W113° 01.370′
West Rim Itinerary, Day 1
Park at the West Rim Trailhead parking area on the dirt service road near Lava Point. This is a gravel lot with parking for at least a half dozen cars or so. It’s about a 40 minute drive from Springdale, Utah. The latter part of the drive is on a dirt road, but non 4wd vehicles should be fine with a bit of care.
Head south on the West Rim Trail
Setup Camp at West Rim campsite #4 GPS N37° 17.144′ W112° 59.030′
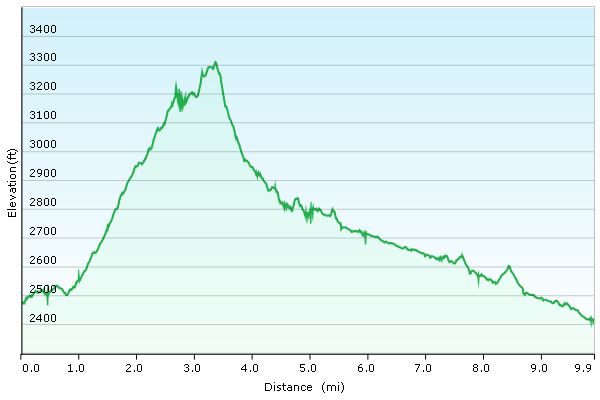
West Rim Hike Elevation Profile- Sintax77
West Rim Hike-In Mileage: 8 miles West Rim Hike-In Gross Elevation Gain: 1,073
West Rim Itinerary, Day 2
Backtrack north on the West Rim Trail
Return to the trailhead parking lot near Lava Point.
Have some tacos at the Whiptail Grill, right next door to the campground. I got the “Fire Asada” tacos and they were great. If you like spicy food that’s actually spicy, I would highly recommend the Whiptail Grill. Heck, even if you don’t like spicy stuff – they have milder options, plus a fun & unique casual atmosphere as well. Oh, and the view is amazing too 🙂
Objective #2: Explore Zion National Park’s Frontcountry & Springdale, Utah.
Take the free Zion shuttle, or a short walk north to the Zion National Park visitor center / entrance.
Take the Zion NP bus from the visitor center to Big Bend.
From the Big Bend bus stop, take the trail south along the Virgin River to Weeping Rock.
Road hike a bit along the Mount Carmel Highway to soak in the sights.
Hop another free Zion bus back towards the Springdale Visitor Center.
Explore Springdale, eat some ice cream at the Zion Candy Company on Zion Park Blvd.
Objective #3: Hike and Backcountry Camp the Narrows, from the Top Down.
Trailhead Used: Chamberlain’s Ranch Trailhead (aka Zion Narrows Upper Trailhead), Duck Creek Village, UT
GPS Coordinates N37° 23.121′ W112° 50.339′ Note: This was an end-to-end hike that required us to park a second vehicle at the Zion visitor center in Springdale to use as a shuttle back to the starting point. The drive from the visitor center back to the Chamberlain’s Ranch Trailhead is around 80 minutes.
Zion NP – The Narrows, Top-down Hike Itinerary, Day 1
Park at the Narrows Upper Trailhead in Duck Creek, UT.
Head southwest on the trail, which is actually dirt road, closed off to vehicles, for the first 3 miles.
Continue to follow the trail along the Virgin River, through the Narrows.
This trail is very easy to follow, as it is literally the river. A majority of the time will be spent walking in the river bed in ankle deep to knee deep water depending on conditions, depending on current water-flow conditions.
Note for reference: The ccf reading during our trip was roughly 40 CCF. Anything under 50 ccf is considered to be relatively ideal. Above 100 cfs, conditions can be difficult and hazardous. At 130 ccf, top-down narrows hikes will be closed. At 150 ccf, bottom up Narrows hikes will be closed. During a flash flood, flows can exceed 1000 cfs.
Setup camp at the Narrows campsite #12. N37° 19.982′ W112° 57.373′
Zion NP – The Narrows, Top-down Hike Itinerary, Day 2
Break camp and continue south along the Virgin River.
Exit the trail and catch the free Zion bus at the Temple of Sinawava shuttle stop.
Return to the Zion NP Springdale Visitor Center
Drive back to retrieve starting vehicle (~80 minute drive)
Join me for a Tour of Texas, from the Gulf of Mexico all the way to a Hike in Big Bend NP, via an adventure along the Mexican border.
For this adventure, I’ll be travelling (via air) from Philadelphia to San Antonio, Texas. After landing, the plan will be to grab a rental car and immediately travel 7 hours west, following a route along the Mexican boarder, to Big Bend National Park. Big Bend holds the distinction as America’s largest protected swath of Chihuahuan desert. Another of Big Bend’s unique distinctions is that around 118 miles of the Mexican / American boarder lay within it’s boundaries, hugging the deepest point of the Rio Grande.
My plan is to arrive at Big Bend National Park before sunset on day one and make a mad scramble for the Window Trail, which is said to boast some amazing sunset views across the Chisos Mountains. Assuming I pull this off, my next task will be to awake just before that burning globe comes back around again, and make way for the tallest peak amongst the Chisos Range – Emory Peak. After that – a quick retreat to the car, a modest rehydration and clean up, and then it will time to hop back in the rental car once again.
Just to keep thing interesting, my plan will be to take an alternate 7 hour route, further to the north, to return to San Antonio. At that point, I’ll scoop up Sara and head an additional 3 hours west to the Gulf of Mexico. More specifically, the Corpus Christi region, for some beach front camping, which would be a first for us.
Of course, all of these plans assume that everything goes as expected. I mean, they never get unexpected or sever weather on the Gulf Coast, do they? Wait… do they?
Join Sara & I for 3 days of desert hiking, backpacking & camping in the Superstition Mountains. And who knows – maybe Sara will find the Lost Dutchman’s Gold Mine…
For this desert backpacking trip, we’ll be hiking a loop in the Superstition Wilderness, within the greater Tonto National Forest – about 60 miles east of Phoenix, Arizona. Not only was this a beautiful and scenic hike due to the stark desert surroundings and sharp, rugged peaks, but this particular region has added bonus – a rich history full of intrigue and lore right at home in your favorite spaghetti western flick. Some of these tales are indisputable facts. Others, are more debatable – the stuff of legends and mystery. The most notable and famous of those stories being that of Jacob Waltz, or as it’s commonly referred to, the mystery of the Lost Dutchman’s Gold.
As touched on in the video, the story of the Dutchman and the lost gold mine is much to deep to give justice to in the passing of a hiking video, so for those interested, I highly recommend taking the time to check out the various iterations of the story, theories, etc. For the sake of this post though, the basic idea goes like this – Jacob Waltz stumbled upon some gold in the Superstition Mountains. Whether it was an actual mine, or a hidden cache that was originally mined elsewhere, depends on which version of several accounts you choose to believe. In fact, even the fact that he came upon it accidentally is up for debate as well. Some iterations of the tale suggest that he was given the details of the hidden mine after saving the life of a man who belonged to a wealthy Mexican mining family. The name of that family, by the way, was Peralta – you know, like the trailhead we parked at. But anyway, I’m getting ahead of myself and going down the rabbit hole. Hmm, maybe the gold was hidden in a burrow of sorts, and not an actual gold mine. No wait, I’ve got to stop this.
Okay, let me try this again. Somehow, Jacob knew where a bunch of gold was in these mountains, and he kept it a complete secret, despite rumors throughout the years that he knew about it’s location. People would try to follow him when he went into the mountains, but he always lost them, or at the least, waved a gun at them until they left. Finally, on his death bed in 1891, he confirmed the gold mine and gave some info on it’s whereabouts to two individuals. Apparently, it wasn’t quite enough info, because they never found it after years of searching. Word spread, many more people started searching, and they continue to search until this day. People have gone missing while searching, some have even had their skull found right on one of the trails we hiked on our loop, complete with two bullet holes and their body found separately 3/4 of a mile away (his name was Adolf Ruth, and he went into the Superstitions in search of the gold back in 1931) .
So what does all this have to do with our backpacking trip? Did we find some gold or something? Am I devoting my life to finding the Lost Dutchman’s Mine? Well no, but it makes hiking around out there pretty cool and Old Westy, if you ask me. At the very least, it gives you something to ponder as you hike along the cactus covered traverses, baked incessantly by a sun they just may have glinted off of Jacob Waltz’s prize back in the 1800’s.
But anyway, back to the hike we did. Here’s the details…
Route Overview – Hiking the Superstition Mountains – Sintax77
Season / Time of Year
Winter – January 20th to January 23, 2016.
Elevation Range
Minimum – 2,283′
Maximum – 3,550′
Full GPS track data and waypoints are available on the Trip Data page.
Trails Used Day 1 (in order of use) Peralta Trailhead Parking Lot, Dutchman Trail Set up camp in a relatively flat area along the trail, about .75 miles after crossing an intermittent stream. This particular stream actually had a decent flow at the time, but depending on recent conditions and time of year, it may not always be that way.
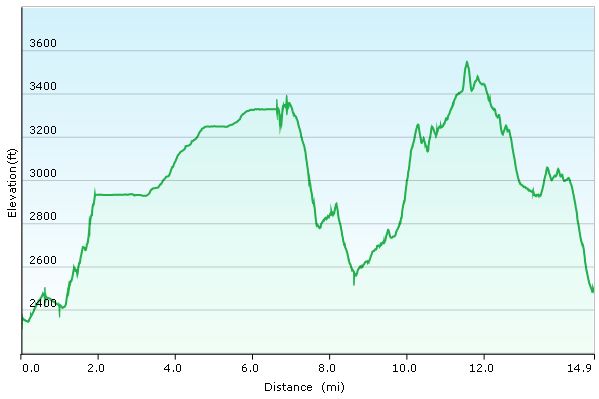
Day 1 Total Mileage: 2 miles Day 1 Total Elevation Gain: 344′
Day 1 Elevation Profile – Superstition Mountains Hike
Trails Used Day 2 (in order of use)
Continue on Dutchman Trail
Pass the intersection with Coffee Flat Trail to stay on Dutchman Trail, after which you’ll begin to rack up the bulk of your elevation gain for the day.
Leave the Dutchman Trail and head east on the Whiskey Springs Trail. Just before the upcoming trail intersection, the trail crosses LeBarge Creek (where we stocked up on water for the rest of the day)
At the intersection, turn left to head west on the Red Tanks Trail.
Red Tanks Trail ends at the intersection with Dutchman Trail.
Turn right to head north on Dutchman Trail.
Set up camp along Dutchman Trail.
Day 2 Total Mileage:10 miles Day 2 Total Elevation Gain:1,325′
Day 2 Elevation Profile – Superstition Mountains – Sintax77
Trails Used Day 3 (in order of use)
Continue on Dutchman Trail
At the intersection, continue straight (west) on Bull Pass Trail
Turn left to head south on Black Top Mesa Trail, towards the top of Black Top Mesa
Explore the mesa and hunt for the Spanish Hieroglyphs or maybe some of the Lost Dutchman’s Gold, etc.
Retrace your steps back down Black Top Mesa Trail.
At the bottom, turn right to head east on the unofficial Bull Pass Alternate Trail (not the same as the previous Bull Pass Trail).
At the intersection, turn right to head south on our recurring friend, Dutchman Trail.
At the intersection, depart the Dutchman Trail and take Terrapin Trail.
At the intersection, turn right to head south on Bluff Springs Trail.
Return to the Peralta Trailhead parking lot.
Day 3 Total Mileage: 15 miles (plus a couple miles of meandering about on Blacktop Mesa) Day 3 Total Elevation Gain:2,933 feet
Day 1 Elevation Profile – Superstition Mountains – Sintax77
Trip Grand Total Mileage: 27 Miles Trip Grand Total Elevation Gain: 4,662′
Highly recommended book for hikes in this area:
‘Hiker’s Guide to the Superstition Wilderness‘ by Jack Carlson and Elizabeth Stewart
This book appears to be out of print, but I managed to get a used copy and love it. It has detailed descriptions of all the trails, with some cool related history mixed in. It also contains plenty of solid maps and a bunch of suggested hikes.

 . For the sake of this post though, the basic idea goes like this – Jacob Waltz stumbled upon some gold in the Superstition Mountains. Whether it was an actual mine, or a hidden cache that was originally mined elsewhere, depends on which version of several accounts you choose to believe. In fact, even the fact that he came upon it accidentally is up for debate as well. Some iterations of the tale suggest that he was given the details of the hidden mine after saving the life of a man who belonged to a wealthy Mexican mining family. The name of that family, by the way, was Peralta – you know, like the trailhead we parked at. But anyway, I’m getting ahead of myself and going down the rabbit hole. Hmm, maybe the gold was hidden in a burrow of sorts, and not an actual gold mine. No wait, I’ve got to stop this.
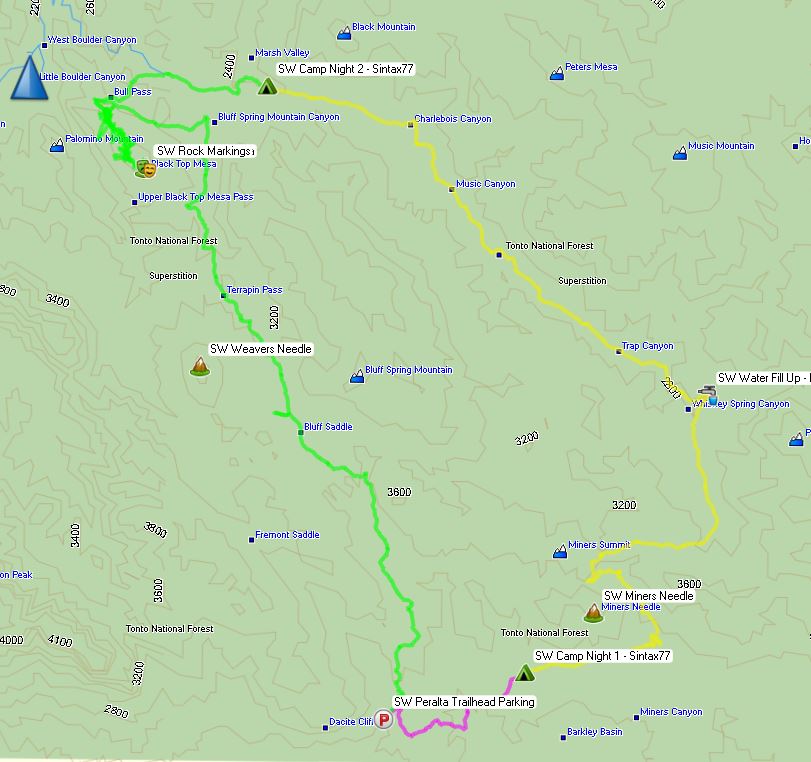


 (long version)
 for water storage.
 for eating our chili and queso appetizer
 on top of a


 water filter configured in a gravity setup
 ‘ by Jack Carlson and Elizabeth Stewart