OV Aerie Underguilt Sleeping Bag Giveaway is still running until November 10th. Enter for free here.
Backpacking water filter membrane sizes.
Roy & Dean sent a great packet of info on hiking and backpacking in Michigan.
Disclosure: A commission may be received for purchases through the links in this post. Your support is appreciated and makes the backpacking trip videos on this channel possible. Be smart, make your own informed decisions, duh. 😉
4 Days of Hiking, Camping & Backpacking on Colorado’s Continental Divide Trail in the Rocky Mountain National Forest.
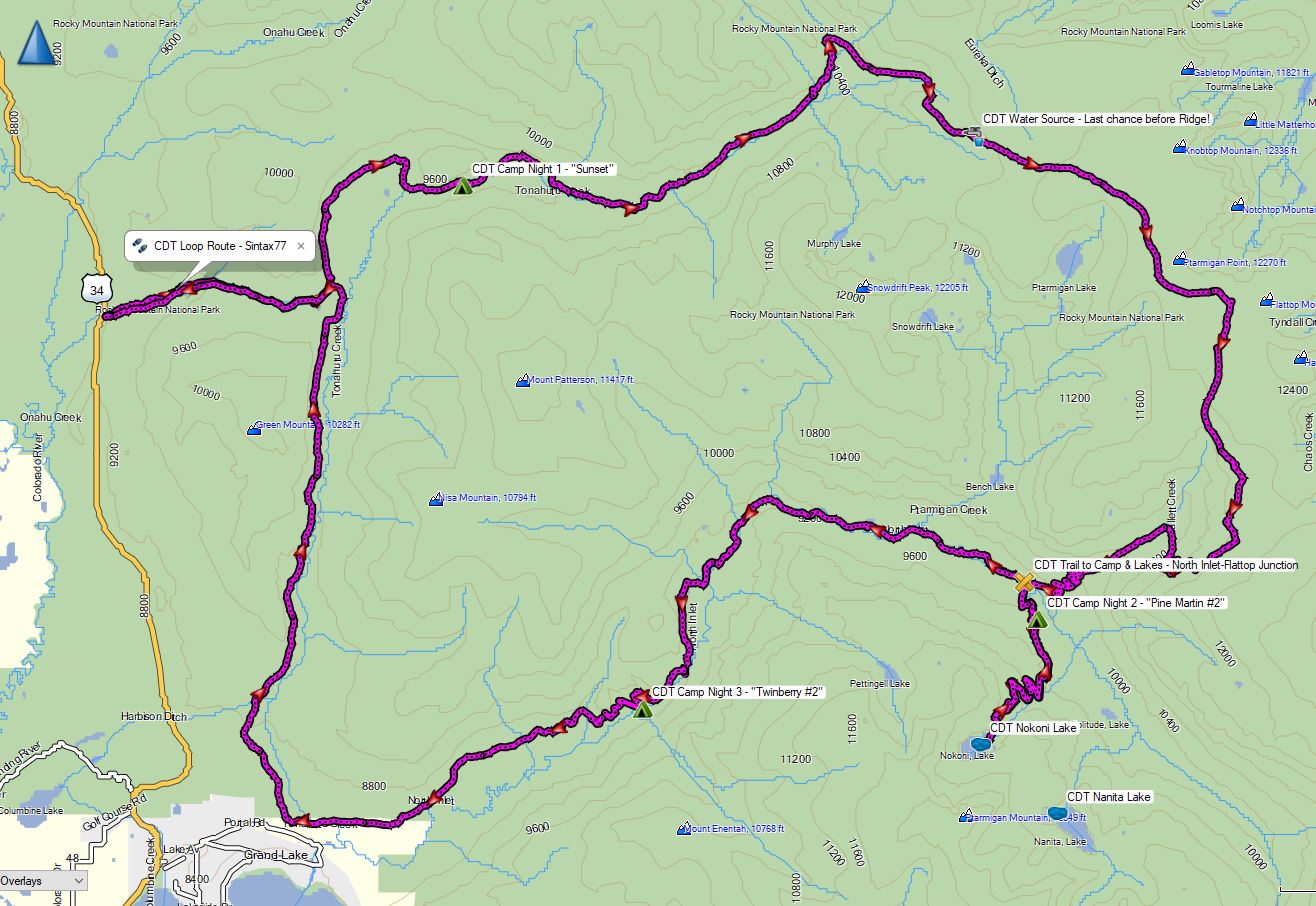
For this backpacking trip, we’ll be doing a 4 day, 3 night camping trip on a section of the Continental Divide Trail in Colorado’s Rocky Mountain National Park. Sometimes referred to as the “CDT Short Loop”, this backpacking loop is a 29 mile mile circuit with several different access point options. In our case, we parked at the Green Mountain trailhead, just past the RMNP Kawuneeche visitor center and park entrance by Grand Lake, CO. The 2 mile Green Mountain trail provided us access to the CDT and brought our mileage for the loop up to 33 miles.
CDT Loop Route Overview – Sintax77
GPS Data for this trip and many others can be found on my Trip Data Page. Includes full track data for each day, and way-points for campsites used, water sources, etc along the loop.
Trailhead Used: Green Mountain Trailhead, RMNP, Grand Lake, CO – 40°18’26.7″N 105°50’28.7″W This parking area is only a few miles into the park & provides overnight parking for plenty of vehicles. A park entrance pass and wilderness camping permit is required (contact the Kawuneeche Office for details and availability)
Trails Used, Day 1
Park at the Green Mountain Trailhead.
Green Mountain Trail
Junction with Tonahutu Creek Trail (CDT)
Continue north on the Continental Divide Trail
Setup camp at Sunset camp (Elevation 9,498′) This is a single group tentsite that must be reserved via permit.
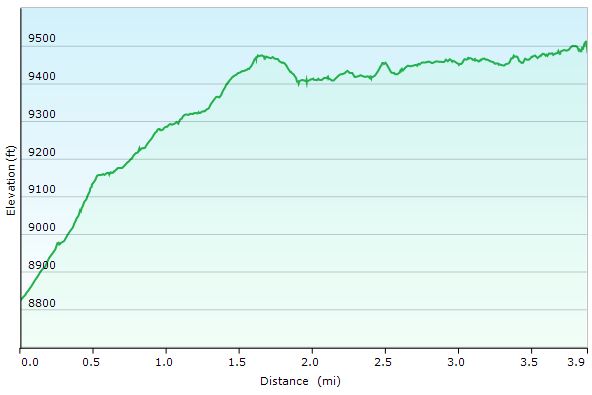
CDT Loop Day 1 Elevation Profile – Sintax77
Day 1 Mileage: 4 miles Day 1 Gross Elevation Gain: 974′
Trails Used, Day 2
Continue on the Tonahutu Creek Trail (CDT)
Stock up on water before heading up the ridge (last chance at N40° 19.579′ W105° 43.701′)
Continue on Tonahutu Creek Trail (CDT) through Ptarmigan Pass
Junction North Inlet Trail / Flattop Mountain Trail
Head south on the North Inlet Trail (CDT)
Junction North Inlet / Lake Nanita Trail
Head South on the Lake Nanita Trail
Setup camp at Pine Marten Camp (Elevation 9,568′) These are two separate single group tentsites that must be reserved via permit.
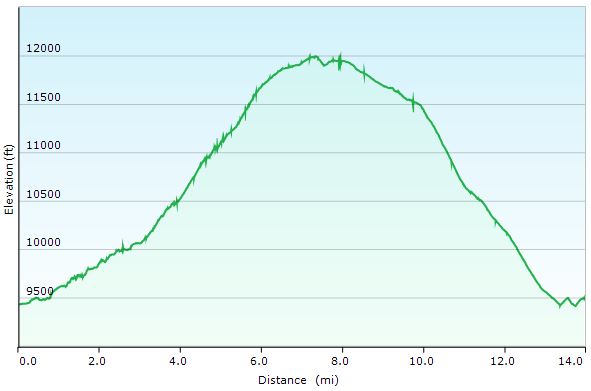
CDT Loop Day 2 Elevation Profile – Sintax77
Day 2 Mileage: 14 miles Day 2 Gross Elevation Gain: 3,074′
Trails used. Day 3
Dayhike to Lake Nokoni by heading south on the Lake Nanita Trail We only went to the first lake, Nokoni, due to weather and time issues, but there is a second lake, Nanita, about .75 miles further up the trail.
Backtrack to camp and grab packs.
Return to Junction with North Inlet Trail
Continue west on the North Inlet Trail (CDT)
Setup camp at Twinberry Camp # 2 (Elevation 8,661′) These are two separate single group tentsites that must be reserved via permit.
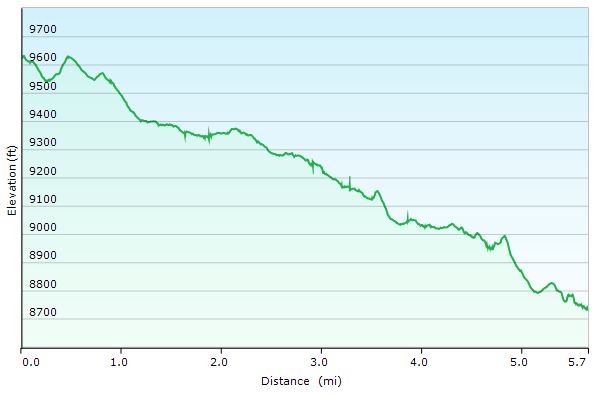
CDT Loop Day 3 Morning Lake Hike Elevation Profile – Sintax77
CDT Loop Day 3 Elevation Profile – Sintax77
Day 3 Mileage: 9.6 miles (4 miles round trip for lake hike, 5.6 miles on the CDT Loop) Day 3 Gross Elevation Gain: 1,414′ (Almost all of this was from the lake hike excursion)
Trails used. Day 4
Continue west on the North Inlet Trail (CDT)
Arrive at the North Inlet Trailhead
Beyond the parking lot, you’ll find the Tonahutu Trailhead
Head north on the Tonahutu Creek Trail
Junction with Green Mountain Trail
Return to Green Mountain Trailhead Parking Lot
CDT Loop Day 4 Elevation Profile – Sintax77
Day 4 Mileage: 9.5 miles Day 4 Gross Elevation Gain: 1,204′
Trip Totals
Grand Total Mileage: 37 Miles
Grand Total Elevation Gain: 6,666′ Note: 4 miles and 1,414′ can be attributed to our day 3 lake hike)
In this backpacking and travel gear review, I give a run down of the various features of the Totalpac Packable Backpack from the perspective of both outdoor applications as well as airport travel, etc.
Sintax77 Viewers Get 50% off by using this link and entering the code TOTALP50 (offer good for a limited time following release)
Disclosure: This post or video contains affiliate links, which means I may receive a commission for purchases made through my links. Cross reference, do your own research and make your own decisions, duh 😉
Specs and Features as per the manufacturer
ULTRA LIGHTWEIGHT AND COMPACT (11oz) – Weighing less than a pound, the portability of this bag is unrivaled. When not in use, the foldable daypack takes up almost no space. With its packable stowaway design, it quickly zips into its own inner pocket for easy compact storage. Store it in any small space and expand into a full sized backpack as needed. No more taking up space or paying airlines extra carry on fees. One of the best mens and womens daypacks on the market
FUNCTIONAL & ORGANIZED (35 liters, 11 pockets, USB Cable) – 35L of storage and 11 pockets to hold your accessories, you’ll have no problem fitting everything inside this roomy daypack. Main storage compartment with internal organization, traveling school laptop sleeve, 2 front pockets with additional zipper pocket inside, mini keychain clip, adjustable dual side water bottle accessory pockets, hidden anti theft pocket for id valuables. USB charging port makes this the go to trekking hike bag
DURABLE – Ultralight but equally strong, this little bag will be your companion for years to come. Made with the best premium grade Diamond Ripstop Nylon, this pack is both water and tear resistant. Robust metal SBS “no catch” zippers provide easy access to pockets. High quality reinforced stitching and bar tacks add structural integrity. Deluxe polyester 200 pound bearing straps and strong ABS plastic buckles make this the perfect outdoor back pack for travel hiking camping and backpacking
COMFORTABLE – Designed with comfort in mind, you’ll be able to pack this bag around for hours on end and still feel great at the end of the day. 2.5 inch carrying straps with breathable padded foam, sleek slim design reduces unnecessary bulk and weight. Adjustable chest strap transfers weight from shoulders to chest for a well balanced load. Packs come in black blue grey orange and are the perfect fit for men women girls boys and kids of all sizes. Ideal comfort for running biking and cycling
NO WORRIES GUARANTEE – Get a full refund or exchange on our backpacks for any reason, at any time. Yes! For any reason, at any time! Buy 100% risk-free knowing that we’ll always have your back. So buy today and enjoy it all, hiking travel gym beach camp trips and more
Disclosure: A commission may be received for purchases through the links in this post. Your support is appreciated and makes the backpacking trip videos on this channel possible. Be smart, make your own informed decisions, duh. 😉
In this camping gear review, I give a run down of the various features of the Unigear Sleeping pad, as well as my own personal experiences with the Unigear pad for backpacking.
Sintax77 Viewers Get 20% off by using this link and entering the code 20sintax77 (offer good through the end of October, 2018)
Disclosure: This post or video contains affiliate links, which means I may receive a commission for purchases made through my links. Cross reference, do your own research and make your own decisions, duh 😉
Specs and Features as per the manufacturer
Comfortable & Stability: The sleeping pad’s wave air tubes support your weight, keep you comfortably cradled in the middle of the pad, you won’t bottom out if you roll on your side. 2 Inch thickness of cushioning provide unrivaled comfort, stability and support, great for sleeping in any position
Durability & Warm: The durable 40-denier ripstop nylon polyester with TPU coating helps prevent tearing, offers the right balance between low weight and durability. You don’t need to worry about punctures or leaks. Thickness material limit heat loss for better support and warmth (R-value 1.3)
Ultralight & Ultra-compact: Unigear sleeping pad with ultralight weight(Only 507g/1.1lb) and compact packed to the size of a 1-liter water bottle, Inflated size is 74”x24”x2”, which is ideal for outdoor activity like fast-and-light backpacking, traveling or camping
Easy to Inflate & Deflate: This sleeping mat with one way valves for inflation and deflation, blowing air into this inflatable sleeping pad really is a breeze! Which allows quick to inflate (10-15 breaths) and super fast deflate(only one second). Includes repair kit with 4 self-adhesive patches for fixing punctures in the field
100% SATISFATION GUARANTEE: If you are not 100% satisfied with this product for any reason, please contact customer service within 60 days, and we will immediately refund your purchase price – no questions asked
Section Hiking on the Vermont Long Trail – Appalachian Gap to Lincoln Gap.
For this backpacking trip, my dog Denali and I will be doing a 2 day, 1 night camping trip in Northern Vermont. The specific area we’ll be camping near is called the Stark’s Nest, which lies on a section of the Long Trail between Appalachian Gap and Lincoln Gap, about 40 minutes west of Montpelier, VT.
The Vermont Long Trail is a 273 mile, long distance hiking trail that runs the entire length of Vermont, from the sothern border with Massachusetts all the way up to the Canadian border to the north. The first hundred miles or so in the south coincide with the Appalachian Trail as well. I’ll be backpacking and camping just a short taste of the Long Trail – a roughly 8 mile section in the North Country of Vermont on a combination of private land and Vermont’s Green Mountain National Forest.
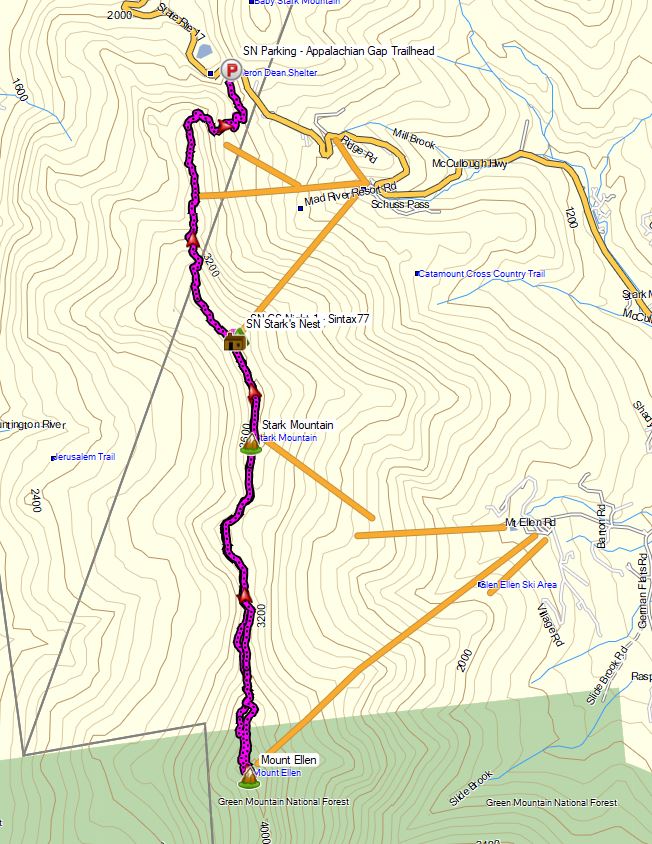
Starks Nest Hike – Route Overview – Sintax77
GPS Data for this trip and many others can be found on my Trip Data Page. Includes full track data for each day, and way-points for campsites used, water sources, etc.
Trailhead Used: Appalachian Gap Trailhead Parking Area – 44°12’39.7″N 72°55’53.5″W This is a large, paved parking area just off of Vermont SR17. The Vermont Long Trail South (which I took in the video) can be found on the opposite side of the road. The Long Trail North (which I didn’t take) is located right in the corner of the lot, by the guard rail.
Trails Used & Itinerary, Day 1
Park at the Appalachian Gap Trailhead Parking Area
Take the Vermont Long Trail South (located on the other side of the road. Look for the white blaze
Arrive at Stark’s Nest warming hut and grab some water from the rain barrel. Note: Stark’s Nest is a ski warming hut. During the winter, this is a hut used to take a break and warm up in between ski runs at Mad River Glen Ski Resort. While this is private property, it is kept open and available to hikers year round as a place to take a break, or camp for the night while hiking the Vermont Long Trail. There is a rain barrel out front that makes for an excellent water source. It’s essentially a fully enclosed cabin that makes it a great option for riding out storms and bad weather. There is a composting outhouse nearby, across from the cabin in the woods opposite the cabin.
Set up camp a little ways down the ski slope near Stark’s Nest
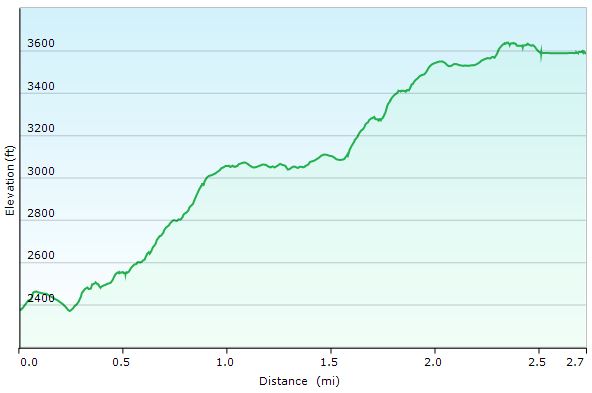
Starks Nest Hike Day 1 – Elevation Profile
Day 1 Mileage: 3 miles Day 1 Gross Elevation Gain: 1,501′ Day 1 Gross Elevation Descent: 283′
Trails Used, Itinerary Day 2
Leave camp and head back uphill to the Stark’s Nest.
Continue south on the Vermont Long Trail.
End at the ski lift area on Mt Ellen for a break and some views.
Backtrack out the way you came, via the Long Trail North.
Arrive back at the Stark’s Nest.
Breakdown camp, pack up and replenish water supplies.
Backtrack out on the Vermont Long Trail North.
Arrive back at the Appalachian Gap Trailhead Parking area.
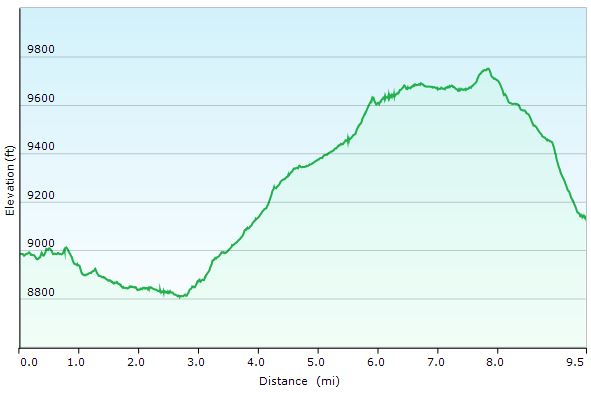
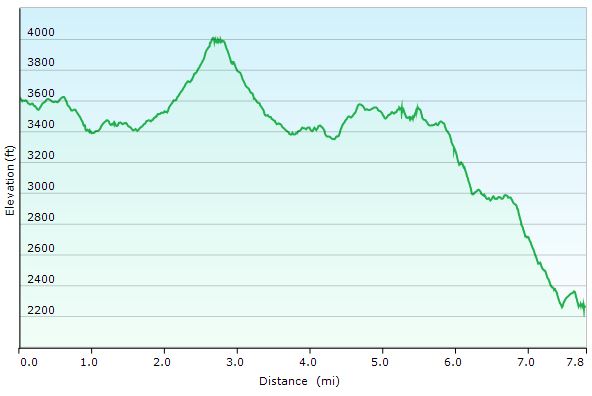
Starks Nest Hike Day 2 – Elevation Profile
Day 2 Mileage: 8 miles (5 round-trip for Mt Ellen, 3 for the hike out from Stark’s Nest) Day 2 Gross Elevation Gain: 1,566′ Day 2 Gross Elevation Descent: 2,919′


 from the perspective of both outdoor applications as well as airport travel, etc.


 Collapsible Dish
 – Freeze Dried Dog Treats for Hiking


 (don’t trust your dog with the cheap key chain grade ones).