Olight S1R Baton II Review – Mini EDC & Backpacking Flashlight

A Review of the Olight S1R Baton II for EDC (Every Day Carry)

The Olight S1R Baton II is a USB rechargeable battery LED flashlight with a 0.5 lumen low mode and a 1,000 lumen high mode. I’ve found this lumen range, combined with it’s size and weight of 1.8 oz (including battery), to make the S1R Baton II a very useful light for my backpacking and camping trips where the expected lighting needs are a bit more critical.  The 2.48 inch length, and deep pocket tail clip make it a great light for my EDC needs as well. Particularly for front pocket carry.

Links for full Manufacturer’s Specs, Features, etc

Specs and Features, as per Manufacturer

  • General Data
    • Beam Distance (ft): 476
    • Beam Distance (m): 145
    • Max. Performance (lumens): 1000
    • Charge type: Magnetic USB charge base
    • Compatible Batteries: Customised RCR123A IMR
    • Light Intensity (candela): 5250
    • Light Form:  Wide/broad hotspot. Perfect for up close illumination.
    • Mode Operation: Side Switch
    • Form / Size Factor: Small size (Car key / Zippo Lighter)
    • Lens / Reflector Type: TIR reflector (big, defined wide hotspot)
    • Series: Series S (EDC, General Use)
  • Notable Characteristics
    • 1,000-lumen output: With the help of the all new customized 10C discharge current lithium-manganese battery, the S1R II delivers a huge output of 1,000 lumens in a small pocket light powered only by a single IMR16340.
    • Premium beam: Perfectly balanced hot spot for optimal clarity and a soft transition to maintain comfortable vision during use.
    • Three-color power level indication: Once the light is turned on, the power indicator located in the center of the side switch shows the power level in three colors (Green: Power>60%, Yellow: Power is between 10% and 60%; Red: Power<10%).
    • Highly efficient MCC II charger: This round-edged magnetic USB charger is not only 13% thinner than the previous MCC but is also compatible with all existing rechargeable flashlights and headlamps using this charging method. The new MCC II provides another fast charging solution to future Olight products with high capacity batteries.
  • Lighting Levels & Run Times
    • Moon – 0.5 lumens, 8 days
    • Low – 12 lumens, 20 hours
    • Medium – 60 lumens, 3 hours 40 mins
    • High – 600 lumens for 1.5 mins, then drops to 300 lumens for 45 mins
    • Turbo – 1,000 lumens for 1.5 mins, then drops to 300 lumens for 37 mins
  • Technical Characteristics
    • Waterproof IPX8
    • Weight: 51 grams / 1.8 oz
    • Length (mm / in): 63 / 2.48
    • Head Diameter (mm / in): 21 / 0.82
    • Body Diameter (mm / in): 21 / 0.82
    • LED:  Cree XM-L2 CW
  • Package Contents
    • Olight S1R II flashlight x 1
    • MCCII Magnetic Charging Cable x 1
    • 550mAh IMR RCR123A Battery x 1
    • Lanyard x 1
    • Battery box x 1
    • Pouch x 1
    • User Manual x 1

Hiking Zion National Park – Camping & Backpacking in Southern Utah

Come along for 5 days of Hiking, Camping & Backpacking in Southern Utah’s Zion National Park.

For this adventure, I’ll be spending 5 days exploring Zion National Park with my friends Derrick, Dave, and Tayson from Outdoor Vitals and Randy from Outdoor.Detour on Instagram.  We’ll be doing 3 different backpacking / camping trips: A backcountry West Rim Backpacking Trip, Exploring & hiking the Frontcountry Zion National Park area while car camping in Springdale, Utah, and a backcountry camping trip on a top-down Narrows hike, ending at the Zion visitor’s center back in Springdale.

Note: All backcountry camping in Zion requires a permit. For details, visit the Zion NPS website.

Limited time offer from Outdoor VitalsGet the camping pillow I’m using in this video for FREE by clicking here.

Objective #1: Backcountry camp on Zion Canyon’s West Rim

Trailhead Used: West Rim Trailhead, Near Lava Point Overlook.
GPS coordinates N37° 22.899′ W113° 01.370′

West Rim Itinerary, Day 1

  • Park at the West Rim Trailhead parking area on the dirt service road near Lava Point.
    This is a gravel lot with parking for at least a half dozen cars or so.  It’s about a 40 minute drive from Springdale, Utah. The latter part of the drive is on a dirt road, but non 4wd vehicles should be fine with a bit of care.
  • Head south on the West Rim Trail
  • Setup Camp at West Rim campsite #4 GPS N37° 17.144′ W112° 59.030′

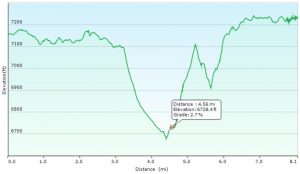
West Rim Hike Elevation Profile- Sintax77

West Rim Hike-In Mileage: 8 miles
West Rim Hike-In Gross Elevation Gain: 1,073

West Rim Itinerary, Day 2

  • Backtrack north on the West Rim Trail
  • Return to the trailhead parking lot near Lava Point.
  • Ghost town pit-stop in Grafton, Utah
  • Continue on to Springdale, Utah.
  • Check into the Quality Inn campground in Springdale, within walking distance of the Zion visitor center and park entrance.
  • Have some tacos at the Whiptail Grill, right next door to the campground. I got the “Fire Asada” tacos and they were great. If you like spicy food that’s actually spicy, I would highly recommend the Whiptail Grill. Heck, even if you don’t like spicy stuff – they have milder options, plus a fun & unique casual atmosphere as well. Oh, and the view is amazing too 🙂

Objective #2: Explore Zion National Park’s Frontcountry & Springdale, Utah.

Zion Frontcountry / Springdale Itinerary. Day 1

  • Wake up at the car campground in Springdale,
  • Take the free Zion shuttle, or a short walk north to the Zion National Park visitor center / entrance.
  • Take the Zion NP bus from the visitor center to Big Bend.
  • From the Big Bend bus stop, take the trail south along the Virgin River to Weeping Rock.
  • Road hike a bit along the Mount Carmel Highway to soak in the sights.
  • Hop another free Zion bus back towards the Springdale Visitor Center.
  • Explore Springdale, eat some ice cream at the Zion Candy Company on Zion Park Blvd.

Objective #3: Hike and Backcountry Camp the Narrows, from the Top Down.

Trailhead Used: Chamberlain’s Ranch Trailhead (aka Zion Narrows Upper Trailhead), Duck Creek Village, UT
GPS Coordinates N37° 23.121′ W112° 50.339′
Note: This was an end-to-end hike that required us to park a second vehicle at the Zion visitor center in Springdale to use as a shuttle back to the starting point.  The drive from the visitor center back to the Chamberlain’s Ranch Trailhead is around 80 minutes.

Zion NP – The Narrows, Top-down Hike Itinerary, Day 1

  • Park at the Narrows Upper Trailhead in Duck Creek, UT.
  • Head southwest on the trail, which is actually dirt road, closed off to vehicles, for the first 3 miles.
  • Continue to follow the trail along the Virgin River, through the Narrows.
  • This trail is very easy to follow, as it is literally the river. A majority of the time will be spent walking in the river bed in ankle deep to knee deep water depending on conditions, depending on current water-flow conditions.
  • Note for reference: The ccf reading during our trip was roughly 40 CCF.  Anything under 50 ccf is considered to be relatively ideal. Above 100 cfs, conditions can be difficult and hazardous. At 130 ccf, top-down narrows hikes will be closed. At 150 ccf, bottom up Narrows hikes will be closed.  During a flash flood, flows can exceed 1000 cfs.
  • Setup camp at the Narrows campsite #12.  N37° 19.982′ W112° 57.373′

Zion NP – The Narrows, Top-down Hike Itinerary, Day 2

  • Break camp and continue south along the Virgin River.
  • Exit the trail and catch the free Zion bus at the Temple of Sinawava shuttle stop.
  • Return to the Zion NP Springdale Visitor Center
  • Drive back to retrieve starting vehicle (~80 minute drive)

Notable Gear Seen:

GCI Slim Fold Cook Station – Make your Vehicle Adventure Ready

A Review of the GCI Outdoor Slim Fold Cook Station.

In this video camping fear review, I give a run down of the various features of the GCI Slim Fold Camp Cook Station, as well as my own personal experiences with the GCI cook station for car camping and various camp cooking applications.

Disclosure: This post or video contains affiliate links, which means I may receive a commission for purchases made through my links. Cross reference, do your own research and make your own decisions, duh 😉

Specs and Features as per the manufacturer

  • Folds flat for storage
  • Easy to open, set up and close
  • Four multi-use fold-out side tables – beverage, wine glass, garbage bag, paper towel and utensil holder (weight limit per table: 30 lb / 13.6 kg)
  • Aluminum counter top (weight limit: 48 lb / 21.8 kg)
  • Lower rack for storage/dry goods (weight limit: 35 lb / 15.9 kg)
  • Powder-coated steel frame
  • Open size: 20.9 x 52 x 32.3 in (53 x 132 x 82 cm)
  • Folded size: 20.9 x 3.7 x 34.6 in (53 x 9.5 x 88 cm)
  • Unit weight: 18.9 lb (8.6 kg)

Mail Call – Back from Zion NP, Alcohol Stove Mods, Backpacking Pillows

Tips, tricks, and discussion on various Backpacking, Hiking & Camping topics.

Topics Discussed / Gear Seen

Flash Sale! Sintax77 T-Shirts (Ends 8/13/18)

Flash Sale is open from Tuesday 8/7/18 to Monday, 8/13/18.

Some of you have let me know that you wanted a t-shirt during our original offering and missed it, so we’re doing a quick flash sale for those of you who would like a second chance 🙂

Official t-shirt of the Sintax77 channel on YouTube, your source for backpacking, hiking, camping, and travel adventure videos. It’s become a custom to end each of my backpacking videos with the parting quote “It’s Cheeseburger Time!”, before leaving the trail to replace some much needed calories.

Now you can wear your fancy new Cheeseburger Time shirt on the way to your own post-hike cheeseburger experience and become a part of the tradition!

Shirts are available in Charcoal, Royal Blue, and Maroon at http://www.bonfire.com/sintax77
Campaign will launch if we hit a threshold of 5 shirts ordered!

I hope you all enjoy the shirt, and thank you to our devoted uber-suscribers for watching and supporting this channel for all these years! 🙂

Flash sale ends on Monday, August 13th, 2018.

Supporters will receive their orders 7 – 14 business days after the campaign ends.

MalloMe Camping Cookware Mess Kit Review

A Review of the MalloMe Camping Cookset.

The MalloMe Cookware set is a 10 piece nesting mess kit for backpacking and camping that I’ve had for about year now, with great results.

While I typically pack pretty minimal for my solo backpacking trips, for group backpacking trips and snow melting in the winter, I’ve grown to really like this budget mess kit. It’s also quite nice for more involved backpacking meals and trail food cooking.

Items included with the MalloMe Cookware Set

  • Aluminum 1 Liter Pot
  • Pot Lid
  • Aluminum Frying Pan
  • 2 BPA Free Bowls
  • Folding Stainless Steel Spork
  • BPA Free Soup Spoon / Ladel
  • Wooden Spoon Spatula
  • Cleaning Sponge
  • Folding Stainless Steel Fork (free bonus)
  • Nylon Travel Bag Drawstring Pouch

Other Trail & Backpacking Cooking Items Seen

Toaks 450ml titanium cup
Toaks 750ml titanium cook pot 
Sea To Summit Alpha Light Long Spoon
Budget Canister Stove