Hiking & Backpacking with Military Surplus Camping Gear in the Adirondacks Eastern High Peaks Region
For this 2 day, 1 night adventure, I’ll be testing out and demonstrating my milsurp backpacking load-out, along with MRE (Meals Ready to Eat) food to keep me fueled up while I search for the remnants of a cold war era B-47 bomber that crashed on Wright Peak during the night of January 2nd, 1962.
My “big 3” for this backpacking trip are a medium sized ALICE pack, USGI Modular Sleeping bag with USGI Term-A-Rest sleeping Pad, and a USGI Poncho for shelter / rain gear. I scored each of these items for around $30. A full gear list can be found at the end of this post.
No permit is required to camp in the Adirondacks, but there are rules and regulations regarding backcountry camping. You can find more information here.
Come along for 5 days of Hiking, Camping & Backpacking in Southern Utah’s Zion National Park.
For this adventure, I’ll be spending 5 days exploring Zion National Park with my friends Derrick, Dave, and Tayson from Outdoor Vitals and Randy from Outdoor.Detour on Instagram. We’ll be doing 3 different backpacking / camping trips: A backcountry West Rim Backpacking Trip, Exploring & hiking the Frontcountry Zion National Park area while car camping in Springdale, Utah, and a backcountry camping trip on a top-down Narrows hike, ending at the Zion visitor’s center back in Springdale.
Note: All backcountry camping in Zion requires a permit. For details, visit the Zion NPS website.
Objective #1: Backcountry camp on Zion Canyon’s West Rim
Trailhead Used: West Rim Trailhead, Near Lava Point Overlook.
GPS coordinates N37° 22.899′ W113° 01.370′
West Rim Itinerary, Day 1
Park at the West Rim Trailhead parking area on the dirt service road near Lava Point. This is a gravel lot with parking for at least a half dozen cars or so. It’s about a 40 minute drive from Springdale, Utah. The latter part of the drive is on a dirt road, but non 4wd vehicles should be fine with a bit of care.
Head south on the West Rim Trail
Setup Camp at West Rim campsite #4 GPS N37° 17.144′ W112° 59.030′
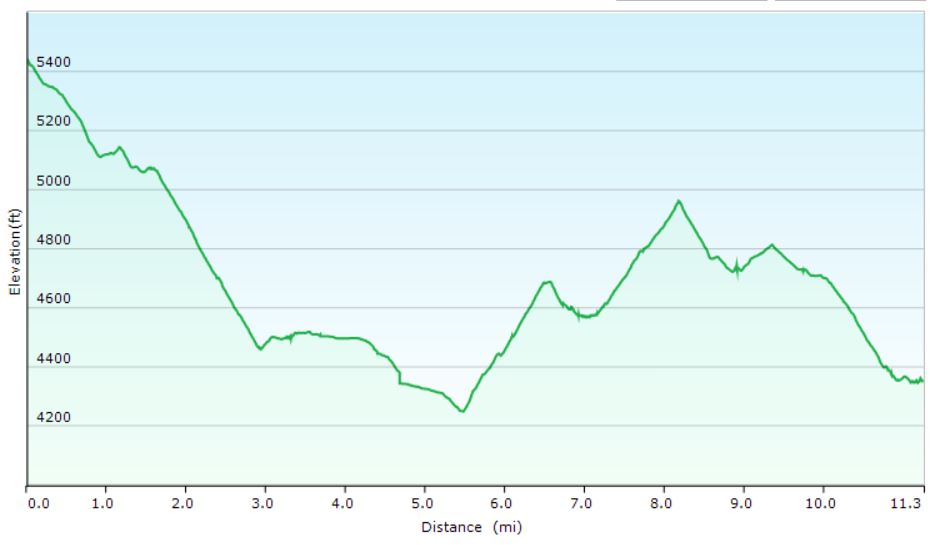
West Rim Hike Elevation Profile- Sintax77
West Rim Hike-In Mileage: 8 miles West Rim Hike-In Gross Elevation Gain: 1,073
West Rim Itinerary, Day 2
Backtrack north on the West Rim Trail
Return to the trailhead parking lot near Lava Point.
Have some tacos at the Whiptail Grill, right next door to the campground. I got the “Fire Asada” tacos and they were great. If you like spicy food that’s actually spicy, I would highly recommend the Whiptail Grill. Heck, even if you don’t like spicy stuff – they have milder options, plus a fun & unique casual atmosphere as well. Oh, and the view is amazing too 🙂
Objective #2: Explore Zion National Park’s Frontcountry & Springdale, Utah.
Take the free Zion shuttle, or a short walk north to the Zion National Park visitor center / entrance.
Take the Zion NP bus from the visitor center to Big Bend.
From the Big Bend bus stop, take the trail south along the Virgin River to Weeping Rock.
Road hike a bit along the Mount Carmel Highway to soak in the sights.
Hop another free Zion bus back towards the Springdale Visitor Center.
Explore Springdale, eat some ice cream at the Zion Candy Company on Zion Park Blvd.
Objective #3: Hike and Backcountry Camp the Narrows, from the Top Down.
Trailhead Used: Chamberlain’s Ranch Trailhead (aka Zion Narrows Upper Trailhead), Duck Creek Village, UT
GPS Coordinates N37° 23.121′ W112° 50.339′ Note: This was an end-to-end hike that required us to park a second vehicle at the Zion visitor center in Springdale to use as a shuttle back to the starting point. The drive from the visitor center back to the Chamberlain’s Ranch Trailhead is around 80 minutes.
Zion NP – The Narrows, Top-down Hike Itinerary, Day 1
Park at the Narrows Upper Trailhead in Duck Creek, UT.
Head southwest on the trail, which is actually dirt road, closed off to vehicles, for the first 3 miles.
Continue to follow the trail along the Virgin River, through the Narrows.
This trail is very easy to follow, as it is literally the river. A majority of the time will be spent walking in the river bed in ankle deep to knee deep water depending on conditions, depending on current water-flow conditions.
Note for reference: The ccf reading during our trip was roughly 40 CCF. Anything under 50 ccf is considered to be relatively ideal. Above 100 cfs, conditions can be difficult and hazardous. At 130 ccf, top-down narrows hikes will be closed. At 150 ccf, bottom up Narrows hikes will be closed. During a flash flood, flows can exceed 1000 cfs.
Setup camp at the Narrows campsite #12. N37° 19.982′ W112° 57.373′
Zion NP – The Narrows, Top-down Hike Itinerary, Day 2
Break camp and continue south along the Virgin River.
Exit the trail and catch the free Zion bus at the Temple of Sinawava shuttle stop.
Return to the Zion NP Springdale Visitor Center
Drive back to retrieve starting vehicle (~80 minute drive)
Join me for 3 days of Hiking, Hammock Camping & Backpacking along the Appalachian Trail in North Carolina’s Nantahala National Forest.
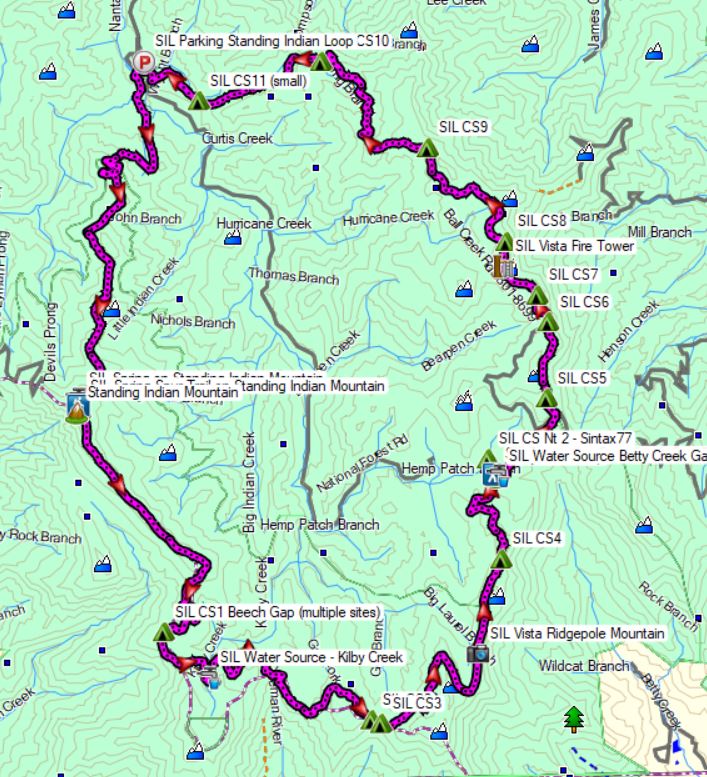
For this backpacking trip, I’ll be doing a 3 day, 2 night hammock camping trip on the Standing Indian Loop in North Carolina’s Nanatahala National Forest. The Standing Indian Loop is a 24 mile loop with a total elevation gain of 4,672′. The loop is made using a portion of the white blazed Appalachian Trail along with the blue blazed Lower Ridge Trail and Long Branch Trail. Campsites and water sources are plentiful on this loop, although many of the campsites are not located along water, so plan accordingly. In my case, I chose two campsites that did have nearby water sources, for added convenience.
Route Overview – Standing Indian Loop – Sintax77
GPS Data for this trip and many others can be found on my Trip Data Page. Includes full track data for each day, and way-points for campsites used / observed along the loop.
Gear Lists for this trip and others can be found on my Gear Lists Page or by using the links below.
Trailhead Used: Standing Indian Campground Information Area – N35° 04.570′ W83° 31.707′ Just up the road from the Standing Indian Campground (car and RV camping), the information area permits overnight parking with spaces available for a half dozen cars or so.
Trails Used, Day 1
Park at the Backcountry Information area, just up the road from Standing Indian Campground. Overnight parking for a half dozen cars or so available at the Info Center, just up the road from the main Standing Indian Campground area. (Overnight parking not available at the actual car camping area)
Lower Ridge Trail (located just behind the bulletin board)
Arrive at intersection with the Appalachian Trail, near summit of Standing Indian Mountain
Setup camp This area has multiple campsite options spread of a large area. A blue blazed spur trail departs the AT near the intersection and leads to a piped spring water source.
Day 1 Elevation Profile – Standing Indian Loop – Sintax77
Day 1 Mileage: 5 miles Day 1 Gross Elevation Gain: 2,113′
Trails Used, Day 2
Head out Northbound on the Appalachian Trail (away from the spring spur trail) Note: In the video I state on this morning that I was on the Appalachian Trail South. That was incorrect. The AT winds around a bit in this area, and while my compass heading was indeed south, I was actually on the Appalachian Trail North. Arrive at Betty Creek Gap and the depart the Appalachian Trail North on the
Blue Blazed Spur trail to legal camping. While you will notice established campsites directly on the AT at Betty Creek Gap, a sign indicates that camping is currently not permitted in the area for restoration purposes. Setup camp along the water at the end of the blue blazed Betty Creek Gap Spur Trail. There are several campsites of varying size near the water. If they are taken – cross the water and continue about 30 yards to the gravel forest road. After crossing the road, you will immediately see more camping options in the woods beyond the road.
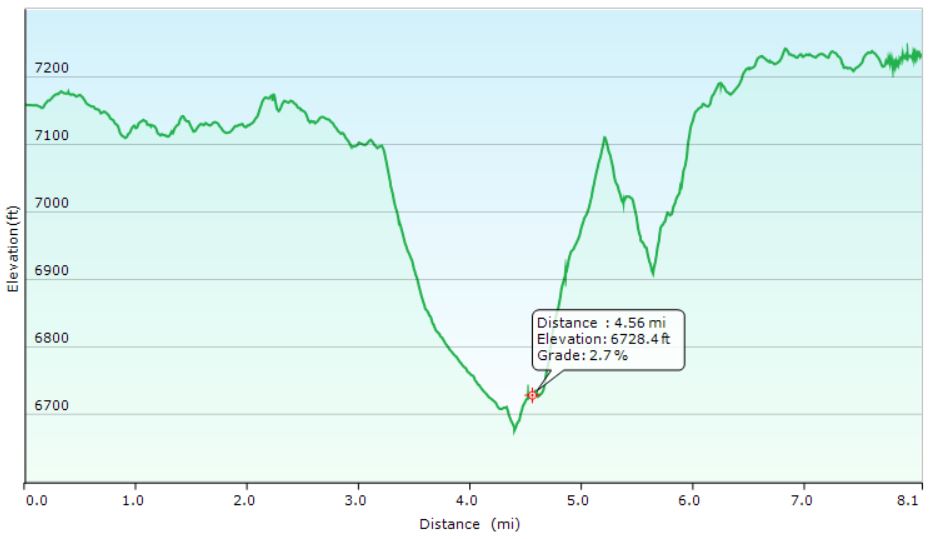
Day 2 Elevation Profile – Standing Indian Loop – Sintax77
Day 2 Mileage: 11 miles Day 2 Gross Elevation Gain: 1,332′
Trails used. Day 3
Backtrack on the blue blazed Betty Creek Spur Trail to the AT intersection from yesterday.
Continue on the Appalachian Trail North.
Catch some views at the Albert Mountain Firetower (located directly on the AT)
Continue on the Appalachian Trail North
At the intersection, take the Long Branch Trail downhill, away from the AT.
Arrive back at the Backcountry Information Area.
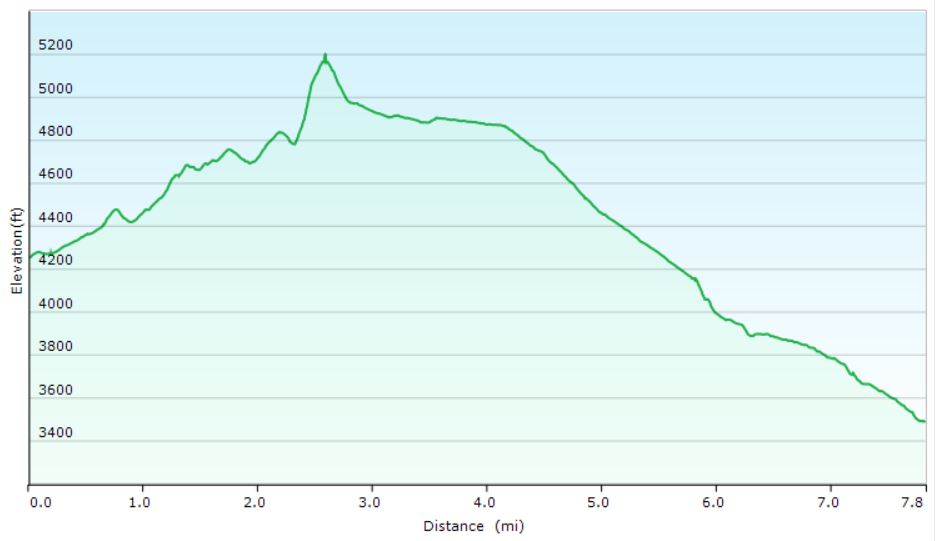
Day 3 Elevation Profile – Standing Indian Loop – Sintax77
Day 3 Mileage: 8 miles Day 3 Gross Elevation Gain: 1,227′
Discussing my Favorite (and cheapest) Ultralight Camping Lantern Option.
Just a quick backpacking tips video to highlight a technique that I actually showed briefly in a video years back. I recently read a list of “camping hacks” that mentioned a DIY way to turn your camping headlamp into a lantern. They used a 1 gallon water jug to diffuse the light. Clever, and it probably works well, but it reminded me of my preferred method – simply using a headlamp and a balloon to create a lantern effect.
Surprisingly, I haven’t really seen or heard of hikers doing this very often. Perhaps it’s because it’s just too obvious, but I figured it was worth sharing.