
3 Days of Winter Hammock Camping and Backpacking in the Roaring Plains Wilderness during Snow and Freezing Rain.
FTC Disclosure: This post contains affiliate links, which means I may receive a commission for purchases made through some of my links.
For this late winter backpacking trip, I decided to head back down to West Virginia’s Monongahela National forest to do some ridge hiking and cold weather hammock camping. Due to temperatures forecasted from the low 20’s to the low 40’s, I needed to pack in some heavier warm clothing layers for this trip, along with some camp tools, so I used my larger winter backpack. For sleep and shelter, I used my go-to ultralight hammock and tarp set-up with winter grade down quilts (full gear list below). As it turns out, I probably should have used that extra pack space for a larger tarp too, but live and learn I guess…
This trip video was sponsored by Magic Spoon. You can try their variety pack and get $5 off by using this link and the code Sintax77.
The 6,792 acre Roaring Plains West Wilderness is a remote federal wilderness area located about 3 miles south of the more popular Dolly Sods Wilderness Area. It boasts a healthy network of trails, which are unmarked and often, grown in and hard to follow. Official paper maps are hard to come by, and by some accounts, not very up to date. Based on my personal experience, I would highly recommend using a GPS with appropriate data while hiking here. You can also find good trail info and map print-outs at MidAtlanticHikes.com and HikingUpward.com. I also recorded my personal GPS data for this trip, which can be found here.
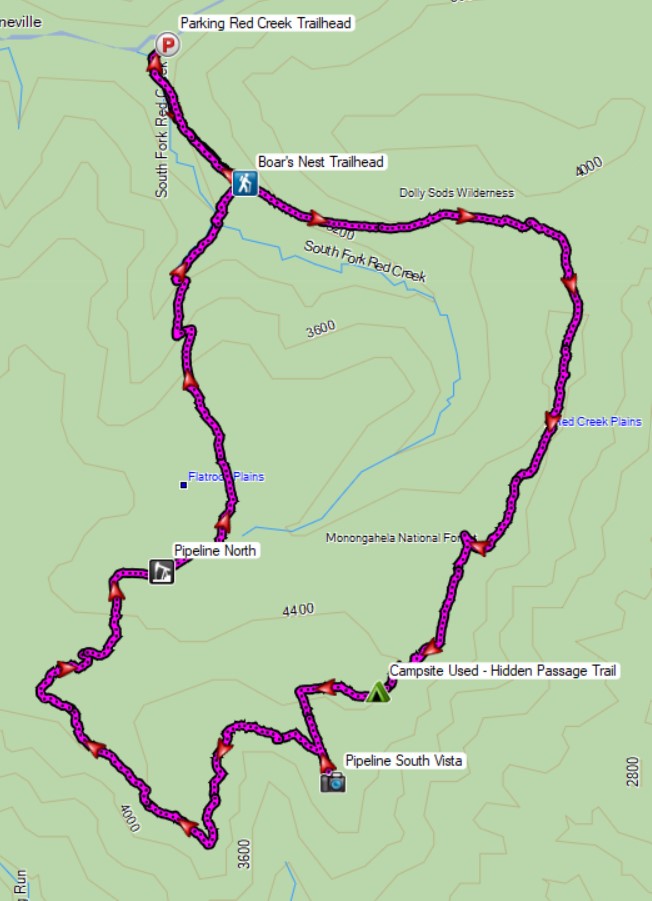
Route Overview – Roaring Plains Backpacking Loop – Sintax77
Trailhead Used: Red Creek Trailhead
37 Public Road, Davis, WV 26260
38°58’20.7″N 79°23’53.8″W
This is an easily accessible lot with room for a half dozen cars or so. I used it to begin a road hike up Forest Road 19 because the gates were closed for the winter. During other seasons, you can drive up the gravel FR19 and park right at the beginning of the South Prong and Boar’s Nest trails.
Trails Used Day 1
- Road hike FR19 for 3 miles
- Left (west) on Hidden Passage Trail
- Camp along Hidden Passage Trail on the Ridge.
- This is a medium sized campsite with room for a hammock or tent on the ridge, as well as some spots with more protection tucked in the pines. There is an established fire pit, but no water. The nearest water is at the campsite 1.5 miles earlier, near the intersection of Hidden Passage trail and South Prong trail.
Day 1 Mileage: 6.9 miles
Day 1 Gross Elevation Gain: 2,255′
Day 1 Gross Descent: 439′
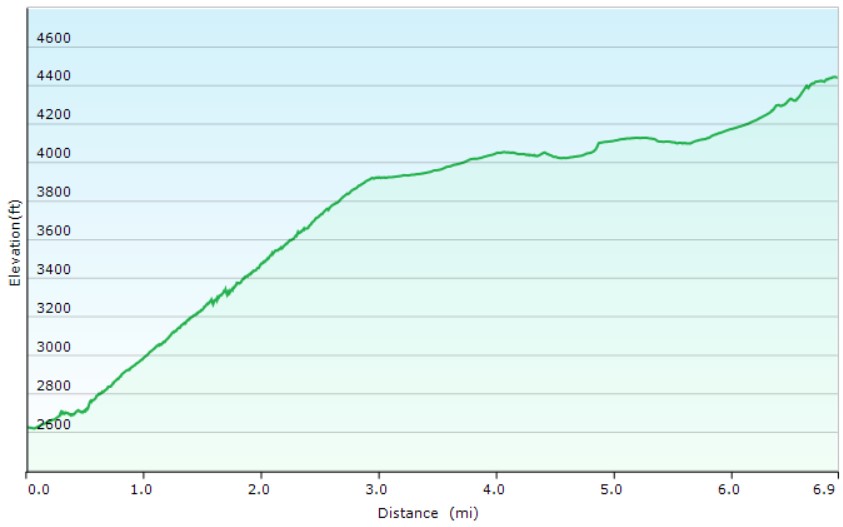
Day 1 Elevation Profile – Roaring Plains Backpacking Loop – Sintax77
Day 2
- Remain at camp on the ridge
Trails Used Day 3 (no trails done on day 2)
- Continue on Hidden Passage Trail
- Left (south) on the Pipeline
- Right (west) on the Canyon Rim Trail
- This trail is very hard to spot, but when I went, there was a white thermometer nailed to a tree along the pipeline right by the grown-in entrance to the trail.
- Right (North) on Tee Pee Trail
- Trail begins next to an established ridge side campsite. When I was there, there was a small piece of orange tape and a very small pile of rocks marking the entrance, both of which could easily not be there in the future. I would highly suggest using GPS data for finding and following the short, but overgrown Tee Pee Trail.
- Right (east) on Roaring Plains Trail
- Right (southeast) on pipeline for a short bit
- Left (northeast) on dirt road for a little bit
- Left (north) on Boar’s Nest Trail
- Return to FR19 for 1 Mile
- Return to Parking
Day 2 Mileage: 11 miles
Day 2 Gross Elevation Gain: 1,571′
Day 2 Gross Descent: 3,391′
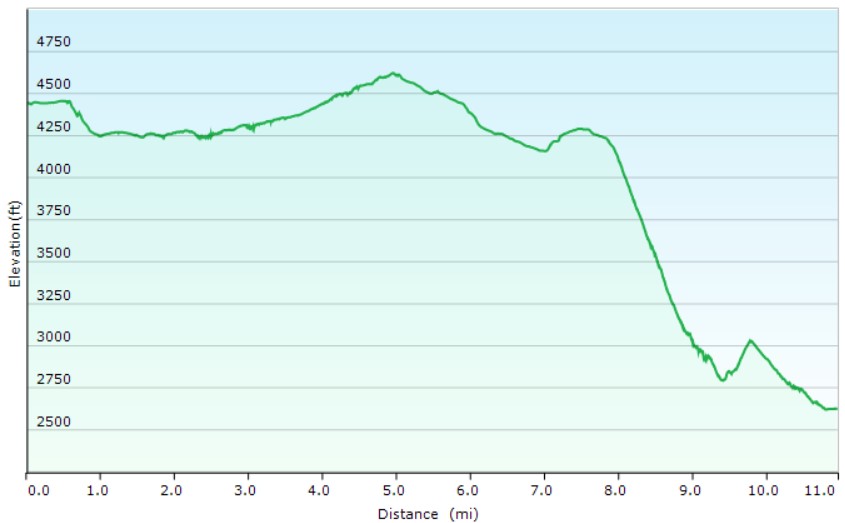
Day 2 Elevation Profile – Roaring Plains Backpacking Loop – Sintax77
Grand Total Mileage: 17.9 miles
Grand Total Elevation Gain: 5,646′
Notable Backpacking Gear
- Fjallraven Kajka 75 Backpack
- Dutchware Gear Half-Wit Hammock with Beetle Buckle Straps
- Hammock Gear Burrow 20 Top Quilt
- Hammock Gear Phoenix 30 Underquilt
- Hammock Gear Dyneema Hex Tarp
- Byer of Maine Trilite Camp Stool
- Optimus Polaris Optifuel Stove (running on white gas)
- Zippo Classic Lighter
- Light My Fire Mini Fire Steel Striker
- Toaks 750ml Titanium Pot
- Sea to Summit Long Handled Spork
- Potable Aqua Water Purification Tablets with PA Plus
- RevolutionRace Men’s Norwand Pants
- Outdoor Vitals Adventure Jacket, Loftek version
- Nitecore NU25 Headlamp
- Silky F-180 Folding Saw
- Benchmade Bugout EDC Folding Knife
- Casio ProTrek F-30 Smartwatch
- Sangean DT-400W Weather Band Radio
- Spot X Satellite Messenger

Camera Gear used for this episode