Hiking Big South Fork Pt 1 – Tennessee Hammock Camping & Backpacking Trip

Join me for 3 days of hiking & hammock camping on a backpacking trip in Tennessee’s Big South Fork Nat’l Rec Area.

For this backpacking adventure, I’ll be breaking the hiking trip into two parts. Part 1 is mostly in the woods and at camp and is more of a hanging in the woods, conversational type video. In BSF Part 2 we will traverse into the higher regions of Big South Fork, hitting the ridges for views of the Cumberland Plateau’s sandstone bluffs and Big South Fork River.

GPS Data for this trip is available on the Trip Data Page or by clicking this link for direct download: Big South Fork Backpacking Loop 2017 GPS Data – Sintax77

Trailhead and Parking Location

Bandy Creek Visitor Center, 151 Stable Rd, Oneida, TN 37841
N36° 29.275′ W84° 41.837′

Topics discussed and things that happen in this episode

  • Feeling like a lost idiot on the trail.
  • Camp setup priorities when arriving at camp.
  • Setup / breaking camp in the rain.
  • Continuous Ridgeline usage and setup for quick and easy tarp deployment.
  • Low carb backpacking food options for carb conscious or ketogenic diets.
  • Starting a campfire in the rain.
  • Campfire cooking some meat on a stick.

Trails Used Day 1

  • Parked at the Bandy Creek Visitor Center
  • Started on the Oscar Blevins Farm Loop Trail (located in the corner of the parking lot on the opposite side of the road from the visitor’s center)
  • At the Intersection, turn right onto the Collier Ridge Bike Loop. This is where I mistakenly continued straight, which would have taken in a circle. Luckily, I realized earlier enough to turn around and head back to the intersection.
  • Turn left (north) on the gravel road. From looking at the map, I could have avoided the short road hike by hopping on the access Jack Ridge trail, which appears to be found either right near where I popped out on the road, or a little ways down that road to the right.  Continuing on the road seems to have saved me a decent amount of hiking though, which made up for my wrong turn earlier,
  • Turn right (east) onto the next, smaller gravel road.
  • Arrived at the sign for Jack Ridge Loop Trail and headed left onto
  • Black House Branch Trail
  • Right on Laurel Fork Creek Trail
  • Setup camp by the waterfall pool along the Laurel Fork Creek Trail.

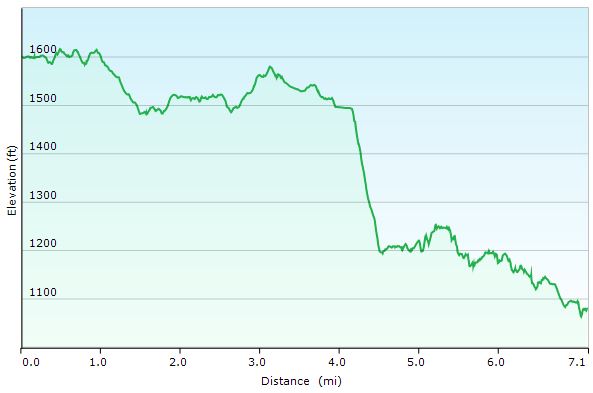
Big South Fork Day 1 Elevation Profile – Sintax77

Day 1 Total Mileage: 7.25 miles
Day 1 Gross Elevation Gain: 860 feet
Day 1 Gross Elevation Loss: 1,256 feet

The gear list used for this trip along with discussion on each item can be found in my accompanying 2017 Ultralight Backpacking Gear List Blog Post and Video.

12,000 Lumen Flashlight?! – Olight X7R Marauder Review

A detailed review of the Olight X7R Marauder 12,000 Lumen Flashlight

In this gear video I go over my personal experiences with using the Olight X7R Marauder Rechargeble flashlight system, specs, features, and operational procedures to access the Olight X7R’s light modes and lockout function.

X7R Marauder Specs & Features, as per the Manufacturer

  • Beam Distance: 1247 feet /  380 meters
  • Performance (in lumens): 12,000
  • Charge type: USB Type C
  • Compatible Batteries: Customized Li-Ion Battery
  • Light Intensity (in candela): 36,100
  • Lens / Reflector Type: Smooth
  • Reflector (central area and flood area)
  • Mode Operation: Side Switch
  • Form Factor /Size Factor: Large size (Deodorant Spray / Coke Can)

Lighting Levels

  • Turbo S: 12,000 lumens, 12 mins / step-down to 7000 lumens, 110 mins
  • Turbo: 7,000 lumens, 3 mins / step-down to 7000 lumens 120 mins
  • High 3,000 lumens , 2 hr 10 mins
  • Medium 1,000 lumens , 6 hrs
  • Low 500 lumens , 14 hrs
  • Nightlight: 10 lumens, 30 days
  • Strobe: Yes
  • SOS / BEACON: No

Technical Characteristics

  • Waterproof: IPX7
  • Weight: 665 grams / 23.46 ounces
  • Length: 129mm / 5.08 inches
  • Head Diameter: 68mm / 2.67 inches
  • Body Diameter: 52mm / 2.05 inches
  • LED: 3 x Cree XHP70 CW
  • Use: Search & rescue, self-defense, car, camping, fishing, household, general use, climbing, cave exploration, outdoor activities

Package Contents

  • Flashlight Olight X7R x 1
  • Holster x 1
  • Lanyard x 1
  • C5V 4A Type-C Wall Power Adapter x 1
  • 0.8-meter USB / Type-C Cable x 1
  • Instruction manual x 1

Olight’s Official Website for more info.

Other Items Seen in the Video

Thorfire PF04 Penlight Flashlight
Olight H2R Nova Headlamp / Flashlight
Olight HS2 Running Headlamp

A Portable Mosquito Bug Zapper for Backpacking? – Enkeeo Mosquito Zapper Lantern Review

A Review of the Enkeeo Mosquito Zapper Lantern for Backpacking and Camping.

For 15% off click here and enter the code UIF34MML at checkout (offer good until 10/18/17)

The Enkeeo Enkeeo 2-in-1 Mosquito Killer Camping Lantern Tent Light is both a standard backpacking / camping lantern with 3 levels of light output, as well as a mosquito zapper.  The bug zapper function uses several blue looking LEDs operating at 360nm to 400nm that specifically targets the attraction of mosquitoes (while mosquitoes are said to not be attracted to UV light (which has wavelengths of around 10nm – 400nm), these LEDs seem to emit light just at the edge between visible light and non visible UV Light. Once attracted, a wire mesh grid operating at 1000 volts completes task.

Features and Specs, As Per the Manufacturer

  • High Light (100% lighting) ≥ 180 Lumen, ≥ 6h
  • Normal Light (50% lighting) ≥ 90 Lumen, ≥ 12h
  • Low Light (20% lighting) ≥ 30 Lumen, ≥ 20h
  • Weight: 200g/ 0.44lb
  • Dimension: φ3.46″ x 5.08″
  • Zapper-Only Mode ≥ 15h
  • Voltage Input: 5.0±0.2V
  • Current Input: 900mA±100mA
  • Full Charge Time: 2~4 hours (depends on the input current)
  • Battery: 3.7V/ 2000mAh
  • Zapper Voltage: 1000V

Items Included in the Box

  • 1 x Mosquito Zapper Lantern
  • 1 x USB Cable
  • 1 x User Manual
  • 1 x Thank You Card

Costa Rica Pt 4 – Breakfast on a Farm, Country Drive, & Return to San Jose Airport

Part 4 of our Costa Rica Travel Series. 

For the final day of our Costa Rican adventure, we check out of our rainforest resort (Lapaz Waterfall Gardens), have an amazing breakfast at a local farm (Corso Lecheria), take a drive through the beautiful countryside, and return to the San Jose Airport for our flight home.

Where we stayed: Peace Lodge and La Paz Waterfall Gardens

Top Rated Costa Rica Travel Guide on Amazon

Top Rated Waterproof Travel Map of Costa Rica

An Eco Friendly Camping Stove? – Enki Wild+ Stove Review

A Review and Demonstration of the Enki Wild Portable Pyrolytic Stove System.

Specs and Features, as per the Manufacturer

Enki Wild Stove:

  • Battery Life 50 Hours ( With One Charge )
  • Weight 1.3 Kg (2.8 lbs)
  • Power 2.5 KW
  • Chamber Max capacity ~ 0.2 Kg (.44 lbs)
  • Power Supply 5V USB
  • Fuel Any Biomass

Enki Wild+ Stove

  • Weight 2.7 Kg (5.95 lbs)
  • Power 8.5 KW
  • Power Supply 5V USB
  • Fuel Any Biomass
  • Chamber Max capacity ~ 0.9 Kg (2 lbs)

Overview (Quoted from the Manufacturer)

  • “Enki Stove Wild is a outdoor camp stove, designed to run with every kind of biomass, avoiding the transportation of gas tanks or charcoal, everywhere and without smoke.”
  • “Enki Stove Wild is a portable pyrolytic stove. Our stove transforms the fuel into gas instead of burning it directly. Through this particular process, you can have a clean, stable and smokeless flame.”

Enki’s Official Website for the Wild stove line

Other gear seen in the video: Aukey 30,000mAh USB Power Bank, AllPowers 21W Solar ChargerSOG FastHawk Tactical Tomahawk


Costa Rica Pt 3 – Pacific Coast Beach Day & Casados at a Soda

Part 3 of our Costa Rica Travel Series. 

For our third day in Costa Rica we decided to leave rainforest the interior of the country and head west on a road trip towards the Pacific Coast.  This not only rewarded us with a fun beach day, but it also gave us a great excuse to get out of the resort area and explore the rest what the country had to offer.  After an early rise, we grabbed some sunscreen, a few towels, and hopped in our rental car for a cruise through Central America.

Itinerary for Day 3

  • Wake up around five thirty and admire the bright, tropical skies.
  • Skip breakfast, in the sake of time, and hope to find something along the way.
  • Hop in the rental car and head southwest from our hotel at the La Paz Waterfall Resort (about an hour north of San Jose)
  • Attempt to find a ATM / cash machine at a couple gas station and stores.
  • Fail at finding an ATM while slowly realizing that they aren’t very widespread in Costa Rica compared to Europe or the U.S.  Oops.
  • Grab some oatmeal cookies and yogurt for breakfast at a small grocery store. They weren’t aware of any ATM’s nearby, but they did take Visa.
  • After some bumpy surface roads (quite barron of ATM’s I might add) we suddenly found ourselves at the entrance to the toll highway. To our relief and surprise, they happily took credit cards. Pretty cool, considering most tolls in the U.S. won’t even do that.  They’ll also take American, although I would recommend avoiding that. We did that once at another toll, and realized later that the conversion the clerk gave us was waaay off.  Probably an accident, but we learned our lesson a paid more attention on subsequent tolls.
  • Continue to drive through the mountains and towards the Pacific coast.  In terms of general direction, the largest town near where we were head was the popular beach town of Jaco, although our actual goal was a white sand beach called Playa Blanca, 30 minutes north of Jaco.

  • Find some glorious ATM’s at a strip mall not too far from our destination and withdrawal some Costa Rican Colones.  Finally, success for the unprepared travelers!
  • Grab some snacks and sandwiches lunch from the Supermarket at the strip mall for our upcoming beach picnic.
  • Arrive at the small parking lot at Playa Mantas This was a beautiful grey sand beach with calm waters, due to it’s cove shape.  It wasn’t, however, our ultimate destination.  By parking here, we were able to do a short walk and a slight climb over an embankment. This lead us to Playa Blanca, which is otherwise inaccessible, due to a resort blocking it from road access.  Fret not though, all Costa Rican beaches are public land, so once you’ve made it over the embankment you’re all set to relax and enjoy the Costa Rican breeze.  For detailed instructions on visiting yourself, check out this blog post that we found and used to get there ourselves.
  • Say hello to the friendly “security guard”.  We knew in advance that we would need to pay to park here, although unofficially (around $3-$5 USD from what we read). I’ve read reports that people had to pay upon arrival, but we were told that there was no payment required, but we may “tip when we left” if we desired.  Wink, wink.
  • Have an amazing Costa Rican Pacific coast beach picnic and afternoon of relaxation.
  • Tip our friendly security specialist $2,000 colones (which was around $4 USD at the time) on the way out. Seriously, though – he was quite friendly.  I don’t want to know what happens if you don’t tip him though…

  • Head back in the direction of San Jose.
  • Stop for dinner at Soda el Guacimo, outside the town of Tarcoles, on the way home. Soda’s are small, family owned restaurants with delicious traditional Costa Rican food at great prices (because this is what the locals actually eat). This particular soda was had an open air layout (as many sodas do), friendly staff, delicious food and an amazing view. Here’s their Faceook page.
  • Dine on some tasty food.  I had casado de bistek (beef) and Sara had casado con pollo (chicken). Casados are a traditional Costa Rican dish consisting of rice, black beans, plantains, salad, a tortilla, and often a protein as well.
  • Drive back home to our hotel for a nightcap of Cafe Rica (Costa Rican coffee liquor)

Where we stayed: Peace Lodge and La Paz Waterfall Gardens

Top Rated Costa Rica Travel Guide on Amazon

Top Rated Waterproof Travel Map of Costa Rica

Stay tuned for Part 4 where we visit a local farm for a hearty Costa Rican breakfast and return to San Jose for a reluctant flight home.