A review of the MSR Flex Skillet camping fry pan, as well as a discussion of other camp skillet options for comparison.
The MSR Flex Skillet is a light weight, easy to pack frying pan aimed at weight conscious hikers who wish to do some some more advanced cooking on their backpacking and camping trips. And by “more advanced”, I mean more than just boiling water for a dehydrated meal. Because some of us, myself included, think anything more than boiling water on a 3 oz stove is going full back country gourmet.
If that sounds like you, then you may be interested in the MSR Flex Skillet, or maybe even it’s little brother, the MSR Quick Skillet, which we’ll also touch on a bit in the video. If your a more hearty backpacker looking to do some heavier duty cooking on perhaps a canoe or car camping trip, then the MSR Flex Skillet may be a tad more minimalist than you need. Towards the second have of the video I’ll also go over some heavier duty alternatives (as the MSR Alpine Fry Pan), as well as some more inexpensive options, depending on your expected usage and needs.
Below are the Flex Skillet’s Specs and details, according to the manufacturer. *As discussed in the video, I did find some discrepancies with MSR’s official specs.
Manufacturer’s Specs and Details
Weight 7 oz / 199 g
Height 2.5 in / 6.35 cm
Diameter 9 in / 22.86 cm
Easy Clean-Up: Scratch-resistant, hard-anodized nonstick aluminum.
Versatile: Nests with MSR® Flex 3 and MSR® Flex 4 Cook Systems and Pot Sets.
Includes: 1 Talon™ pot handle.
Join Mike and I for for a “Train to Trail” Winter Camping, Backpacking, Campfire cooking, & Hiking adventure in Harpers Ferry, WV.
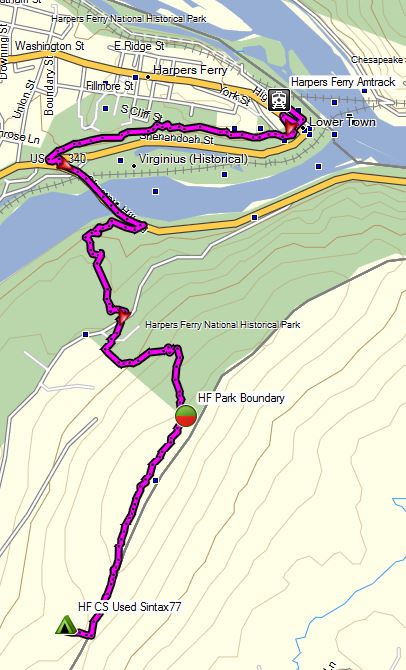
We tried something a bit different for fun on this winter camping trip – instead of driving, we decided to take an Amtrak train directly to the trailhead. This is actually and idea that Mike and I had been kicking around for a while now. The first challenge was finding an interesting trail that was actually close to a train station, without a need for secondary transportation or an excessive walk. After a bit of research, we determined that Harpers Ferry, West Virginia fit the criteria quite well. The train practically dumps you right on the Appalachian Trail. We booked our tickets, packed our bags, and hit the trail, er, I mean, train station.
With 4 days and 3 nights off, we had a decent amount of time to play with on this trip. The challenge however, would be that we needed to plan an out and back trip that didn’t put us to far away from the train station on our final morning, rather than doing a loop like we normally prefer. Fortunately, we quickly realized that to be a perfect excuse to do a a laid back, more camping, less hiking kind of trip.
The plan? After leaving the train behind,we would hop on the Appalachian trail for a few miles – just long enough to feel the seclusion of the deep winter woods, and set up a base camp for the duration of the trip. Other than that, we really had no hard set plans, other than relaxing, having a good time, and brushing up on our campfire cooking skills. Did we succeed? I guess you’ll just have to watch and see…
Trails Used
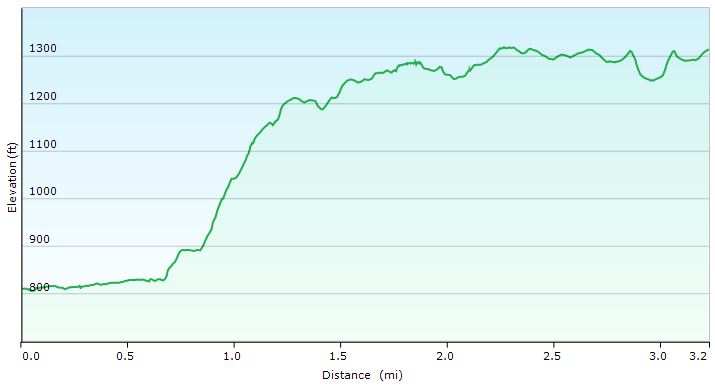
Leave Harpers Ferry via Appalachian Trail South After around 3 miles, bushwack West to unofficial campsite.
Return via Appalachian Trail North
A Review of the Pocket Chainsaw – a Packable, Lightweight Backpacking or Camping Saw
As discussed in the video this is not a brand specific review, but rather an overview and discussion on pocket chainsaws in general. There are many different manufacturers out there making camping and survival saws with this general design, so if this design meets your usage needs, it’s probably best to just find the best value one available to you. As you can see, it’s basically just a length of chainsaw blade with nylon handles attached at each end.Of course there are minor variables to keep in mind, such as specially designed blades, alternative handle shapes, and chain lengths.
The specific model seen in the video is a Chainmate 24-Inch Survival Pocket Chain Saw With Pouch (model CM-24SSP), but any brand with similar features should be just fine. It’s pretty much your standard pocket chainsaw in terms of quality and features, so I think it makes for an decent baseline for reviewing this type of saw.
Join Sara and I as we take our puppy, Denali, on his very first backpacking trip.
For this adventure, we were joined by a brand new hiking partner – our 7 month old puppy dog, Denali. While Denali is no stranger to walking and hiking (we’ve tried to make that a regular part of his life since we adopted him at 2 months old), this will be his very first foray into an overnight backpacking trip. Or to put it in terms from his perspective; his first time sleeping out in the woods, seemingly in the middle of nowhere, nary a shred of carpet or plush dog bed to be seen.
Denali’s First Backpacking Trip Route Overview – Sintax77
Our chosen destination was a 14 mile loop comprised of several trails in Virginia’s Shenandoah National Park. I was made aware of this trip via the super-helpful website called “Hiking Upward”. For those of you hikers along the mid-Atlantic who haven’t heard of this site before, I highly suggest checking it out some time. Since this was a bit of a last minute trip, coupled with the fact that it was our pup’s first time backpacking, I wanted everything to go nice and smoothly, and their detailed trip reports were a welcomed asset.
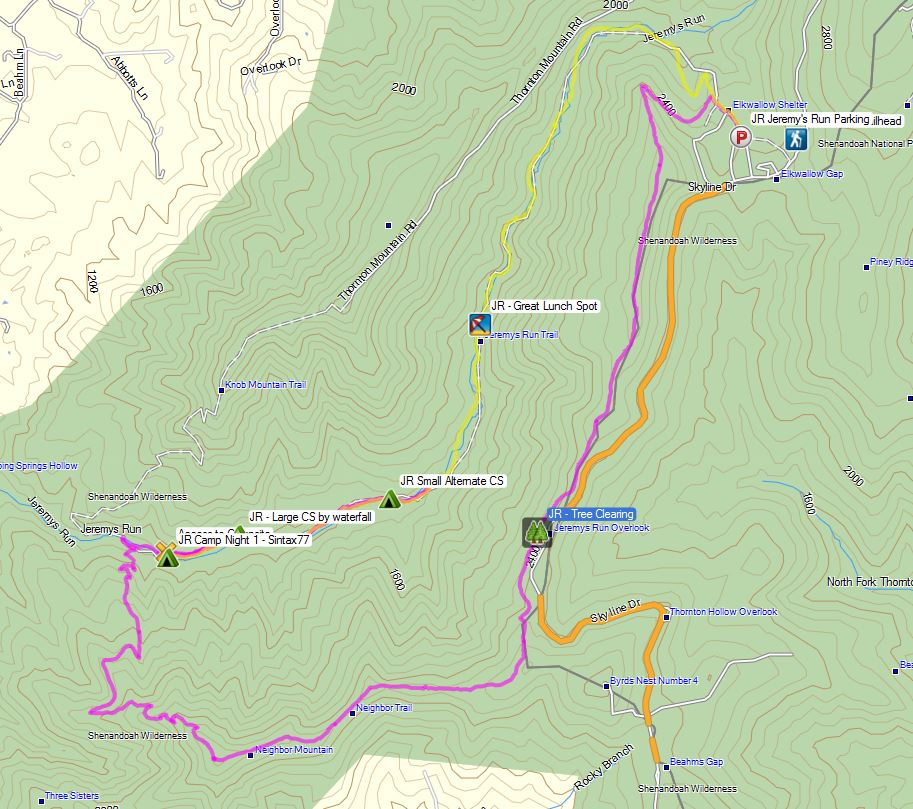
The first half of this circuit was of the higher elevation variety, consisting primarily of a ridge walk along a the Neighbor Mountain Trail, as well as a section of the Appalachian Trail. Day two would be mostly along the Jeremy’s Run Trail. As the name would suggest, the Jeremy’s run trail closely follows the contours of Jeremy’s Run, a stream that we would traverse 14 times before returning to the metallic confines of our car. Below is an overview of our route, along with trailhead parking ocation and other points of interest. For those of you interested, I recorded full GPS track data during this backpacking trip. along with campsites and other notable POI’s which can be downloaded on my Trip Data page.
Trailhead and Parking: Jeremy’s Run Trailhead N38° 44.456′ W78° 18.716′ (by Elkwallow Picnic Gound and the Wayside Store)
Trails Used Day 1 (in order)
Starting from the Jeremy’s Run Trailhead,
Take the Appalachian Trail (south)
Turn right (west) on Neighbor Mountain Trail
At intersection, turn right (east) on Jeremy’s Run Trail
Set-up camp along Jeremy’s Run at N38° 42.629′ W78° 21.913′
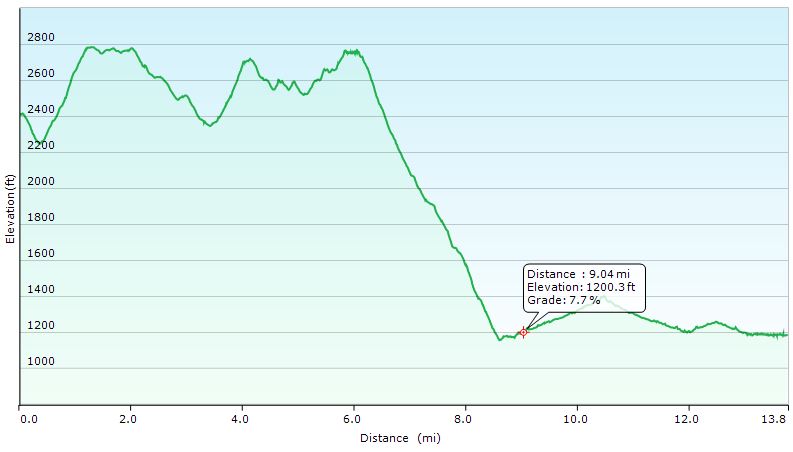
Day 1 Total Mileage: 9 miles (This is the mileage to the actual campsite. My solo mileage for the day, including scouting and backtracking, totaled 13.5 miles) Day 1 Total Elevation Gain: 1,785′
Denali’s First Backpacking Trip Day 1 – Sintax77
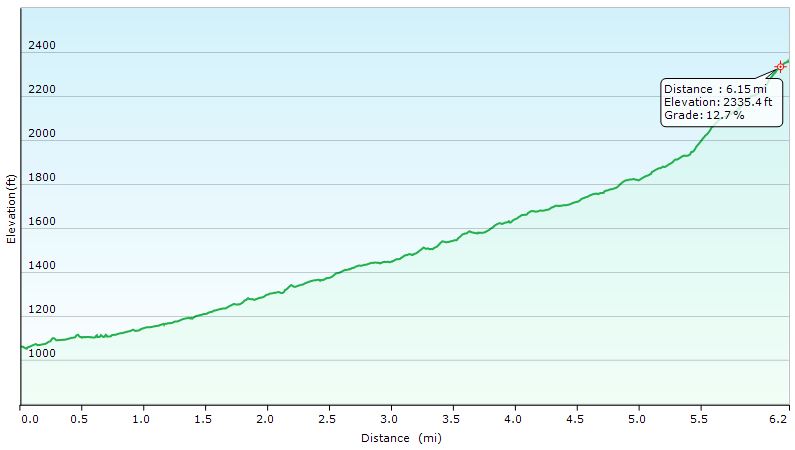
Trails Used Day 2 (in order)
Continue on Jeremy’s Run Trail
At intersection, continue north on Appalachian Trail
back to the Jeremy’s Run Parking Trailhead and parking area.
Day 2 Total Mileage: 6 miles Day 2 Total Elevation Gain: 1,391′
Total Mileage for Trip: 15 miles Total Elevation Gain for Trip: 3,176′
A review and my thoughts on the Fozzils flat packable bowl for ultralight backpacking & camping.
Fozzils Bowlz are a unique and lightweight backpacking and camping bowl that packs down flat, but quickly converts into and bowl and 16 oz measuring cup using four simple plastic snaps. The flat configuration also gives you the ability to use Fozzils Bowlz as minimalist plate or makeshift serving platter at camp.
In this video, I specifically review the bowl, but Fozzils also has a 3 piece set consisting of a bowl, cup, and plate bowl that function in similar fashion.
The ability to clean it while flat, combined with it’s non-stick silicone coating makes for easy cleanup in the field as well. The plastic is also BPA free.
Join the crew as we revisit the Red River Gorge for 3 days of hiking, hammock camping and backpacking in Kentucky.
The Red River Gorge a unique Geological Area within Kentucky’s Daniel Boone National Forest. This area hosts an impressive collection of natural arches (or natural bridges, as they’re often call), spread across some relatively young forest in the hills of eastern Kentucky, about 1 hour shy of Lexington. The Red River Gorge has the highest concentration of rock arches east of the Rock Mountains (over 100). This makes Red River Gorge a visually impressive hiking area, as well as one of the world’s top rock climbing destinations.
This is actually my second exploration of the RRG. My first backpacking experience here was a solo hammock camping trip in October, a couple of years back. On that trip, I covered more ground and saw a nice sampling of the area’s more well known arches, but helpful feedback from some of my viewers who were more versed in the area alerted me to the fact that I had missed out on some pretty cool unofficial trails and spots. In fact, I had walk right by a few of them. I made a mental note to get back down to the Red River Gorge some day and give it another go.
Finally, the opportunity arose for that trip, and to sweeten the deal, I managed to round up an outdoor posse for this renewed exploration the RRG. This time around, I’ll be joined by my wife as well as my friend Mike and his wife Danielle. And while my last trip was a 2 day, higher mileage affair, we decided to extend this backpacking trip to 3 days and to drop the mileage back a bit to create a trip with more emphasis on time to relax at camp. Actually, our night two camp site was one of the very areas that several viewers had suggested I check out on my next visit – an unofficial (but completely legal) camping spot called Hanson’s Point. The actual point has an amazing view out into the gorge, and the nearby camping opportunities are large, flat, and nicely shaded.
The route we chose for this trip starts out at the same trailhead as my previous Red River Gorge trip video, but shortly after starting, it deviates onto an unofficial spur trail for another viewer suggested feature, called Indian Staircase. This area offers an impressive view into the gorge as well. It also boasts a pretty cool feature that gives it it’s name – a series of foot and hand holds carved into it’s sandstone face to assist with traversing it’s steep grade. As the name would suggest, legend says that local Native Americans originally created these features, but who actually created these carvings remains a mystery and the source of some debate. Regardless of the true history, it’s a very cool place and well worth checking out. While I didn’t personally find the route overly steep or exposed, it should be pointed out that this trail could be a bit nerve wracking for some sensitive to heights. Leaving you pack stashed at the base is certainly helpful and will save you a few ounces of sweat as well.
GPS track data along for each day’s hiking route, along with waypoints for campsites and other points of interest, can be downloaded on my Trip Data page.
Trails Used, in order (with Trail Numbers):
Park at Bison Way Trailhead 37.83685,-83.609546
Day 1
Bison Way Trail 210
Unofficial Spur Trail to Indian Staircase at GPS coordinates
Sheltowee Trace Trail 100
Cross State Road 715 and River via suspension bridge
Rough Trail 221
Set up camp along Chimney Top Creek
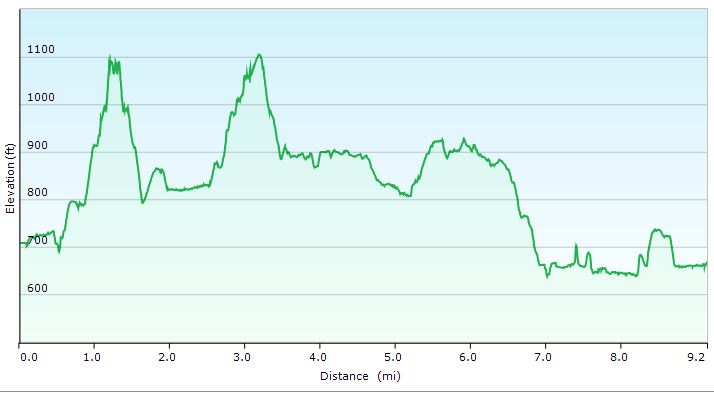
Stats for Day: 9.2 Miles ; 1,413 feet of elevation gain
Day 2
Rough Trail 221
Hanson’s Point Spur Trail (unoffcial)
Set up near near Hanson’s Point
Stats for Day 2: 3.2 Miles ; 731 feet of elevation gain
Day 3
Hanson’s Point Spur Trail (unoffcial)
Rough Trail 221 (short segment towards Sheltowee Tr )
Sheltowee Trace Trail 100
Road Hike along Red River back towards Bison Way parking area.
Stats for Day 3: 5.9 Miles ; 377 feet of elevation gain.
Grand Totals for Trip: 18.3 Miles ; 2,521 feet of elevation gain


 backpack
 stove
stove with fancy lightshow
 .
.

 / Plate
 tanto blade pocket knife