Winter Hammock Camping in a Snow Storm – Sub Zero Backpacking in the White Mountains

Join me for 3 days of Winter Camping, Hammock setup, Snowshoeing, Camp Stove testing with multiple Fuel types for Snow Melting, Cold Weather Clothing tips & more on this mega episode.

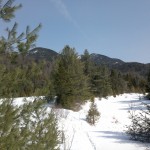
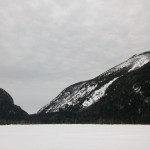
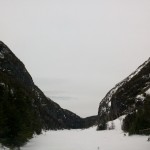
For this solo winter backpacking and snow camping adventure, I’ll be heading into the deep snow of the Sandwich Range Wilderness in New Hampshire’s White Mountains.  If you’re serious about geeking out on the finer details of camping in deep snow in temperatures below zero F, this video is for you.  We’ll be spending a lot of time at camp experimenting, demonstrating and discussing a lot of winter camping topics in detail, including –

  • Snowshoe types and usage
  • Campsite selection
  • Using the Outdoor Vitals Mummy Pod System
  • Snow melting for drinking water
  • Extensive testing using the Optimus Polaris Optifuel stove comparing several camping fuel types for winter cooking & snow melting – LPG canister fuel, white gas, and diesel fuel. Liquid fuel stove priming, inverted canister mode, fuel efficiency, etc.
  • Winter hammock camping tarp setup in the snow.
  • Trekking poles for winter hiking
  • Staying warm on winter camping trips – clothing layer management and strategy, sleeping bag choices, hot water bottle for supplemental warmth.
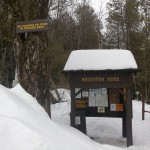
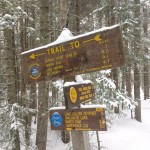
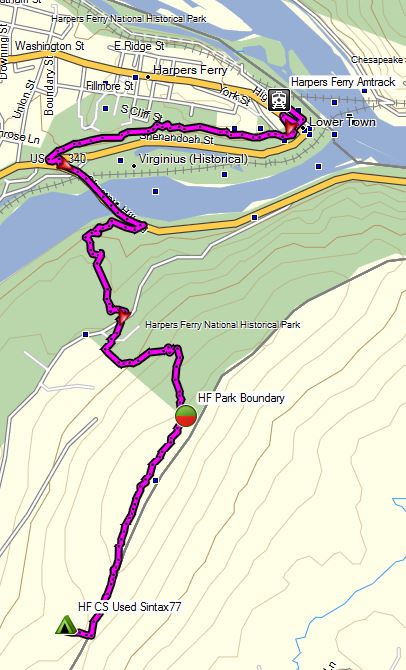
Trailhead Parking

  • Oliverian Brook Trailhead, Kancamangus Hwy, Albany, NH
  • N43° 59.747′ W71° 21.032′

GPS Data for this trip is available on the Trip Data Page, or by using this link for direct download: Sandwich Range Winter 2018 Hammock Camping Trip GPS Data – Sintax77

Stats & Trails Used, Day One

  • Park at Oliverian Brook Trailhead.
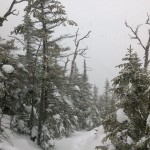
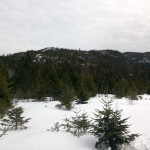
  • Head south on the Oliverian Brook Trail
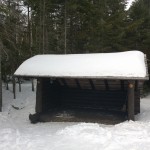
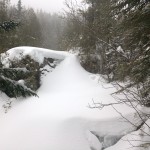
  • Setup camp in the flat area near the junction with Passaconaway Cutoff Trial

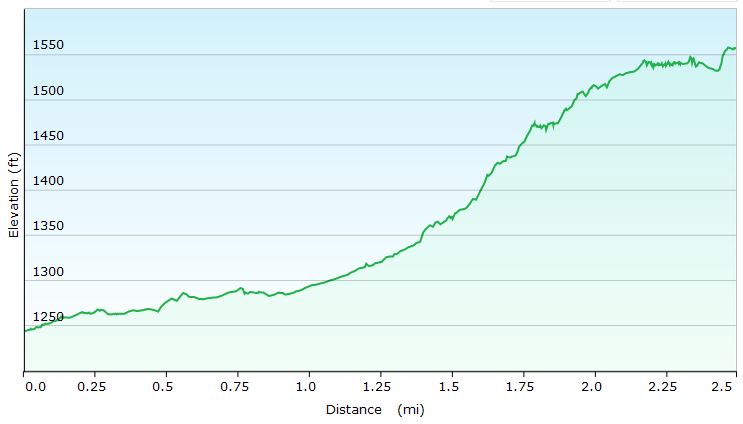
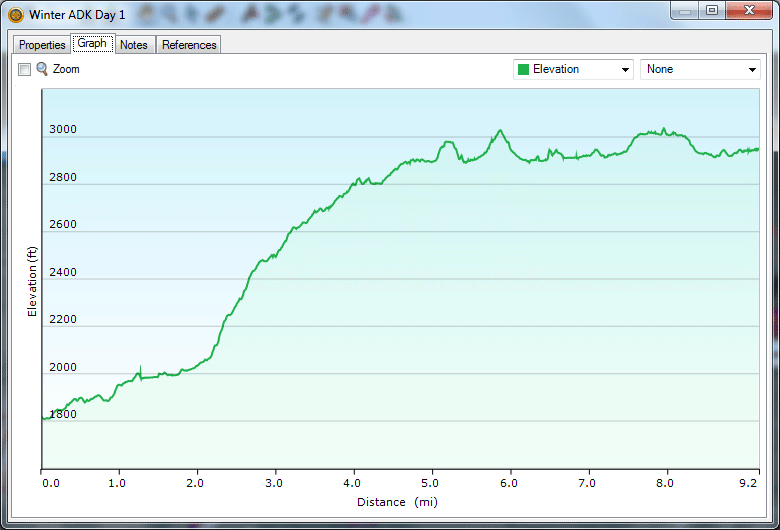
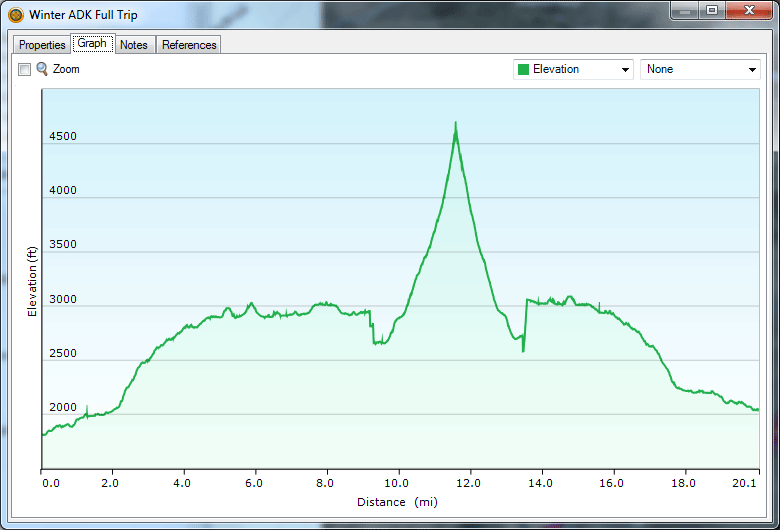
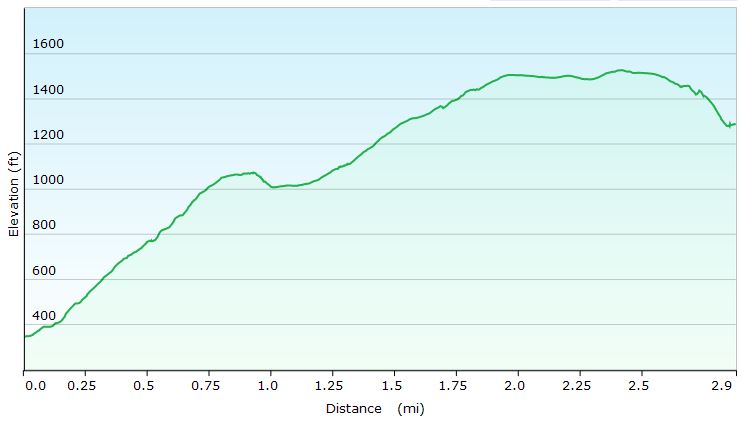
Day 1 Elevation Profile – Sandwich Range Winter – Sintax77

Day 1 Mileage: 2.5 miles
Day 1 Elevation Gain: 502′

Stats & Trails Used, Day Two

  • Continue south on the Oliverian Brook Trail.
  • At the junction, take the Passaconaway Cutoff, towards the summit of Mt Passaconaway.
  • Head back down the same way, to return to base camp.

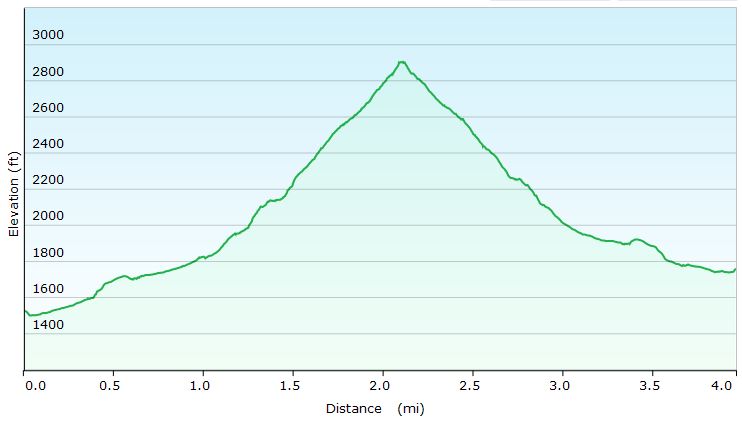
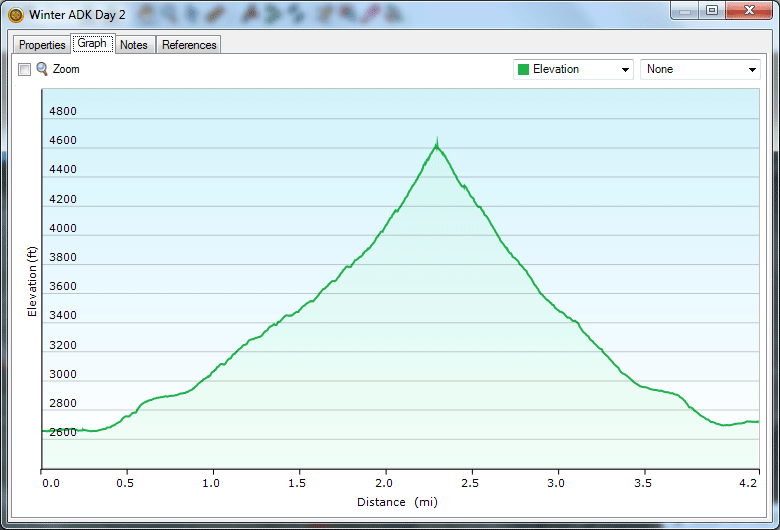
Day 2 Elevation Profile – Sandwich Range Winter – Sintax77

Day 2 Mileage: 4 miles
Day 2 Elevation Gain: 1,473′

Notable Gear Used / Seen on this Backpacking Trip:

Pack
Backpack – EMS Longtrail 70 (2011 model)

Location
GPS Unit – Garmin Oregon 650

Cooking & Eating Utensils
Multi-fuel Camping Stove – Optimus Polaris Optifuel
Cook Pot, 1L – MallowMe
Cup – Vargo 450ml Titanium Cup
Spork, Long – Sea to Summit Alpha

Hammock System
Hammock Body – Dutchware NylonD 11′ Netless
Hammock Suspension – Dutchware Polyester Tree Straps with Titanium Cinch Buckles

Sleep System
Sleeping Bag / Hammock Quilt – Outdoor Vitals Mummy 15° Down Model

Shelter
Tarp – Hammock Gear Cuben Hex Tarp
Ground Cloth – Tyvek, long

Water Storage
Water Bottle – 40 Below 1 Liter Bottle w/ Bottle Boot

Light Sources
Flashlight / Clip-on Headlamp – Olight S1 Mini Baton

First Aid & SOS Messenger
Spot Messenger

Traction & Traversal
MSR Denali Ascent Snowshoes *No longer in production, I got them on Ebay. A modern equivalent would be something like the MSR Evo Ascent Snowshoe.
Kahtoola Micro Spikes *I didn’t end up using them, as I had my snowshoes on most of the time, but I always throw these in the pack for snow trips to deal with icy terrain.
Trekking Poles – CNOC Outdoors Carbon Fiber Vertex Trekking Poles

Snow Camping Tools
Camp Brand Snow Shovel *I’m not sure my model is in production anymore.  The closest current version seems to be the Camp Rocket Shovel.

Clothing
Mid Layer – Surplus Military Fleece
US Army Gen III Extreme Cold Weather Trousers
Gloves – Sealskinz Water Proof Ultra Grip Gloves
EMS Over-mittens w/ US Army Wool Gloves
Boots, Winter High Top Garmont GTX
Face mask / neck gaiter by Seirus Innovation

Winter Hammock Camping on the Appalachian Trail – Port Clinton, PA

Come along for 2 days of Winter Hammock Camping, Backpacking, & Camp cooking as we hike a portion of the Appalachian Trail near Port Clinton, PA. 

For this winter camping adventure, I’ll be taking advantage of a couple of free days by heading up to Port Clinton, Pennsylvania for a spur of the moment solo backpacking trip.  Along the way, we’ll see some sections of the Appalachian Trail that PA has to offer, go over my winter backpacking gear, setup a winter hammock camping rig, build a campfire, and do a a decent amount of camp cooking on my trusty, old-school canister stove.

Trailhead Parking

  • Appalachian Trailhead, Port Clinton, Pennsylvania, Rt 61
    Note: Parking at the actual trailhead is no longer allowed / possible.  I parked in the town of Port Clinton near the Fire Station and proceeded down Penn St to the dead end.  This small detour allows you to hike directly under the highway bridge and link up with the Appalachian Trail on the other side.

GPS Data for this trip is available on the Trip Data Page, or by using this link for direct download: Port Clinton Winter Hammock Camping 2018 GPS Data – Sintax77

This was a relatively simple ‘in and out’ hike with a total one way distance of just under 3 miles and an elevation gain of 1,284′.

Port Clinton Winter Hammock Camping Elevation Profile for Hike In – Sintax77

Notable Gear Used / Seen on this Backpacking Trip:
For a more detailed account, check out my full Winter Ultralight Backpacking Gear List Blog Post / Video.

Pack
Backpack – ULA Ohm 2.0
Pack Cover – Dutchware Argon

Location
GPS Unit – Garmin Oregon 650

Cooking & Eating Utensils

Spork, Plastic – Sea to Summit
Stove – MSR Rapidfire

Hammock System
Hammock Body – Dutchware Chameleon
Hammock Sock – Dutchware Winter Vented Sock with Optional Zipper
Hammock Suspension – Dutchware Polyester Tree Straps with Titanium Cinch Buckles

Sleep System
Under Quilt – Hammock Gear Incubator 20
Top Quilt – HG Burrow 20

Shelter
Tarp – Hammock Gear Cuben Hex Tarp
Ground Cloth – Tyvek, long
Tent spike – Titanium

Water Treatment & Storage
Water Filter – Sawyer Micro (came with my Sawyer S3 system)
Dirty Water Bag – CNOC Outdoors 2L Vecto Water Container Bag
Water Bottle – 40 Below 1 Liter Bottle w/ Bottle Boot

Light Sources
Flashlight / Clip-on Headlamp – Olight S1 Mini Baton

First Aid & SOS Messenger
Spot Messenger

Clothing
Mid Layer – Surplus Military Fleece
US Army Gen III Extreme Cold Weather Trousers
Gloves – Sealskinz Water Proof Ultra Grip Gloves
Boots, Winter High Top Garmont GTX
Face mask / neck gaiter by Seirus Innovation

Chair
Alite Mayfly Chair 

Deep Winter Hammock Camping System

A look at my Cold Weather Winter Hammock Camping Setup for Backpacking Trips that have Potential for Sub-Zero Temperatures.

Deep Winter Hammock Camping System Components

Total Hammock System Weight: 1.75 lbs (793 grams)
Total Insulation System Weight: 3.25 lbs (1.47 kilos)
Shelter System Weight (tarp plus all lines & adjustment hardware): 8.75 oz

Deep Winter Hammock Camping System Grand Total Weight: 5.55 lbs (2.52 kilos)


Other Gear Seen

Train to Trail – Harpers Ferry Winter Backpacking Trip – Hiking in Virginia

Join Mike and I for for a “Train to Trail” Winter Camping, Backpacking, Campfire cooking, & Hiking adventure in Harpers Ferry, WV.

We tried something a bit different for fun on this winter camping trip – instead of driving, we decided to take an Amtrak train directly to the trailhead.  This is actually and idea that Mike and I had been kicking around for a while now.  The first challenge was finding an interesting trail that was actually close to a train station, without a need for secondary transportation or an excessive walk.  After a bit of research, we determined that Harpers Ferry, West Virginia fit the criteria quite well.  The train practically dumps you right on the Appalachian Trail.  We booked our tickets, packed our bags, and hit the trail, er, I mean, train station.

With 4 days and 3 nights off, we had a decent amount of time to play with on this trip.  The challenge however, would be that we needed to plan an out and back trip that didn’t put us to far away from the train station on our final morning, rather than doing a loop like we normally prefer.  Fortunately, we quickly realized that to be a perfect excuse to do a a laid back, more camping, less hiking  kind of trip.

The plan?  After leaving the train behind,we would hop on the Appalachian trail for a few miles – just long enough to feel the seclusion of the deep winter woods, and set up a base camp for the duration of the trip.  Other than that, we really had no hard set plans, other than relaxing, having a good time, and brushing up on our campfire cooking skills.  Did we succeed?  I guess you’ll just have to watch and see…

Trailhead:  Harpers Ferry Amtrak Train Station

GPS Data for this trip available on the Trip Data Page.

Harpers Ferry Winter Route Overview Sintax77

Harpers Ferry Winter Route Overview Sintax77

Trails Used
Leave Harpers Ferry via Appalachian Trail South
After around 3 miles, bushwack West to unofficial campsite.
Return via Appalachian Trail North

Notable Gear Used on this Trip by Mike
Gregory Palisade 80 backpack
EMS Down Parka
EMS Ascent Hard shell Jacket
MSR Whisperlite International stove
Dream Hammock Thunderbird Hammock
Hammock Gear Burrow 20 top quilt
Hammock Gear Incubator 20 underquilt
Hammock Gear Cuben Hex Tarp with doors
Portable bluetooth speaker with fancy lightshow
GSI cookset

Notable Gear Used on this Trip by Sintax77
EMS Longtrail 70 backpack (2011 version)
Montbell UL down parka
EMS Ascent Hardshell
MSR Rapidfire stove (see my video on it here) *no longer manufactured – modern equivalent is the MSR Windpro.
MSR Flex Skillet
Dollar Store tongs and turner for cooking
Sea to Summit Alpha Cutlery Set
Fozzils Bowl / Plate
Dream Hammock Darien Hammock
Hammock Gear Burrow 0 top quilt
Hammock Gear Incubator 0 underquilt
Hammock Gear Cuben Hex Tarp (standard model, no doors)
Pocket Chainsaw
SOG Flash I tanto blade pocket knife

Winter Hammock Camping in the Adirondacks

Three days of Winter Hammock Camping and backpacking in the Adirondacks High Peaks Region.

GPS track data for the full trip was recorded using my new Garmin 650 gps unit, and can be found on the Trip Data page, for download in GPX format. (All photos in this post are geo-tagged as well)

Parking Location: At the end of Upperworks Road 44°05’20.6″N 74°03’22.7″W

The Upperworks Trailhead Parking Area

The Upperworks Trailhead Parking Area


Trails Used in Order:

Day 1 (Hike In)

  • Begin at Upperworks Trailhead
  • Calamity Brook Trail
  • Cross frozen Lake Colden towards the Ranger Station
  • (If lake is not frozen, the Algonquin Peak Trail can be taken instead)
  • Take Avalanche Pass Trail to visit Avalanche Lake
  • Reverse course on Avalanche Pass Trail back towards Lake Colden
  • Camp near intersection of Ranger Station Spur Trail and Cold Brook Trail
    Campsite coordinates N44 07.494 W73 58.912
    Mileage Total: 9.16 miles

    Elevation-Winter-ADK-Day-1

    Elevation Profile for Day 1

Day 2 (Above Treeline Excursion)

  • Avalanche Pass Trail
  • Algonquin Trail via Lake Colden
  • Enjoy the views (or summit fog) and head back down towards campsite
    Mileage Total: 4.16 miles
Elevation Profile for Day 2

Elevation Profile for Day 2 (Ouch)

Day 3 (Hike Out)

  • Head out across frozen Lake Colden back towards car
  • Calamity Brook Trail
  • End back at Upperworks Trailhead
    Mileage Total: 6.38 miles

    Elevation Profile for Day 3

    Elevation Profile for Day 3

    Returning to the Upperworks Parking area, via Calamity Brook Trail

    Returning to the Upperworks Parking area, via Calamity Brook Trail

    Mileage & Elevation Profile for Full 3 Day Trip

    Mileage & Elevation Profile for Full 3 Day Trip

For a look at my winter gear, check out my Winter Gear List Video. Notable changes: Hammock instead of Kelty Salida 2 Tent, MSR Rapidfire Stove instead of generic upright canister stove, and I picked up another pair of fleece lined hiking pants as an alternative to the backup sleeping pants I used to pack.

 All video content, photos and music are original works by myself, Sintax77.