Vermont Long Trail Section Hike – Camping at Stark’s Nest

Section Hiking on the Vermont Long Trail – Appalachian Gap to Lincoln Gap.

For this backpacking trip, my dog Denali and I will be doing a 2 day, 1 night camping trip in Northern Vermont.  The specific area we’ll be camping near is called the Stark’s Nest, which lies on a section of the Long Trail between Appalachian Gap and Lincoln Gap, about 40 minutes west of Montpelier, VT.

As seen in the video, use this link to get your free camping pillow from Outdoor Vitals for a limited time.

The Vermont Long Trail is a 273 mile, long distance hiking trail that runs the entire length of Vermont, from the sothern border with Massachusetts all the way up to the Canadian border to the north.  The first hundred miles or so in the south coincide with the Appalachian Trail as well.  I’ll be backpacking and camping just a short taste of the Long Trail – a roughly 8 mile section in the North Country of Vermont on a combination of private land and Vermont’s Green Mountain National Forest.

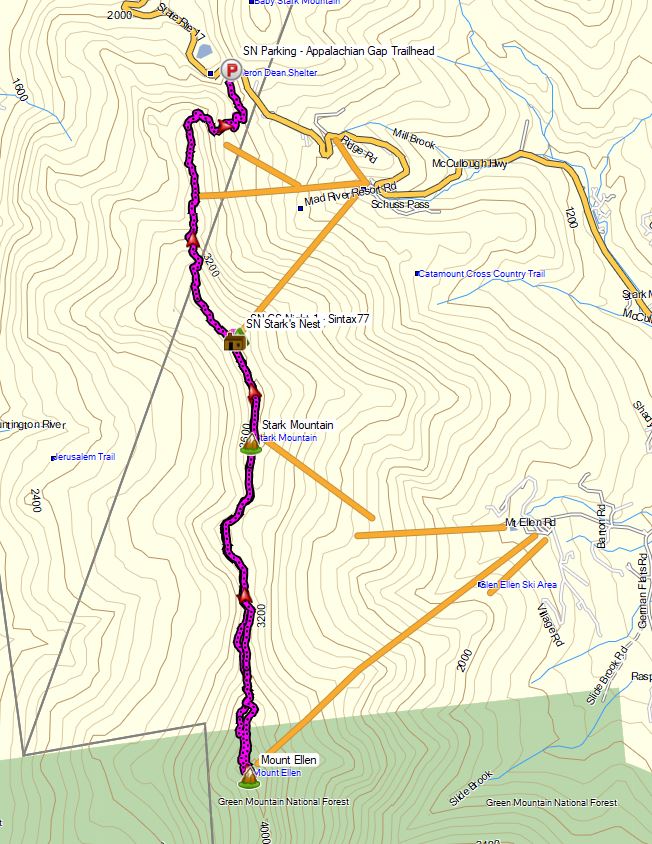
Starks Nest Hike – Route Overview – Sintax77

GPS Data for this trip and many others can be found on my Trip Data Page.  Includes full track data for each day, and way-points for campsites used, water sources, etc.

Trailhead Used: Appalachian Gap Trailhead Parking Area  – 44°12’39.7″N 72°55’53.5″W
This is a large, paved parking area just off of Vermont SR17.  The Vermont Long Trail South (which I took in the video) can be found on the opposite side of the road.  The Long Trail North (which I didn’t take) is located right in the corner of the lot, by the guard rail.

Trails Used & Itinerary, Day 1

  • Park at the Appalachian Gap Trailhead Parking Area
  • Take the Vermont Long Trail South (located on the other side of the road. Look for the white blaze
  • Arrive at Stark’s Nest warming hut and grab some water from the rain barrel.
    Note: Stark’s Nest is a ski warming hut. During the winter, this is a hut used to take a break and warm up in between ski runs at Mad River Glen Ski Resort. While this is private property, it is kept open and available to hikers year round as a place to take a break, or camp for the night while hiking the Vermont Long Trail. There is a rain barrel out front that makes for an excellent water source. It’s essentially a fully enclosed cabin that makes it a great option for riding out storms and bad weather. There is a composting outhouse nearby, across from the cabin in the woods opposite the cabin.
  • Set up camp a little ways down the ski slope near Stark’s Nest

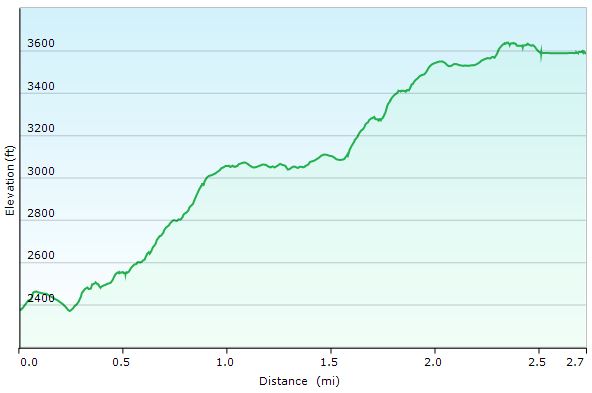
Starks Nest Hike Day 1 – Elevation Profile

Day 1 Mileage: 3 miles
Day 1 Gross Elevation Gain: 1,501′
Day 1 Gross Elevation Descent: 283′

Trails Used, Itinerary Day 2

  • Leave camp and head back uphill to the Stark’s Nest.
  • Continue south on the Vermont Long Trail.
  • End at the ski lift area on Mt Ellen for a break and some views.
  • Backtrack out the way you came, via the Long Trail North.
  • Arrive back at the Stark’s Nest.
  • Breakdown camp, pack up and replenish water supplies.
  • Backtrack out on the Vermont Long Trail North.
  • Arrive back at the Appalachian Gap Trailhead Parking area.

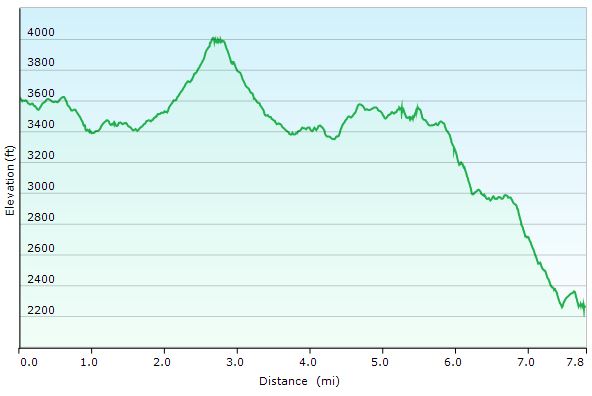
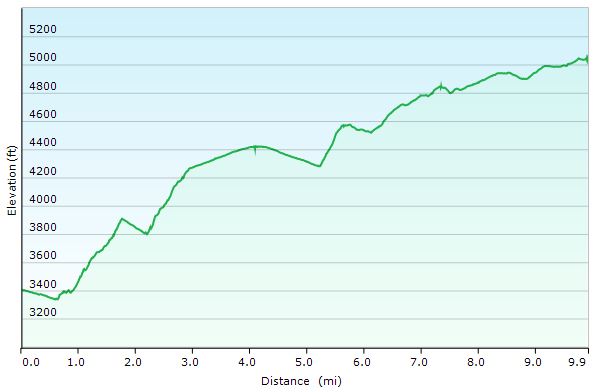
Starks Nest Hike Day 2 – Elevation Profile

Day 2 Mileage: 8 miles (5 round-trip for Mt Ellen, 3 for the hike out from Stark’s Nest)
Day 2 Gross Elevation Gain: 1,566′
Day 2 Gross Elevation Descent: 2,919′

Trip Totals
Grand Total Mileage: 11 Miles
Grand Total Elevation Gain: 3,067′

Notable Backpacking Gear Seen & Used

Notable Dog Backpacking Gear Seen & Used

Budget Backpacking Trip – Camping in Tuscarora State Forest

Budget Backpacking & Camping with my Dog in Tuscarora SF.

For this hiking and camping trip, we’ll be using the exact gear seen on my previous ‘Budget Backpacking Gear List – Go Camping for Under $250‘ video.

Check out my live gear list on LighterPack.com for weights, prices, descriptions and product links.

Other Backpacking Topics Discussed on this Episode

  • Camping & backpacking with your dog.
  • Keto backpacking food options (hiking on a ketogenic diet – low carb, high fat)

Trailhead Parking
Hemlocks Natural Area Parking Lot, Tuscarora State Forest
40°15’18.7″N 77°38’02.8″W

Trails Used

  • Patterson Run Trail
  • Rim Trail
  • Hemlock Trail
  • Bushwack to legal campsite outside Hemlocks Natural Area

Denali’s Dog Backpacking Gear

Simplified Budget Backpacking Gear List:

Backpack

Shelter

Sleep System

Storage

  • Bear Bag Line (25′ guyline leftover from tarp setup, and small carabiner)
  • Bear Bag – 13 gal trash bag
  • Zip-lock Bag – Sandwich
  • Zip-lock Bag – Gallon

Cooking & Eating

Water Treatment & Storage

Tools

First Aid

  • First Aid Kit
    (Adhesive bandages, 1 gauze bandage, superglue, neosporin in straw tube, tealight wax candle, 6 doses benedryl, 10 doses ibuprofen, spare water bottle cap)
  • Sunscreen – 30 SPF 10ml bottle https://dutchwaregear.com/product/eye-dropper-bottles/
  • Fire Starter, DIY (dryer lint and wax, or cotton balls with vasoline)
  • Bug Spray – 100% Deet Mini Bottle 

Clothing (Packed, not worn. For spare, sleeping, rain)

  • Frogg Toggs Ultralight Rain Jacket 
  • Underwear – Synthetic (1 Pair)
  • Shorts
  • Shirt, Long Sleeve -Lt Wgt
  • Shirt, short sleeve
  • Hat, Beanie – Lt Wgt Fleece
  • Wool Socks – Lt Wgt (1 pair)

Lighting

Toiletries

  • Toilet Paper
  • Toiletry Kit
  • Wet Wipes
  • Hand Sanitizer

Additional Budget Backpacking Gear Options Discussed 

Approximate Costs for Each System

  • Tarp Camping version $248
  • Kelty tent version $317
  • Hammock Version $352
Clothing Worn (not included in cost)

Our Dog’s New Custom Sleeping Bag …from the Netherlands!

A first look at our Dog’s new Sleeping Bag.

Custom made by viewer Pim in the Netherlands.  He’s just getting started, but you can check out his website JustHanging.eu for custom backpacking and hammock camping gear.  Thanks, Pim!

Denali and I are excited to try his new doggie sleeping bag out on future hammock and tent camping trips  🙂

Here’s some more info on the bag from Pim’s website

“This bag is designed for dogs whom love to travel with there owners,
it is light weight, easy to pack and wil fit in a doggy backpack so he can
carry his own sleep system!

The estimated total weight for medium sized dogs is around 500 grams
or 18 Oz using the climashield 100 gr or 3 Oz.

For Goose down fill please send us a e-mail, also if you have other wishes you can
mail us so we can see if this is possible.”

Tips & Gear for aking your Dog Backpacking Hiking & Camping

Tips, Gear & our Experiences with getting a puppy / Dog into Backpacking, Hiking & Camping.

Topics Discussed

  • Dog training for trips, daily walks as a puppy etc.
  • Age to start hiking with a dog?
  • Trip planning and strategies your dog’s first backpacking trip.
  • Differences in trail selection, water sources, etc.
  • Hiking dog food – nutrition, packing options, need for increased consumption.
  • Usage of dog backpacks for hiking.
  • Sleeping arrangements, leashes and leads for around camp and on the trail.
  • Some discussion on each of our dog’s camping trips so far.
  • Items that we bring for our dog camping trips (see below)

Dog Backpacking Gear / Items Seen

Hammock Camping with my Dog – Seneca Creek Hiking & Backpacking Trip

Join my dog Denali and I for some Hiking, Backpacking, and Hammock Camping in the Seneca Creek Backcountry.

For this hiking adventure, my pup and I will be visiting the Spruce Knob-Seneca Creek National Recreation area, within West Virginia’s greater Monongahela National Forest. Our route will be a “lollipop”style hike – meaning we’ll use an “out and back” section of trail from the Spruce Knob trailhead parking area to connect with a series of other trails that form a loop. After completing the loop portion of the hike, we’ll backtrack out using the same section of trail from day one.

The Spruce Knob-Seneca Creek Backcountry offers around 60 miles of trails (marked with blue blazes) with an elevation range of 3,000 to 4,800 feet above sea level. The beginning of this particular loop is actually the highest point in all of West Virginia – Spruce Knob – standing at and elevation of 4,861 feet. Below is a list of trails for each day, along with stats for elevation gain and mileage.

Trailhead Parking: Spruce Knob Parking area (right by the observation tower).

Parking Notes:  No parking fees or overnight permits are required.  There are restrooms and bear-proof trash bins available for use.

GPS Track Data for this trip can be found on my Trip Data Page.

Trails used, Day 1

  • Huckleberry Trail
  • Hornton Trail (just for a short bit)
  • Judy Springs Trail
  • Seneca Creek Trail
  • Hammock Camp along Seneca Creek.

Day 1 – Seneca Creek Loop elevation Profile – Sintax77

Day 1 Mileage: 6.5 miles
Day 1 Gross Elevation Gain:  221 feet (pretty much down hill all day)

Trails used, Day 2

  • Seneca Creek Trail
  • High Meadows Trail
  • Lumberjack Trail
  • Join back up with Huckleberry Trail
  • Arrive back at Spruce Knob Parking Lot

Day 2 – Seneca Creek Loop elevation Profile – Sintax77

Day 2 Mileage: 10 miles
Day 2 Gross Elevation Gain:  2,173 feet (pretty much up hill all day)

Notable Gear Seen in the Video

Denali’s Hammock – 2T’s Hammock Chair from Dutchware
Denali’s Dog Backpack – “One Tigris Cotton Canvas Dog Pack”
Denali’s Collapsible Dog Dish – Doggone Dish
Dutchware Chameleon Hammock
Hammock Gear Burrow 40 Top Quilt

Hammock Gear Phoenix 30 Underquilt
Hammock Gear Cuben Hex Tarp
Katadyn BeFree Water Filter
Toaks 750ml Titanium Pot
Vargo Windscreen
Esbit Solid Fuel Cubes
ULA Ohm 2.0 Backpack

Aerial Photography – DJI Mavic Pro
Primary Camera – Blackmagic Pocket Cinema Camera

Catskills Hiking & Trail Pizza – Backpacking with our Dog

Join Sara, our dog Denali, & I for some Catskills hiking, trail cooking, backpacking, and hammock camping in upstate New York.

For this backpacking trip, we’ll be hiking and camping near Slide Mountain and the East Branch Neversink River in the Catskills, complete with a visit to the summit of Table Mountain and Peekamoose Moose Mountain.  The mileage will be low, but the star of this trip isn’t the trails.  It’s the food.  Good old, classic trail cooking.

What’s on our backpacker’s menu?  Well, Sara had a craving for some trail pizza in the middle of the woods somewhere, and I was up for the challenge.  Were we successful?  You’ll just have to come along and find out.  Either way, it’s bound to be an adventure.  😉

Full GPS data for this, as well as all of my other trips, is available on the Trip Data page.

Trailhead Used:  
Denning Rd Trailhead  N41° 57.924′ W74° 27.144′


Trails Used Day 1, in Order

Pheonicia East Branch Trail
Peekamoose Table Trail
Set up camp after second bridge (the double log one) at N41° 58.474′ W74° 25.734′
Continue up Peekamoose Table Trail towards summit of
Table Mt and Peekamoose Mountain
Lunch / Snack at summit and
Return to camp on the East Branch Neversink River

Day 1 Mileage: 7.8 miles, including summit round trip (about 3 miles each way)
Day 1 Gross Elevation Gain: 2,130′

Trails Used Day 2, in Order

Peekamoose Table Trail
Pheonicia East Branch Trail
Return to vehicle at Denning Rd Trailhead

Day 2 Mileage: 1.8 miles
Day 2 Gross Elevation Gain: 
146′

Trip Total Mileage: 9.6 miles
Trip Total Elevation Gain: 2,276


Trail Pizza 
Ingredients

Boboli Pizza Crust, Individual Size – 2 Pack
Boboli Pizza Sauce Individual Pack (comes in 3 pack box)
Cabot Mozzarella Cheese, Shredded – 8 oz package (2 cups volume)
Hormel Pepperoni, pre-sliced – 6 oz package (enough for 2 pizzas, plus snacking)
Camp Cooking Gear Used for Pizza

Pair of cheap aluminum tongs (from dollar store, or whatever)
Coghlan’s Camp Grill  – rack used to hold pizza
Fozzils Bowlz (used as a plate / prepping dish / cutting board)
Sea-to-Summit Alpha Utensil Set