A Review and Demonstration of the Enki Wild Portable Pyrolytic Stove System.
Specs and Features, as per the Manufacturer
Enki Wild Stove:
Battery Life 50 Hours ( With One Charge )
Weight 1.3 Kg (2.8 lbs)
Power 2.5 KW
Chamber Max capacity ~ 0.2 Kg (.44 lbs)
Power Supply 5V USB
Fuel Any Biomass
Enki Wild+ Stove
Weight 2.7 Kg (5.95 lbs)
Power 8.5 KW
Power Supply 5V USB
Fuel Any Biomass
Chamber Max capacity ~ 0.9 Kg (2 lbs)
Overview (Quoted from the Manufacturer)
“Enki Stove Wild is a outdoor camp stove, designed to run with every kind of biomass, avoiding the transportation of gas tanks or charcoal, everywhere and without smoke.”
“Enki Stove Wild is a portable pyrolytic stove. Our stove transforms the fuel into gas instead of burning it directly. Through this particular process, you can have a clean, stable and smokeless flame.”
For this Backpacking Trip, we use a Pulk Sled to go Winter Camping in the Deep Snow of the White Mountains.
Mike and I originally planned to do a long overdue return trip to Mt Crawford for some winter backpacking and camping, but as is usually the case, the notorious weather of the White Mountains thwarted our efforts. With a higher summits forecast from the White Mountains Observatory calling for -60° wind chills due subzero temps combined with high winds and gusts upwards of 90 MPH, we opted to stick to the lower elevations instead. So we shelved our higher elevation idea to camp on Mt Crawford, and instead started scouting for a new location on the fly.
Basically, we were winging it in terms of trip planning, but fortunately I was armed with a full set of White Mountains AMC maps to keep up safely prepared on whatever trail we ended up cast upon by the winter hiking gods.
In the video we do some snow campsite selection and setup, tons of firewood collection, snow furniture building, campfire cooking, trail sledding on the rather steep Airline Trail, and overall just plain having a fun time out in the snowy woods of New Hampshire for a few days.
Downloadable GPS data for this trip and others can be found on the Trip Data Page.
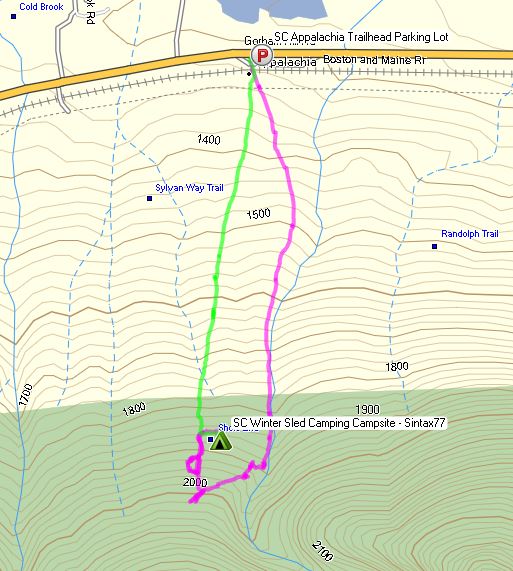
Winter Sled Camping Route Overview – Sintax77
Time of Year Mid February
Parking Location Appalachia Trailhead Parking Lot
44°22’17.6″N 71°17’19.9″W
Trailhead
Appalachia Trailhead on Presidential Hwy (Hwy 2), Randolph, NH
Trails Used, Day One
Valley Way Trail
Randolph Path
Airline Trail
Setup Camp near Airline Trail
Located in the middle of the triangle formed for the Airline, Randolph Path, and Valley Way Trails.We used this campsite with significant snow pack on the ground so leveling out a decent platform for a tent was no problem. Based on my experience in this general area on previous summer trips, I would assume it would not make a very accommodating tentsite without snow, due to the steep and rugged terrain.
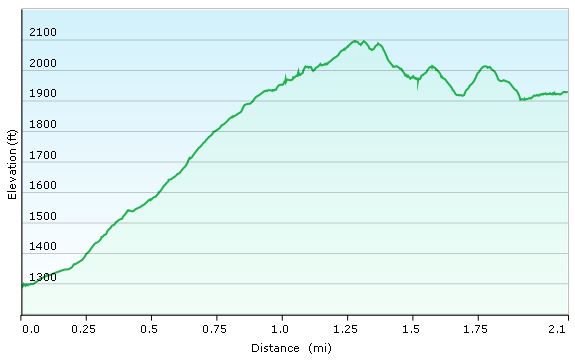
Day 1 Mileage: 2 miles Day 1 Elevation Gain: 1,122′
Winter Sled Camping Day 1 Elevation Profile – Sintax77
Trails Used, Day Two
Airline Trail
Return to vehicle at Appalachia Trailhead Parking Lot
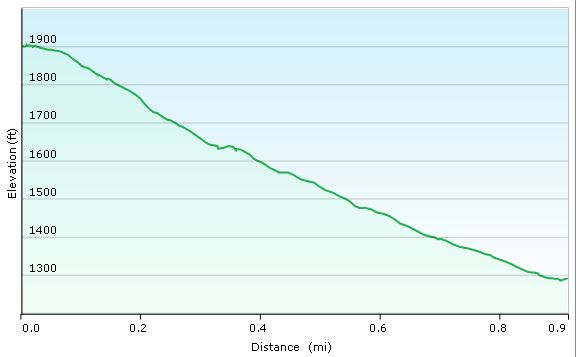
Day 1 Mileage: 1 mile Day 1 Elevation Gain: 6′ (pretty brutal, I know)
Winter Sled Camping Day 2 Elevation Profile – Sintax77
Join Sara, our dog Denali, & I for some Catskills hiking, trail cooking, backpacking, and hammock camping in upstate New York.
For this backpacking trip, we’ll be hiking and camping near Slide Mountain and the East Branch Neversink River in the Catskills, complete with a visit to the summit of Table Mountain and Peekamoose Moose Mountain. The mileage will be low, but the star of this trip isn’t the trails. It’s the food. Good old, classic trail cooking.
What’s on our backpacker’s menu? Well, Sara had a craving for some trail pizza in the middle of the woods somewhere, and I was up for the challenge. Were we successful? You’ll just have to come along and find out. Either way, it’s bound to be an adventure. 😉
Full GPS data for this, as well as all of my other trips, is available on the Trip Data page.
Pheonicia East Branch Trail Peekamoose Table Trail
Set up camp after second bridge (the double log one) at N41° 58.474′ W74° 25.734′
Continue up Peekamoose Table Trail towards summit of
Table Mt and Peekamoose Mountain
Lunch / Snack at summit and Return to camp on the East Branch Neversink River
Day 1 Mileage: 7.8 miles, including summit round trip (about 3 miles each way) Day 1 Gross Elevation Gain: 2,130′
Trails Used Day 2, in Order
Peekamoose Table Trail Pheonicia East Branch Trail Return to vehicle at Denning Rd Trailhead
Day 2 Mileage: 1.8 miles Day 2 Gross Elevation Gain:146′
Trip Total Mileage: 9.6 miles Trip Total Elevation Gain: 2,276
Trail Pizza Ingredients
Boboli Pizza Crust, Individual Size – 2 Pack
Boboli Pizza Sauce Individual Pack (comes in 3 pack box)
Cabot Mozzarella Cheese, Shredded – 8 oz package (2 cups volume)
Hormel Pepperoni, pre-sliced – 6 oz package (enough for 2 pizzas, plus snacking) Camp Cooking Gear Used for Pizza
A review of the MSR Flex Skillet camping fry pan, as well as a discussion of other camp skillet options for comparison.
The MSR Flex Skillet is a light weight, easy to pack frying pan aimed at weight conscious hikers who wish to do some some more advanced cooking on their backpacking and camping trips. And by “more advanced”, I mean more than just boiling water for a dehydrated meal. Because some of us, myself included, think anything more than boiling water on a 3 oz stove is going full back country gourmet.
If that sounds like you, then you may be interested in the MSR Flex Skillet, or maybe even it’s little brother, the MSR Quick Skillet, which we’ll also touch on a bit in the video. If your a more hearty backpacker looking to do some heavier duty cooking on perhaps a canoe or car camping trip, then the MSR Flex Skillet may be a tad more minimalist than you need. Towards the second have of the video I’ll also go over some heavier duty alternatives (as the MSR Alpine Fry Pan), as well as some more inexpensive options, depending on your expected usage and needs.
Below are the Flex Skillet’s Specs and details, according to the manufacturer. *As discussed in the video, I did find some discrepancies with MSR’s official specs.
Manufacturer’s Specs and Details
Weight 7 oz / 199 g
Height 2.5 in / 6.35 cm
Diameter 9 in / 22.86 cm
Easy Clean-Up: Scratch-resistant, hard-anodized nonstick aluminum.
Versatile: Nests with MSR® Flex 3 and MSR® Flex 4 Cook Systems and Pot Sets.
Includes: 1 Talon™ pot handle.
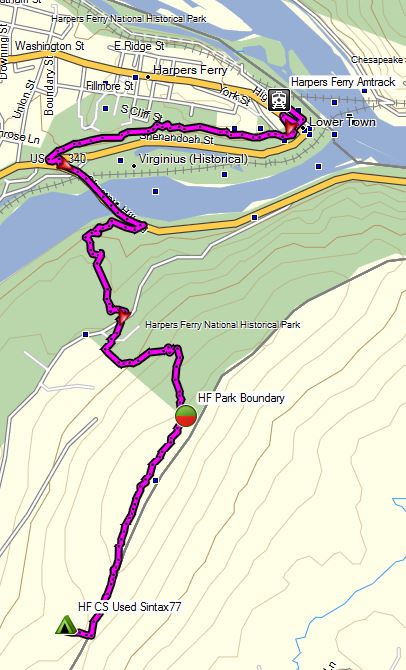
Join Mike and I for for a “Train to Trail” Winter Camping, Backpacking, Campfire cooking, & Hiking adventure in Harpers Ferry, WV.
We tried something a bit different for fun on this winter camping trip – instead of driving, we decided to take an Amtrak train directly to the trailhead. This is actually and idea that Mike and I had been kicking around for a while now. The first challenge was finding an interesting trail that was actually close to a train station, without a need for secondary transportation or an excessive walk. After a bit of research, we determined that Harpers Ferry, West Virginia fit the criteria quite well. The train practically dumps you right on the Appalachian Trail. We booked our tickets, packed our bags, and hit the trail, er, I mean, train station.
With 4 days and 3 nights off, we had a decent amount of time to play with on this trip. The challenge however, would be that we needed to plan an out and back trip that didn’t put us to far away from the train station on our final morning, rather than doing a loop like we normally prefer. Fortunately, we quickly realized that to be a perfect excuse to do a a laid back, more camping, less hiking kind of trip.
The plan? After leaving the train behind,we would hop on the Appalachian trail for a few miles – just long enough to feel the seclusion of the deep winter woods, and set up a base camp for the duration of the trip. Other than that, we really had no hard set plans, other than relaxing, having a good time, and brushing up on our campfire cooking skills. Did we succeed? I guess you’ll just have to watch and see…
Trails Used
Leave Harpers Ferry via Appalachian Trail South After around 3 miles, bushwack West to unofficial campsite.
Return via Appalachian Trail North


 (we were using white gas)

 Tent
Tent (Yellow pad used for bench, I stacked it on top of a
  pad for sleeping at night)
 Sleeping Pad (Mikes sleep pad)
 Backpack (Mike’s pack)
 Snowshoes (my grey snowshoes)
 (Mike’s snowshoes)
 (Fire starter used on day 2)
 listed on Amazon.
 (from dollar store, or whatever)
 – rack used to hold pizza
 (used as a plate / prepping dish / cutting board)
 , or maybe even it’s little brother, the
 , which we’ll also touch on a bit in the video. If your a more hearty backpacker looking to do some heavier duty cooking on perhaps a canoe or car camping trip, then the MSR Flex Skillet may be a tad more minimalist than you need. Towards the second have of the video I’ll also go over some heavier duty alternatives (as the
  ), as well as some more inexpensive options, depending on your expected usage and needs.
 and
and  Cook Systems and Pot Sets.
 .
.
 backpack
 stove
stove with fancy lightshow
 .
.

 / Plate
 tanto blade pocket knife