Setting up my Dutchware Xenon Two Person Tarp for Two Hammocks under One Tarp or Bad Weather Camping Conditions, such as wind snow and rain while hammock camping.
This is a 12 foot long, 11.5 foot wide tarp with an end pole mod to better accommodate a two hammock spreader bar setup and two doors at one end for wind protection, privacy at camp, etc.
I’m also using an optional internal pole mode to create even more space inside. I’m using a single one in the middle, but it’s also possible to use two of them for even more space. If you want to take it even further, you can have it made with optional side pull-outs as well. I don’t really find this necessary with the internal pole mods that I’m using. I suppose you could go that route if you’re looking for a lighter alternative to the internal pole mod.
The double hammock spreader bar system I’m using is a Dutchware Beetle Buckle suspension with 32″ spreader bar pole, but I don’t see why you couldn’t use this tarp with any other DIY spreader bar solution you may already be using.
Backpacking & Winter Camping with a Hot Tent on the Appalachian Trail using a Titanium Wood Stove & 5 person Luxe Twinpeak tent.
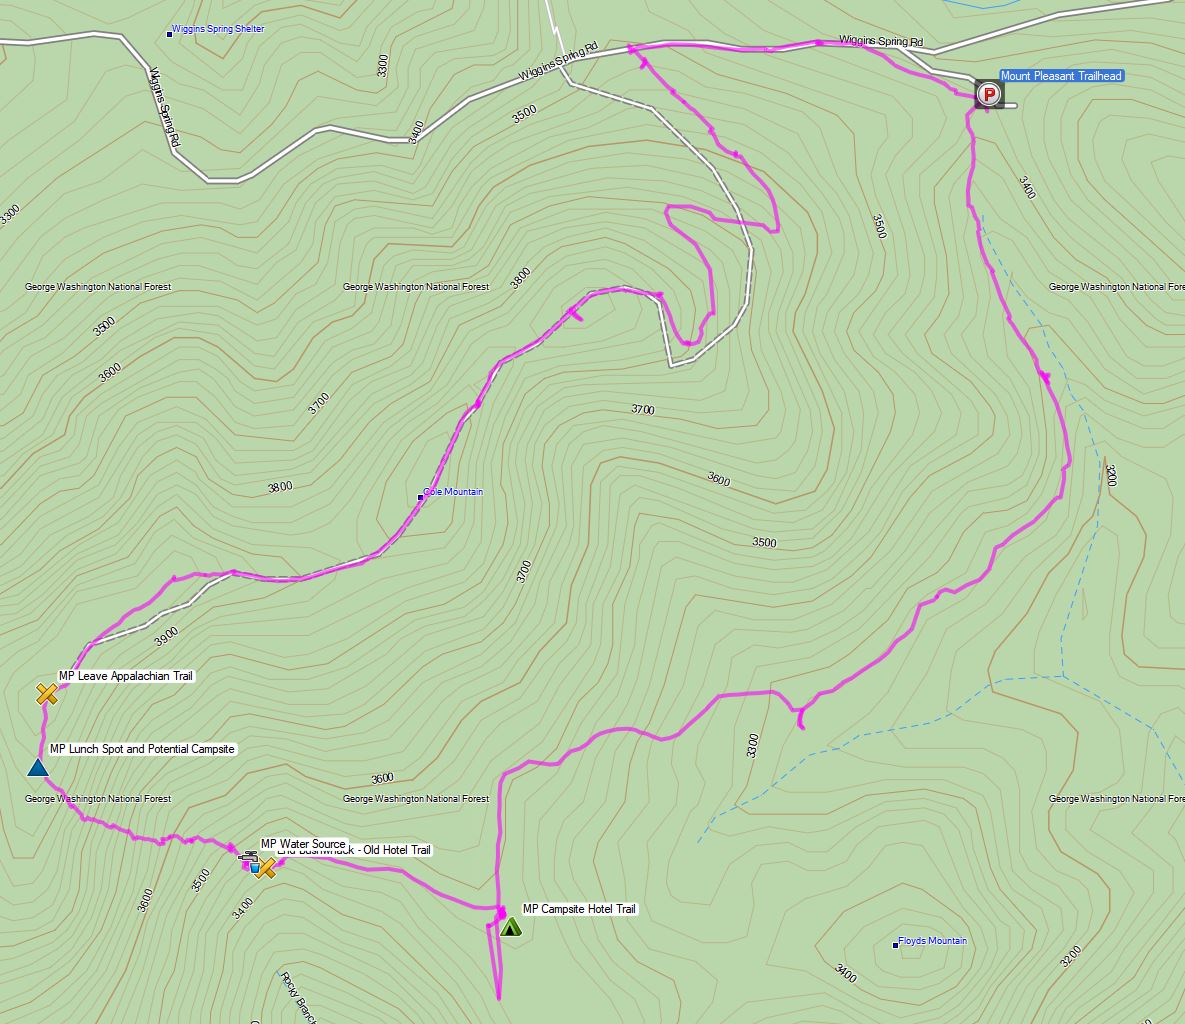
For this adventure, we got a guided tour of Virginia’s Mount Pleasant Scenic Area in the George Washington National Forest. The weather at our elevation of roughly 4,000′ was forecast to be in the mid to low 20’s with high winds, so we were excited to see how the tent & wood stove combo would work out.
Cole Mountain Loop Route Overview – Sintax77
No permit is required to camp in the George Washington National forest, but there are rules and regulations regarding backcountry camping. You can find more information on the George Washington & Jefferson National Forest website here.
How to use a GPS Device or GPS App for Hiking & Backpacking Trips using Caltopo and free Garmin Basecamp GPS Software for route planning, point of interest waypoints, elevation profiles and more.
Whether you use a dedicated GPS device or a GPS phone app, the free tools and software I share in this tutorial can help you take your pre-trip planning to the next level.
This is the current version, but for the reasons discussed in the video, I would recommend that Garmin device users install the previous version 4.6.2 until they fix the map install issues on 4.7.0. If you’re using a GPS phone app, you’ll be fine with 4.7.0.
Awesome web based GPS tool. You can use it as a standalone tool, but I prefer to use it as a supplement to Basecamp. I pretty much just use it for the routable trails feature. Between the two, there’s not much you can’t do.
Free tool for adding elevation data to GPS tracks. Simply export the track as a GPX file, run it through here, and re-import into Basecamp or directly into your GPS device.
Suggested maps to start with on GPS File Depot
Editor’s Choice map for the state you’ll be hiking or backpacking in.
Hiking & Backpacking with Military Surplus Camping Gear in the Adirondacks Eastern High Peaks Region
For this 2 day, 1 night adventure, I’ll be testing out and demonstrating my milsurp backpacking load-out, along with MRE (Meals Ready to Eat) food to keep me fueled up while I search for the remnants of a cold war era B-47 bomber that crashed on Wright Peak during the night of January 2nd, 1962.
My “big 3” for this backpacking trip are a medium sized ALICE pack, USGI Modular Sleeping bag with USGI Term-A-Rest sleeping Pad, and a USGI Poncho for shelter / rain gear. I scored each of these items for around $30. A full gear list can be found at the end of this post.
No permit is required to camp in the Adirondacks, but there are rules and regulations regarding backcountry camping. You can find more information here.
3 Days of Hammock Camping, Hiking & Backpacking on the White Mountains Presicat Loop.
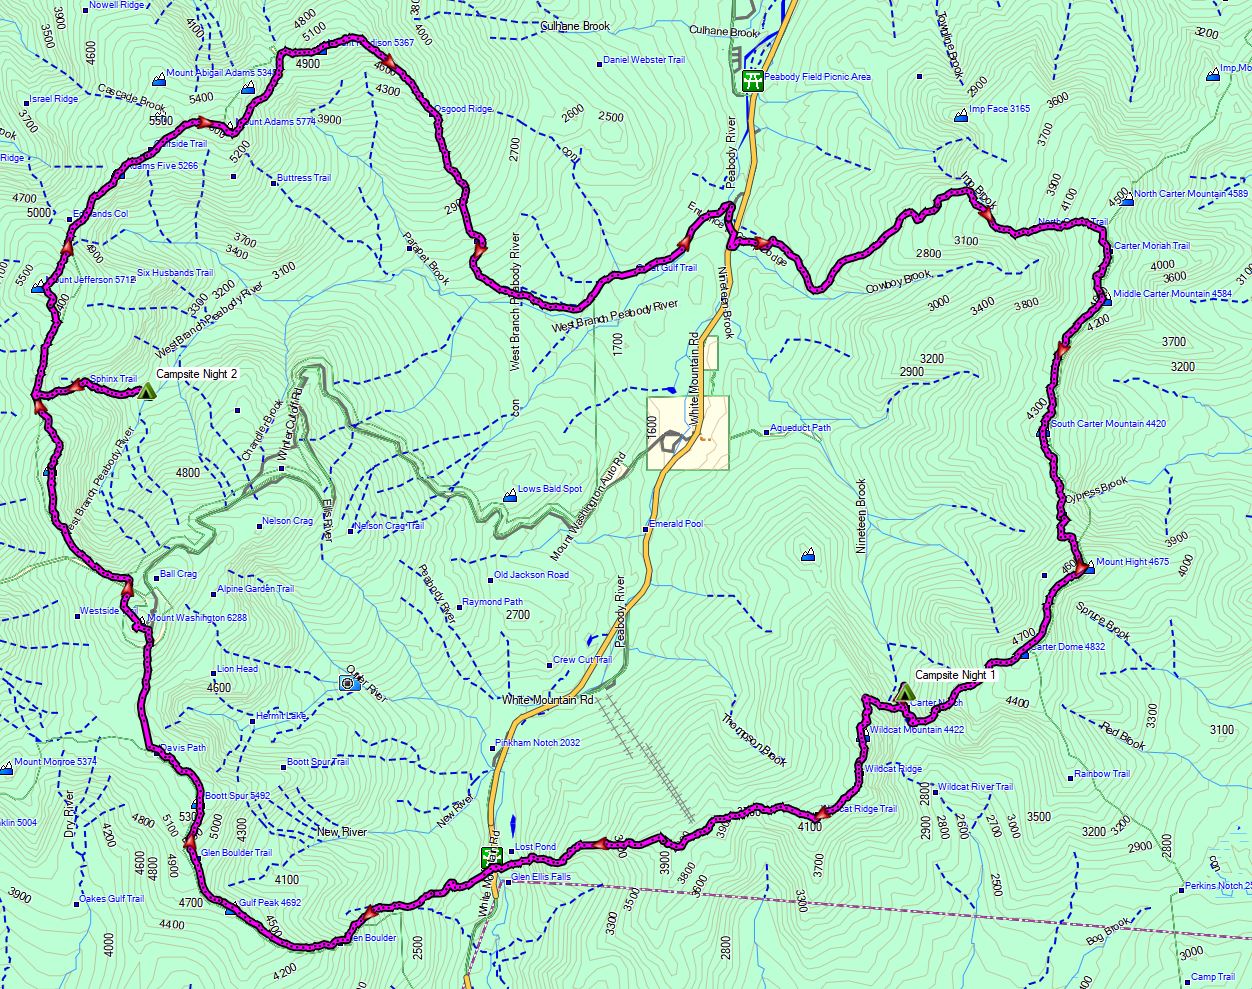
For this 3 day, 2 night summer backpacking trip, I’ll be hiking a 30 mile backpacking loop in New Hampshire’s White Mountain National Forest. I call this the Presicat loop because it’s comprised of the Carter Range and Wildcat Range on one side, and the northern section of the Presidential Range on the other.
This route creates a grand tour of the northern White Mountains with a section of the Appalachian Trail and Mt Washington as it’s centerpiece. Along the way we’ll hit 9 major summits (NH48’s) and 8 subsidiary peaks, while racking up 15,228 feet of elevation gain on some pretty rugged trails.
For sleep and shelter I chose a minimalist ultralight hammock camping system. This allowed me to get my base weight down to 9 lb. Notable gear can be found in the gear section below. Or check out my full printable list with weights and links on LighterPack.
Presicat Loop Route Overview 2019 – Sintax77
No permit is required to camp in the White Mountains, but the trailhead I chose did require a self payment of $3 per day. Rules and regulations regarding backcountry camping can be found on the USFS website here.
Come along for 5 days of Hiking, Camping & Backpacking in Southern Utah’s Zion National Park.
For this adventure, I’ll be spending 5 days exploring Zion National Park with my friends Derrick, Dave, and Tayson from Outdoor Vitals and Randy from Outdoor.Detour on Instagram. We’ll be doing 3 different backpacking / camping trips: A backcountry West Rim Backpacking Trip, Exploring & hiking the Frontcountry Zion National Park area while car camping in Springdale, Utah, and a backcountry camping trip on a top-down Narrows hike, ending at the Zion visitor’s center back in Springdale.
Note: All backcountry camping in Zion requires a permit. For details, visit the Zion NPS website.
Objective #1: Backcountry camp on Zion Canyon’s West Rim
Trailhead Used: West Rim Trailhead, Near Lava Point Overlook.
GPS coordinates N37° 22.899′ W113° 01.370′
West Rim Itinerary, Day 1
Park at the West Rim Trailhead parking area on the dirt service road near Lava Point. This is a gravel lot with parking for at least a half dozen cars or so. It’s about a 40 minute drive from Springdale, Utah. The latter part of the drive is on a dirt road, but non 4wd vehicles should be fine with a bit of care.
Head south on the West Rim Trail
Setup Camp at West Rim campsite #4 GPS N37° 17.144′ W112° 59.030′
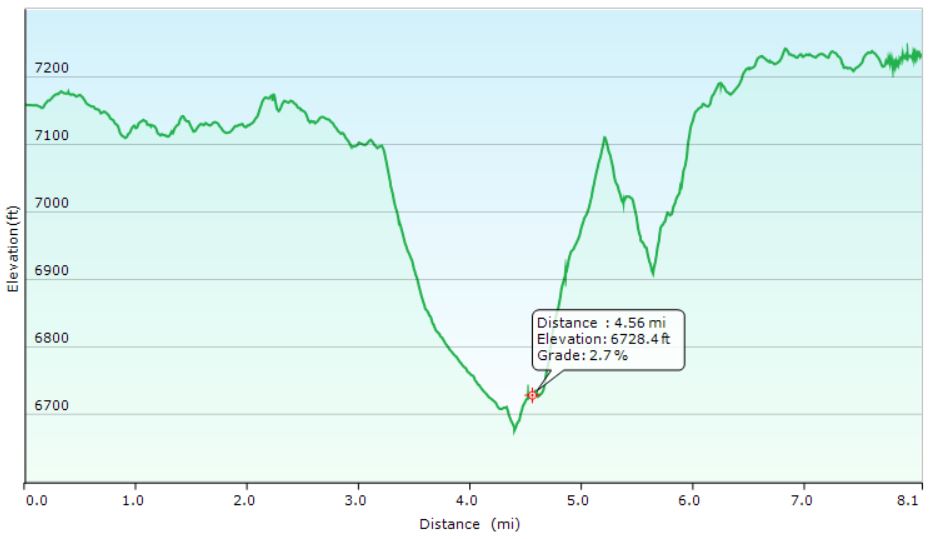
West Rim Hike Elevation Profile- Sintax77
West Rim Hike-In Mileage: 8 miles West Rim Hike-In Gross Elevation Gain: 1,073
West Rim Itinerary, Day 2
Backtrack north on the West Rim Trail
Return to the trailhead parking lot near Lava Point.
Have some tacos at the Whiptail Grill, right next door to the campground. I got the “Fire Asada” tacos and they were great. If you like spicy food that’s actually spicy, I would highly recommend the Whiptail Grill. Heck, even if you don’t like spicy stuff – they have milder options, plus a fun & unique casual atmosphere as well. Oh, and the view is amazing too 🙂
Objective #2: Explore Zion National Park’s Frontcountry & Springdale, Utah.
Take the free Zion shuttle, or a short walk north to the Zion National Park visitor center / entrance.
Take the Zion NP bus from the visitor center to Big Bend.
From the Big Bend bus stop, take the trail south along the Virgin River to Weeping Rock.
Road hike a bit along the Mount Carmel Highway to soak in the sights.
Hop another free Zion bus back towards the Springdale Visitor Center.
Explore Springdale, eat some ice cream at the Zion Candy Company on Zion Park Blvd.
Objective #3: Hike and Backcountry Camp the Narrows, from the Top Down.
Trailhead Used: Chamberlain’s Ranch Trailhead (aka Zion Narrows Upper Trailhead), Duck Creek Village, UT
GPS Coordinates N37° 23.121′ W112° 50.339′ Note: This was an end-to-end hike that required us to park a second vehicle at the Zion visitor center in Springdale to use as a shuttle back to the starting point. The drive from the visitor center back to the Chamberlain’s Ranch Trailhead is around 80 minutes.
Zion NP – The Narrows, Top-down Hike Itinerary, Day 1
Park at the Narrows Upper Trailhead in Duck Creek, UT.
Head southwest on the trail, which is actually dirt road, closed off to vehicles, for the first 3 miles.
Continue to follow the trail along the Virgin River, through the Narrows.
This trail is very easy to follow, as it is literally the river. A majority of the time will be spent walking in the river bed in ankle deep to knee deep water depending on conditions, depending on current water-flow conditions.
Note for reference: The ccf reading during our trip was roughly 40 CCF. Anything under 50 ccf is considered to be relatively ideal. Above 100 cfs, conditions can be difficult and hazardous. At 130 ccf, top-down narrows hikes will be closed. At 150 ccf, bottom up Narrows hikes will be closed. During a flash flood, flows can exceed 1000 cfs.
Setup camp at the Narrows campsite #12. N37° 19.982′ W112° 57.373′
Zion NP – The Narrows, Top-down Hike Itinerary, Day 2
Break camp and continue south along the Virgin River.
Exit the trail and catch the free Zion bus at the Temple of Sinawava shuttle stop.
Return to the Zion NP Springdale Visitor Center
Drive back to retrieve starting vehicle (~80 minute drive)