3 days of Backpacking and Hammock Camping on Virginia’s Tuscarora Trail.
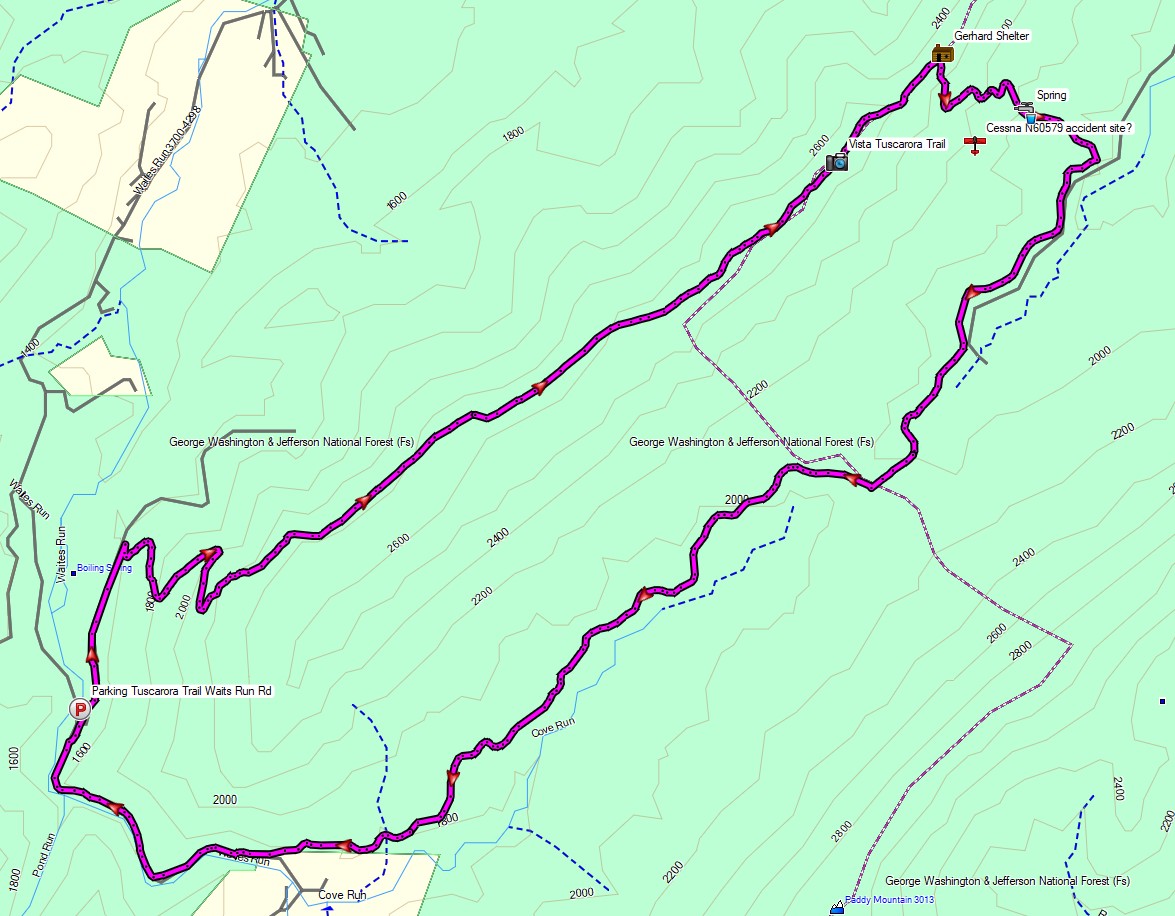
For this backpacking trip, I decided to head down to the border of West Virginia and Virginia to check out a pretty cool mountaintop lean-to shelter and do a little airplane scavenger hunt in-between the occasional rain showers that always tend to follow me around. On day one I would hike up to the ridge using the Tuscarora Trail, day two I would base camp and explore, and on day three I would hike back out via a different set of trails to complete the loop.
My options for shelter would be to either use the Gerhard Shelter lean-to if I had the place to myself, or a lightweight tarp and minimalist hammock if I decided to wander out further into the woods and camp near the search area and nearby spring.
My April temperature range for this trip was between 40° and 75°. This allowed me to get my backpack’s base weight down to around 10 lbs, while still including my puffy jacket and ultralight rain jacket for supplemental warmth at camp if needed.
The details of the aviation accident site that I was looking for can be found here. It was a small Cessna 150J that went down due to engine power loss and fortunately their were only minimal injuries to one of the two passengers. I’ve never read any reports of anyone actually finding or visiting this site, so I really had no idea if there would be anything to be found. But hey, it was a good excuse to get out into the woods, so I grabbed my pack and headed out for some adventure…
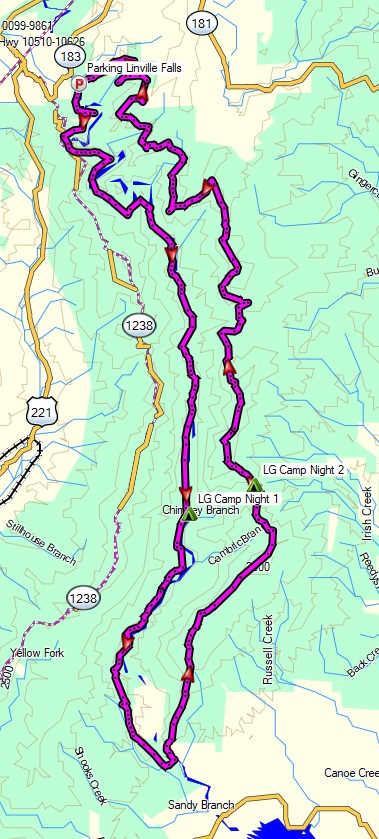
3 days of Hammock Camping & Solo Ultralight Backpacking on a 40 mile Grand Loop of the Linville Gorge Wilderness.
For this backpacking trip, I headed back down to North Carolina’s Pisgah National Forest for some hammock camping and another attempt at the “Grand Loop”, a roughly 40 mile trek with 11,000 feet of gross elevation gain.
The Linville Gorge Grand Loop is not a single official trail. It’s actually a patchwork of several official and unofficial trails. In fact, due to the extensive network of unofficial trails in the Gorge, there isn’t really any one “real” way to do the loop. The basic goal is simply to circumnavigate the gorge, hiking along the Linville River on the west side, and along the ridge top of the gorge on the east side. Whatever trails you decide to use is really up to you.
The upper ridges stand an average of 1,400 feet above the river banks below, with trails frequently descending down to the river and back up again on rugged terrain, without signage or trail blazes, and minimal use of switchbacks. This can make for some challenging hiking, that I personally believe to be some of the toughest on the east coast. The pay off is a heavy sense of adventure compared to traditional trails and some amazing mountain top views of the surrounding Blue Ridge Mountains.
Thank you to Upstart for sponsoring this trip. See how they can help you build your credit and get free of high interest debt at Upstart.com/Sintax
My mid-May temperature range for this trip was between 45° and 85° with no rain in the forecast until the end of the third day. This allowed me to get my backpack’s base weight down to around 9 lbs by leaving my puffy jacket and extra base layers at home. I simply packed a long sleeve shirt and my ultralight rain jacket for supplemental warmth at camp if needed.
I went with a fairly minimalist hammock camping setup for this trip. There are plenty of trees and fun unofficial campsite gems to be found in the Gorge that make it ideal for hammocks. Water is obviously of minimal concern for the lower regions of the gorge. This allows you to save some weight on trails in those sections, but make sure to stock up when your route heads up towards the ridge. Especially if you’re looking to camp in one the beautiful ridge side campsites up there. Fortunately, I was able to take advantage of several springs up on the ridge that were still flowing at the time of my trip.
A free permit is required on weekends and holidays from May 1st through October 31st each year. You can find more information on the NFS Grandfather Ranger District website here.
If planning your own trip, I would highly recommend visiting LinvilleGorge.net for maps, info and extensive GPS data including official and unofficial trails, campsites, water sources, etc. They also have a free version of their map available on the Avenza phone app. Due to the fact that their data is so darn good, I didn’t package my own GPS file for this trip, but you can use this Caltopo link that someone from LinvilleGorge.net posted containing all of the trails and POI coordinates
3 Days of Winter Camping, Backpacking & Campfire Cooking in Pennsylvania’s Pinchot State Forest.
FTC Disclosure: This post contains affiliate links, which means I may receive a commission for purchases made through some of my links.
For this late winter backpacking trip, I decided to challenge myself to cook “real food” using only fire for the duration of my trip. If you know anything about my patience for making fires, you’ll know this will truly be a bit of a challenge. 🙂
For shelter, I went with my minimalist camping hammock and ultralight backpacking tarp set-up. I also utilized a grill grate, a folding saw for harvesting campfire wood, and some extra cold weather clothing layers, as the temps were forecasted to head down to around 15° F or so. There was also a chance of snow, sleet, and even rain, so I brought a full set of rain gear for warmth at camp and keeping dry while hiking.
Full Route Overview – Pinchot Trail North Backpacking Loop – Sintax77
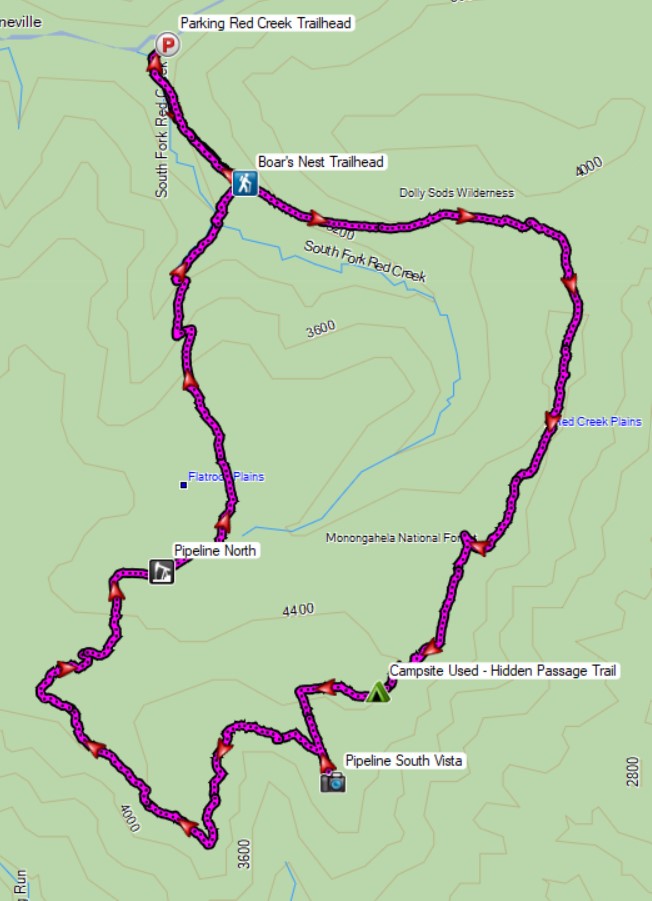
3 Days of Winter Hammock Camping and Backpacking in the Roaring Plains Wilderness during Snow and Freezing Rain.
FTC Disclosure: This post contains affiliate links, which means I may receive a commission for purchases made through some of my links.
For this late winter backpacking trip, I decided to head back down to West Virginia’s Monongahela National forest to do some ridge hiking and cold weather hammock camping. Due to temperatures forecasted from the low 20’s to the low 40’s, I needed to pack in some heavier warm clothing layers for this trip, along with some camp tools, so I used my larger winter backpack. For sleep and shelter, I used my go-to ultralight hammock and tarp set-up with winter grade down quilts (full gear list below). As it turns out, I probably should have used that extra pack space for a larger tarp too, but live and learn I guess…
The 6,792 acre Roaring Plains West Wilderness is a remote federal wilderness area located about 3 miles south of the more popular Dolly Sods Wilderness Area. It boasts a healthy network of trails, which are unmarked and often, grown in and hard to follow. Official paper maps are hard to come by, and by some accounts, not very up to date. Based on my personal experience, I would highly recommend using a GPS with appropriate data while hiking here. You can also find good trail info and map print-outs at MidAtlanticHikes.com and HikingUpward.com. I also recorded my personal GPS data for this trip, which can be found here.
Hammock Camping, Trail Cooking and the search for an Elusive Hearth in the Woods of West Virginia.
FTC Disclosure: This post contains affiliate links, which means I may receive a commission for purchases made through some of my links.
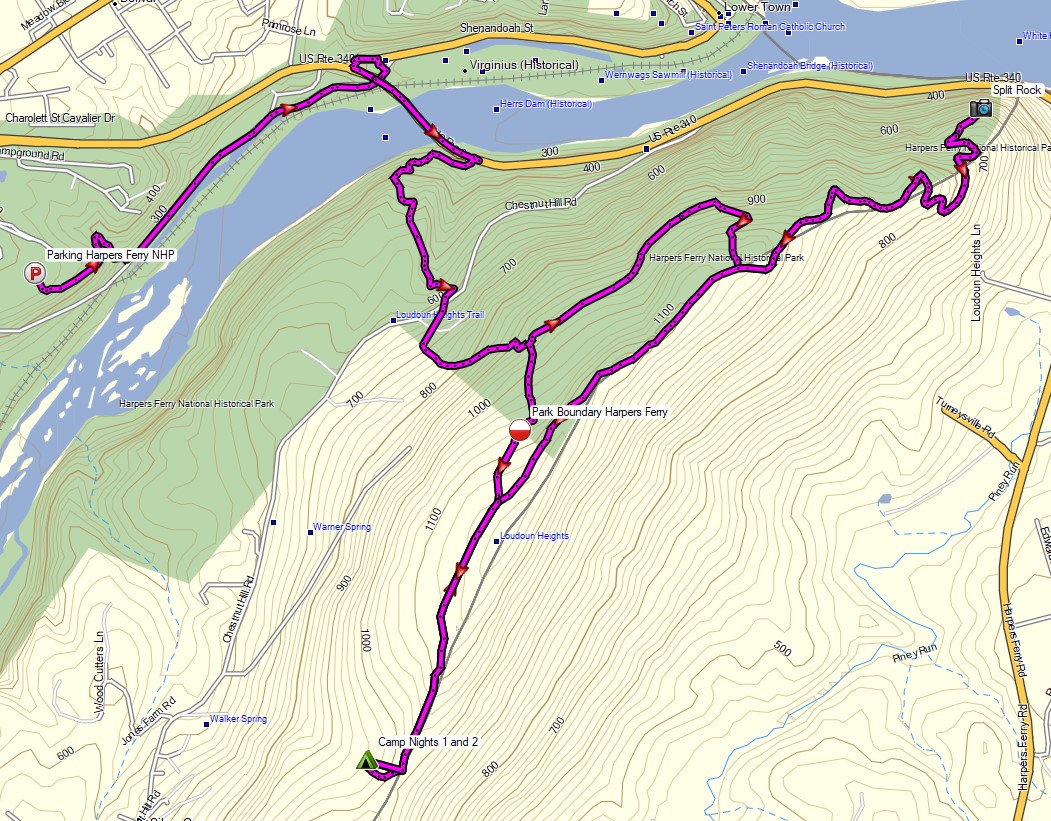
For this early February hammock camping trip, I set out to hike a 3 day hike with a nostalgic goal – to find a giant campfire hearth that my friend and I had built five years ago, somewhere off of the Appalachian Trail near the town of Harpers Ferry, West Virginia. I had always wondered if it was still standing after all these years, and thought it would be a great excuse to spend some time in the woods a cook some hearty camping meals.
My weather conditions were forecasted to have a pretty wide range during this trip, from the upper 50’s down to 30 degrees each evening. I had a rough idea of the hearth’s location. We built it at camp not too long after leaving the Harpers Ferry National Historic Area’s boundary while heading south on the Appalachian Trail. My goal for the first day was to get myself to a legal camping area in this general area so I could search for it first thing the next morning. If I found it early, I would then have the option to do a day hike to Loudoun Heights and Split Rock for views of the Shenandoah River and Potomac River below the ridge.
For sleep and shelter on this trip, I went with a simple hammock camping and ultralight tarp setup (gear list below). I used the extra space in my winter backpack to load up on extra clothing layers, a saw for harvesting firewood, a stool for working in my makeshift camp kitchen, and my white gas stove system paired up with a fry pan and diffuser to try my hand at baking some trail bread at camp. The cooler temps also allowed me to bring some “real” food, so I brought along some ingredients to make some smoked sausage one day and pasta with a slow cooked meat sauce the next.
This trip video was sponsored by Anker and their model 521 and 535 Portable Power Station.
3 days of Backpacking & Hammock Camping along Cranberry Lake in the Adirondacks
FTC Disclosure: This post contains affiliate links, which means I may receive a commission for purchases made through some of my links.
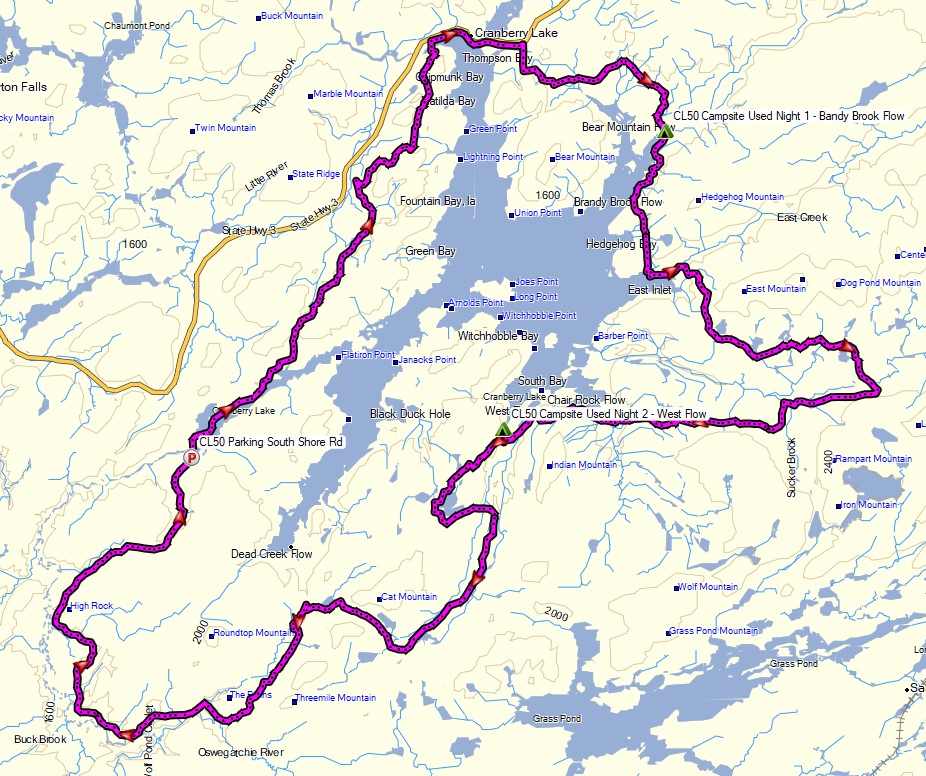
For this adventure, I decided to do a fall backpacking trip with some higher trail mileage than I’ve been doing lately. Nestled in New York’s Five Pond Wilderness, the Cranberry Lake 50 is a fifty mile loop hike that circumnavigates it’s namesake, and passes by many smaller ponds along the way as well. Most of these smaller ponds have campsites or even a lean-to shelter nearby, which is quite nice.
The CL50 is not really an individual trail, but a collection of trail sections from 12 other trails is the area. The route is well blazed with blue CL50 plastic discs nailed to trees along the way. The trails used to make up the CL50 are blazed with similar yellow trail discs, so you will often see both blazes simultaneously.
The Cranberry Lake 50 goes directly through two towns – Wanakena, where I started, and the town of Cranberry Lake. There’s only about 10 trail miles between them, so neither really poses much logistical value for resupplying, but they are nice towns to stroll through.
I chose to do the loop counter clockwise from Wanakena because the last 10 miles traverse some muddy wet sections due to beaver dams, so I figured it would be best to save that for the last afternoon.
I typically like to hike my backpacking trips on a 3 day, 2 night timeline, so that meant my daily trail mileage had to be around 17 miles or so during the shortened daylight hours of October. On the upside, this hike is primarily along the perimeter of a lake, with minimal elevation changes, but did I mention that I hadn’t done a high mileage trip in a while? Yeah, the headlamp got a good amount of usage on this one. Let the night hiking begin…
Route Overview – Cranberry Lake 50 Backpacking Loop – Sintax77